Appendix A: Rack mount configuration
160
5
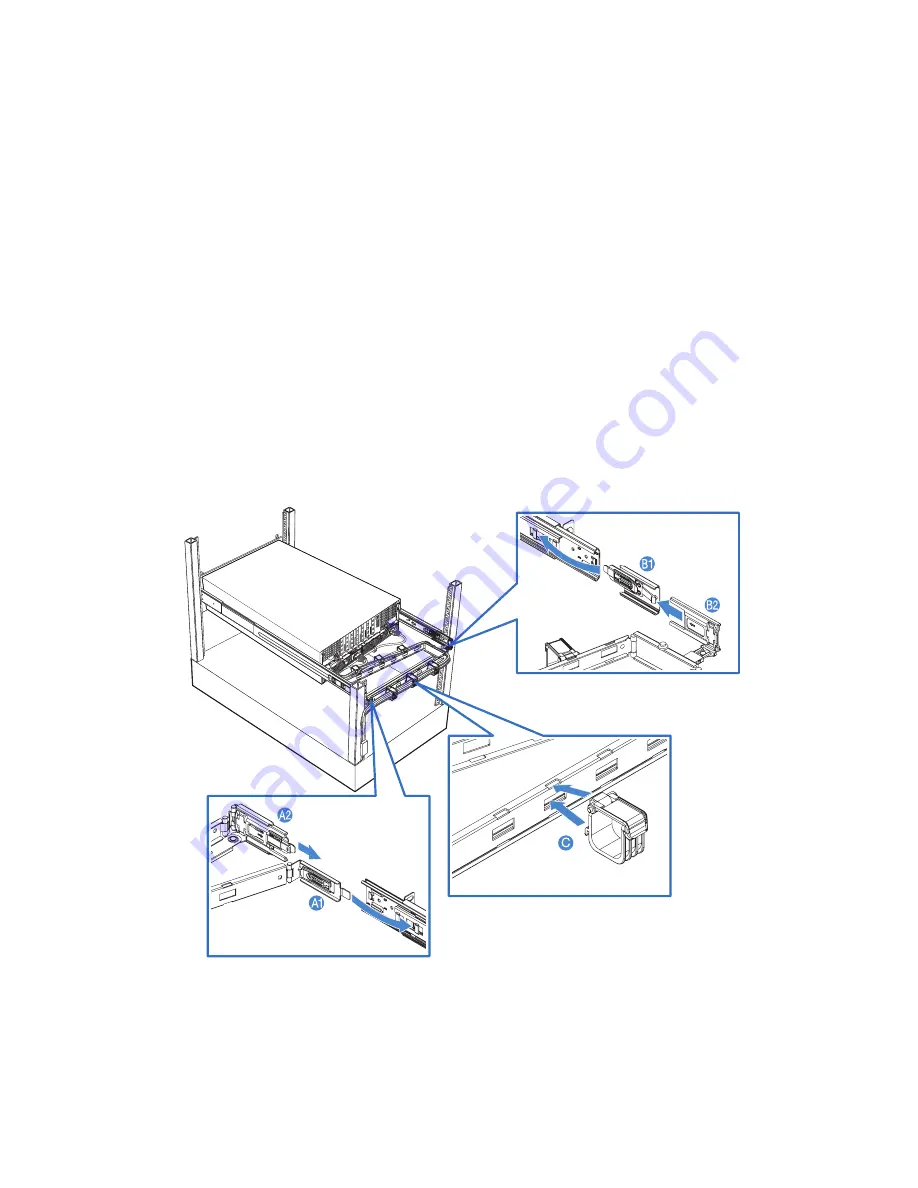
Attach the CMA (cable management arm) to the rear of the server.
The CMA allows you to tie-wrap all cables to and from the system.
As you slide the system in and out of the rack, the CMA collapses
and extends, keeping the cables untangled and attached to the
system.
(1) Insert the smaller CMA extension into the rear of the left inner
rail
(A1)
.
(2) Insert the larger CMA extension into the rear of left mounting
rail
(A2)
.
(3) Insert the CMA extension connector into the rear of the right
mounting rail
(B1)
.
(4) Insert the CMA arm connector into the blue plastic cutout on
the CMA extension connector
(B2)
.
(5) Attach the cable clips into the appropriate mounting holes in
the CMA
(C)
.
Summary of Contents for Altos R920 Series
Page 1: ...Acer Altos R920 Series User s Guide ...
Page 18: ...xviii SAS configuration utility 180 SAS RAID configuration utility 182 Index 185 ...
Page 19: ...1 System tour ...
Page 47: ...2 System setup ...
Page 55: ...3 System upgrade ...
Page 60: ...3 System upgrade 42 To install the front bezel Slide the front bezel onto the chassis ...
Page 115: ...4 System BIOS ...
Page 153: ...5 System troubleshooting ...
Page 166: ...5 System troubleshooting 148 ...
Page 167: ...Appendix A Rack mount configuration ...
Page 168: ...This appendix shows you how to set up the Altos R920 system in a rack mount configuration ...
Page 176: ...Appendix A Rack mount configuration 158 6 Fully extend the mounting rails on the rack ...
Page 180: ...Appendix A Rack mount configuration 162 ...
Page 181: ...Appendix B Memory configuration ...
Page 195: ...Appendix C SAS and SAS RAID configuration utilities ...
Page 196: ...This appendix gives an overview of the RAID configuration utilities supported by your server ...
Page 202: ...Appendix C SAS and SAS RAID configuration utilities 184 ...
Page 206: ...188 ...


