


•
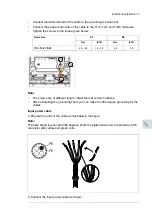
Ground the shield 360 degrees by tightening the clamp of the power cable grounding
shelf onto the stripped part of the cable (6a).
•
Connect the twisted shield of the cable to the grounding terminal (6b).
•
Connect the phase conductors of the cable to the terminals of L1, L2 and L3.
•
Tighten the screws to the torque given below.
R4
R3
Frame size
lbf·ft
N·m
lbf·ft
N·m
3.0
4.0
1.8…3.3
2.5…4.5
L1, L2, L3
84 Electrical installation
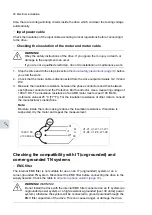
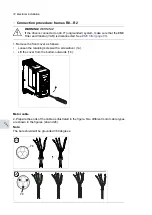
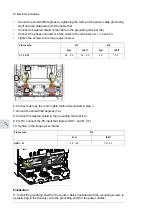
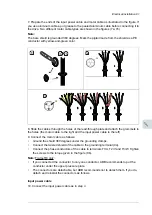
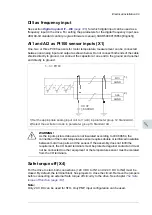
5. Connect the input power cable as follows:
•
Ground the shield 360 degrees by tightening the clamp of the power cable
grounding shelf onto the stripped part of the cable (6a).
•
Connect the twisted shield of the cable to the grounding terminal (6b).
•
Connect the phase conductors of the cable to the terminals of L1, L2 and L3.
•
Tighten the screws to the torque given below.
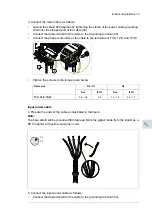
6. For R3, connect cable by the motor cable method mentioned instep
3
.
7. Ground the shield 360 degrees (7a).
8. Connect the twisted shield to the grounding terminal (7b).
9. Connect the conductors to the R+ and R- terminals (7c).
10. Tighten to the torque given below.
Frame size
R3
R4
N·m
lbf·ft
N·m
lbf·ft
L1. L2. L3
2.5…4.5 1.8…3.3
4.0
3.0
Frame size
R3
N·m
lbf·ft
R+. R-
2.5…4.5 1.8…3.3
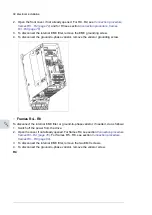
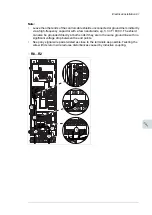
6a
6c
6b
7a
7b
7c
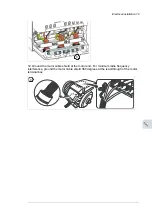
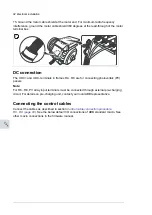
6. Connect cable by the motor cable method mentioned in step
7. Ground the shield 360 degrees (7a).
8. Connect the twisted shield to the grounding terminal (7b).
9. For R3, connect the PV input terminals to UDC+ and R- (7c).
10. Tighten to the torque given below.
R3
Frame size
lbf.ft
N.m
1.8...3.3
2.5...4.5
UDC+, R-
84 Electrical installation
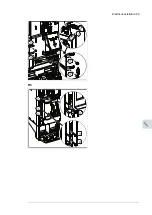
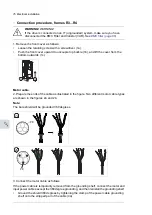
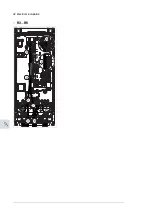
5. Connect the input power cable as follows:
•
Ground the shield 360 degrees by tightening the clamp of the power cable
grounding shelf onto the stripped part of the cable (6a).
•
Connect the twisted shield of the cable to the grounding terminal (6b).
•
Connect the phase conductors of the cable to the terminals of L1, L2 and L3.
•
Tighten the screws to the torque given below.
6. For R3, connect cable by the motor cable method mentioned instep
3
.
7. Ground the shield 360 degrees (7a).
8. Connect the twisted shield to the grounding terminal (7b).
9. Connect the conductors to the R+ and R- terminals (7c).
10. Tighten to the torque given below.
Frame size
R3
R4
N·m
lbf·ft
N·m
lbf·ft
L1. L2. L3
2.5…4.5 1.8…3.3
4.0
3.0
Frame size
R3
N·m
lbf·ft
R+. R-
2.5…4.5 1.8…3.3
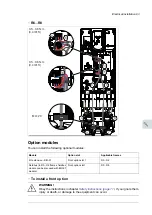
6a
6c
6b
7a
7b
7c
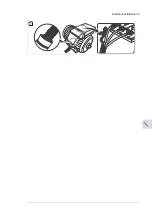
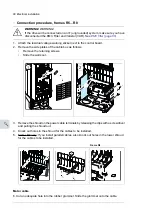
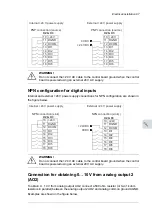
Finalization
11. Install the grounding shelf for the control cables (included with the mounting screws in
a plastic bag in the delivery) onto the grounding shelf for the power cables.
78 Electrical installation
Summary of Contents for ACQ80-04 Series
Page 1: ...ABB DRIVES FOR WATER ACQ80 04 drives 0 75 to 160 kW 1 0 to 215 hp Hardware manual...
Page 2: ......
Page 4: ......
Page 18: ...18...
Page 24: ...24...
Page 38: ...38...
Page 50: ...50...
Page 64: ...64...
Page 98: ...98...
Page 110: ...110...
Page 140: ...Frame R3 IP20 140 Dimension drawings...
Page 146: ...146...
Page 162: ...162...
Page 168: ......


