Information Center Configuration
345
Information Center
Configuration
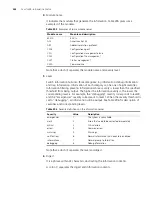
The switch supports information output to six directions.
By far, each output direction is assigned with an information channel, as shown in
Table 297.
Settings for the six output directions are independent. However, for any output
direction, you must first enable the information center to make all other settings
effective.
Information center of the Ethernet switch features:
■
Supporting six information output directions, namely, console (console), monitor
terminal (monitor), log host (loghost), trap buffer (trapbuffer), log buffer
(logbuffer) and SNMP (snmpagent),
■
Filtering information by information severities (information is divided into eight
severity levels),
■
Filtering information by modules where information is generated,
■
Language options (Chinese or English) for information output.
Enabling Synchronous
Terminal Output
To avoid user’s input from being interrupted by system information output, you can
enable the synchronous terminal output function, which echoes user's input after
each system output. This makes users work with ease, for they no longer worry about
losing uncompleted inputs.
Running the
info-center synchronous
command during debug information
collection may result in a command prompt echoed after each item of debug
information. To avoid unnecessary output, it is recommended that you disable
synchronous terminal output in such cases.
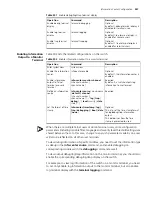
Table 297
Information channel names and numbers
Output direction
Channel number
Default channel name
Console
0
console
Monitor terminal
1
monitor
Log host
2
loghost
Trap buffer
3
trapbuffer
Log buffer
4
logbuffer
SNMP
5
snmpagent
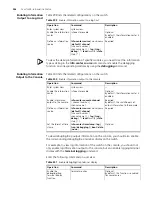
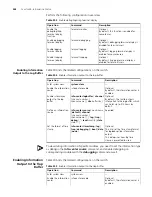
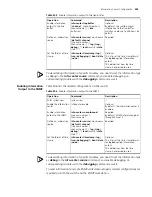
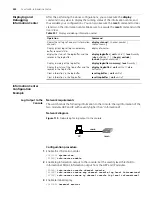
Table 298
Enable synchronous terminal output
Operation
Command
Description
Enter system view
system-view
—
Enable synchronous
terminal output
info-center synchronous
Optional
By default, synchronous terminal
output is disabled.
Summary of Contents for 4200G 12-Port
Page 10: ...8 CONTENTS...
Page 14: ...4 ABOUT THIS GUIDE...
Page 46: ...32 CHAPTER 5 LOGGING IN THROUGH WEB BASED NETWORK MANAGEMENT SYSTEM...
Page 48: ...34 CHAPTER 6 LOGGING IN THROUGH NMS...
Page 60: ...46 CHAPTER 9 VLAN CONFIGURATION...
Page 64: ...50 CHAPTER 10 MANAGEMENT VLAN CONFIGURATION...
Page 80: ...66 CHAPTER 13 GVRP CONFIGURATION...
Page 98: ...84 CHAPTER 15 LINK AGGREGATION CONFIGURATION...
Page 112: ...98 CHAPTER 18 MAC ADDRESS TABLE MANAGEMENT...
Page 126: ...112 CHAPTER 19 LOGGING IN THROUGH TELNET...
Page 162: ...148 CHAPTER 20 MSTP CONFIGURATION...
Page 274: ...260 CHAPTER 29 IGMP SNOOPING CONFIGURATION...
Page 276: ...262 CHAPTER 30 ROUTING PORT JOIN TO MULTICAST GROUP CONFIGURATION...
Page 298: ...284 CHAPTER 33 SNMP CONFIGURATION...
Page 304: ...290 CHAPTER 34 RMON CONFIGURATION...
Page 338: ...324 CHAPTER 36 SSH TERMINAL SERVICES...
Page 356: ...342 CHAPTER 38 FTP AND TFTP CONFIGURATION...
Page 365: ...Information Center Configuration Example 351 S4200G terminal logging...
Page 366: ...352 CHAPTER 39 INFORMATION CENTER...
Page 378: ...364 CHAPTER 40 BOOTROM AND HOST SOFTWARE LOADING...
Page 384: ...370 CHAPTER 41 Basic System Configuration and Debugging...
Page 388: ...374 CHAPTER 43 NETWORK CONNECTIVITY TEST...
Page 406: ...392 CHAPTER 45 CONFIGURATION OF NEWLY ADDED CLUSTER FUNCTIONS...

