ZMODO H9104V Скачать руководство пользователя страница 4

HDD Support

SATA HDD x 1 (Max up to 1TB)
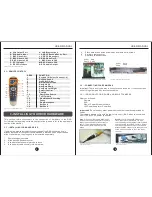
1.

Use proper power source. 

Do  not  use  this  product  with  a  power  source  that  applies  more  than  specified 
voltage (100-240V AC). 

2.

Never insert anything metallic into DVR. 

Inserting metal object into the DVR can be a source of dangerous electric shock.

3.

Do not operate in wet or dusty environment. 

Avoid places like a damp basement or dusty hallway. 

4.

Do not expose this product to water.

If this product gets wet, unplug it and contact an authorized dealer immediately. 

5.

Keep product surfaces clean and dry. 

To clean the outside case of the DVR, use a cloth lightly dampened with water (no 
solvents). 

6.

Provide proper ventilation. 

The  DVR  uses  a  hard  drive  for  video  storage,  which  generates  heat  during 
operation. Do not block the air vents (bottom, upper, sides and back) of the DVR 
that cool down the system while running.


7.

Do not attempt to remove the top cover. 

You  may  suffer  severe  electrical  shock  if  you  remove  the  cover  of  the  DVR.  If 
there  are  any  unusual  sounds  or  smells  coming  from  the  DVR,  unplug  it 
immediately and contact Customer Service.

8.

Handle DVR box carefully. 

Dropping the DVR on any hard surface may cause a malfunction. If the DVR does 
not  work  properly  due  to  physical  damage,  please  contact  Customer  Service  for 
repair or exchange. 

9.

Use standard lithium cell battery. (NOTE: Manufacturer has preinstalled 

battery.)

The standard lithium cell 3v battery located on the motherboard 
should be replaced if the time clock does not hold its time after 
the power is turned off. Warning: unplug the DVR before replacing 
battery or you may be subjected to severe electrical shock. 
Properly dispose of old batteries.

SAFETY INSTRUCTIONS

WHAT YOU GET

1.1 - Benefits 

        Watch what's going on as it happens in real time.
        Save your recorded files and snapshots on a DVR-rated hard drive.
        Backup and move your videos off-site with either a USB flash drive or 
external hard drive.
        View what you recorded straight from the DVR or remotely from a computer.
        Set up your DVR to be accessed from any Internet-connected computer.  
Friends, family, and co-workers can be given permission, too.  Double-encoded 
bit network transmission keeps your video secure.
        Get notified of system events, motion detection, and external alarm 
activation – by e-mail, too!

Move through menus easily and quickly with a USB 2.0 mouse.
Connect Pan/Tilt/Zoom cameras – freeing you from fixed position cameras – 

and giving you 180˚ motion control, leaving no corners undetected.

Download and install software on your mobile phone to view your DVR and 

cameras. 

Record, play back, and connect remotely at the same time with Triplex 

technology.

Pierce low- or no-light conditions using cameras with Infrared LED light 

(night vision) technology.
        Pack your videos in increments of 15, 30, 45 or 60 minutes for better search 
and storage.

Display menus in your language with Multi-lingual OSD (Operating System 

Display).

Configure your DVR and cameras with a familiar look and feel with graphical 

interface.

Connect a standard VGA computer monitor or a TV with RCA jacks (using 

BNC-to-RCA adapter).

Keep your DVR in optimal performance condition by scheduling automatic 

restarting.

Store more videos on the DVR and use less space with H.264 (MPEG-4) 

video compression format.

Determine playback clarity with three different resolution options.

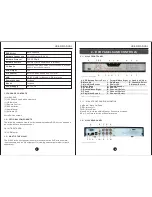
1.2 - DVR SPECIFICATIONS 

Model

Video Compression

Operating System

Signal System

Video Input

Video Output

Audio Input

Audio Output

Display Frame Rate

Display Resolution

Recording Frame Rate 

Recording Mode

Playback Resolution

DVR-H9104V-4 CH Standalone DVR

H.264

Linux Based

NTSC / PAL

BNC4-Channel Input

BNC2-Channel Output

RCA1 -Channel Input

RCA 1-Channel Output

NTSC: 120fps / PAL: 100fps

NTSC: 704 x 480 / PAL: 704 x 576

NTSC: 120 fps / PAL: 100 fps 

NTSC: CIF (352x240), PAL: CIF (352x288)

Continuous / Time Schedule / Motion Detection ½

2

USER MANUAL

USER MANUAL

Содержание H9104V

Страница 1: ...H9104V...

Страница 2: ...Display 3 4 1 Connecting a TV 3 4 2 Connecting a Computer Monitor 3 5 Connecting a USB Backup Device 3 6 Connecting a USB Mouse 3 7 Connecting the DVR to a Local Area Network LAN 4 Starting up Your D...

Страница 3: ...hone Setup 28 12 1 User Name 28 12 2 User Password 28 12 3 Server Port 29 12 4 Setting Up Your Phone 29 13 Motion Detection 29 13 1 Options 29 13 2 Motion Detection Area 30 14 System Setup 30 14 1 Tim...

Страница 4: ...and move your videos off site with either a USB flash drive or external hard drive View what you recorded straight from the DVR or remotely from a computer Set up your DVR to be accessed from any Int...

Страница 5: ...Power Supply Built in RS485 Support PELCO P D USB 2 0 USB for Backup USB for mouse Included Included DC12V 3A Table 1 1 DVR Technical Specifications 1 3 PACKAGE CONTENTS 1 9104V DVR 1 12V Power Suppl...

Страница 6: ...amera into the male BNC video connector of the extension cable The male end attaches to the female end clockwise and locks into place Step 2 Your 4 Channel DVR has four video input ports labeled CH1 t...

Страница 7: ...es with electrical tape 5 Connect the female end of the 12V DC power connector from the camera to male end on the extension cable See Figure 3 7 6 Connect power connector on other end of extension cab...

Страница 8: ...he DVR It is the top port labeled with a mouse icon 1 Power off or unplug the DVR 2 Connect mouse 3 Power on or plug in the DVR No other configuration is necessary Troubleshooting Tips Issues There is...

Страница 9: ...igure 5 14 Menu Lock dialog box 5 3 MAIN MENU FUNCTIONS TABLE 5 1 1 Menu Function Buttons The following buttons are common to most menus and submenus DEFAULT Clicking this button resets current menu o...

Страница 10: ...to match PTZ cameras dip switches PTZ Setup Sets a username password and port for connecting to the DVR remotely via mobile phone Mobile Turns and off motion detection Sets sensitivity and detection a...

Страница 11: ...OPTIONS While in Live View Shows or hides current date and time on live video display While Recording Shows or hides date and time while recording 6 6 AUTOSEQ Auto sequencing scrolls through each cha...

Страница 12: ...ay value is the local address of the router to which the DVR is connected The default value is 192 168 1 1 8 7 DNS DNS or Domain Name Server should also be set to the local address of the router 18 17...

Страница 13: ...LOCAL CONNECTION Method 1 Netviewer D9 Client Software 1 Install D9 Viewer on local PC a Software is on CD included in shipment b Download from http zmodo net 2 Launch software 3 Log in to DVR a Enter...

Страница 14: ...ctly See Section 4 3 Setting System Date and Time 2 Enter in a time at which to begin searching for files on the designated date optional 3 Click the Search button to execute the file search 9 2 IDENT...

Страница 15: ...is full At that point it will be necessary to enable overwrite replace the hard drive or format it 10 1 3 HDD FORMAT Clicking this button will execute the hard drive format process Formatting the hard...

Страница 16: ...Output Sets the duration for the external alarm Options are OFF and 10 20 40 or 60 Figure 10 37 Alarm Setup menu seconds Buzzer Sets the duration of the audio buzzer when an alarm condition is met Op...

Страница 17: ...he cameras please see Section 3 2 4 Connecting Your PTZ Cameras For directions on programming the PTZ camera to survey automatically see Section 15 PTZ Cruising The settings under each channel must ma...

Страница 18: ...phone This is not the same password as the admin or user account either for local or Internet access 12 3 SERVER PORT Enter a port over which the mobile phone will communicate with the DVR We recomme...

Страница 19: ...t The user password also grants access to the Quick Launch menu The user password must be six digits and must be different from the admin password After entering the user password type it again in the...

Страница 20: ...he Load Default button will restore all customized settings on the DVR back to their factory defaults It will not erase content on the hard drive Before executing the Load Default process the user wil...

Страница 21: ...A red square with a white H will be displayed on the main video screen if hard drive loss occurs The H icon will also appear if there is no hard drive installed or if it has not been formatted Refer t...

Страница 22: ...iggered Motion may have been detected the hard drive may be low on space or disconnected or a camera may have lost video Check your alarm settings See Section 10 2 17 APPENDICES Zmodo offers its custo...

Отзывы: