


Page 18 INSTRUCTION MANUAL CENTRAL COMMAND STATION MX10
“MX10 Update (all)” includes:
-
Main processor MX10 update
-
Radio processor update
-
XILINX update
-
Language (DE, EN)
-
CV list
-
Decoder denominations
-
MX10 sounds (e.g. Error)
(flash drive)
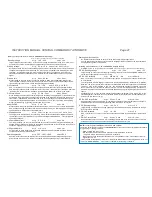
7.
MX10 update, data import and storage
The current software version:
You can download it for free from our website:
www.zimo.at
“Update & Sound”
“Update System (MX10, MX32, ...)”
Starting with software version 01.17, a so-
called “Container-File” is used for MX10 and MX32(FU). This
Container File contains all necessary files for the update of both devices. This way, only one file has to
be downloaded and stored on the flash drive.
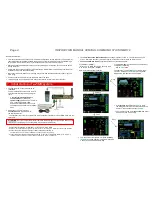
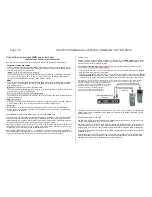
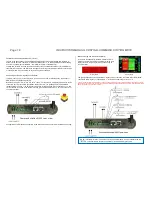
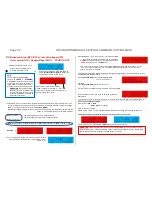
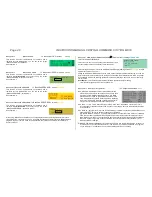
The currently loaded version (incl. current software versions of the radio processors and XILINX)
can be called up in the MX10’s menu.
Press
button 2 (MENU)
screen
GREY
:
MENU for operating the MX10
Positioning the cursor (
) with the rotary knob on “MX10 Config”, press=select
Positioning the cursor (
) with the rotary knob on “Version-SW...”
Button 3
(
) press three times
back to normal screen
BLUE
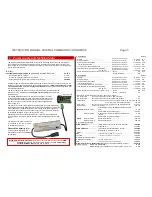
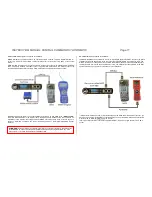
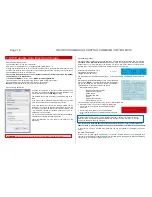
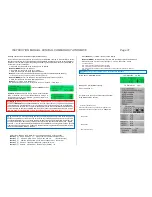
The necessary flash drive:
As shown in the window on the left, the flash drive has to be
formatted in the filesystem
FAT32
to update the MX10. The
Cluster size shall be set to
4096 Bytes
(= 4kB).
The standard flash drives are already formatted this way by de-
fault.
If you use an older or differently formatted flash drive, untick the
point “Quick Format” when formatting for the first time.
If the right flash drive is found, the software update can be
stored on it. It is very important that the update is saved in the
root directory, because the MX10 cannot look into folders. The
“.zip” file which contains the software update has to be un-
zipped before it can be used.
You do not need a special flash drive especially for the update,
other files do not disturb the updating process.
These characteristics are also valid for the update of the
MX32(FU)!
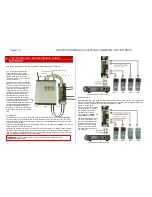
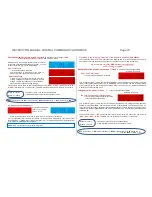
The updating process:
The MX10 software update is done during operation. If a flash drive with the usable files is connected,
all outputs on the MX10 are switched off.
All devices which are supplied by the MX10 are therefore
without current. To prevent damage to the vehicles, it is best to stop all operation on the layout before
the flash drive is connected to the MX10 and therefore all current is shut down.
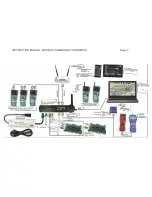
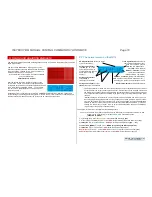
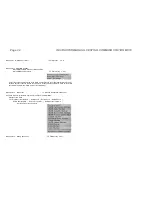
Screen in normal operation
BLUE
Flash drive with update file is
plugged into the USB socket.
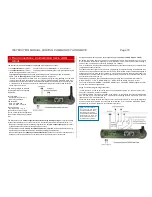
The MX10 reads the flash drive automatically,
on the update screen
TURQUOISE
all found files are
listed:
Available and therefore selectable positions on the flash drive
are shown in “
BOLD”.
The other points are files which gener-
ally can be loaded into the MX10 but are NOT available on
THIS flash drive, or cannot be found by the MX10.
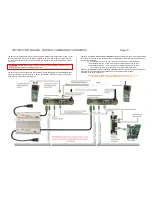
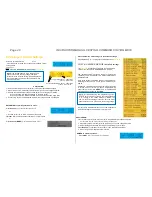
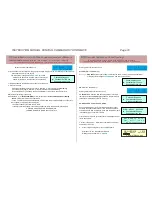
Positioning the cursor (
) with the rotary knob on “MX10 update (all)”
Press rotary knob
The screen changes to
RED
colour
,
version number and creation date of the MX10 update
are shown.
Press rotary knob (again)
run software update.
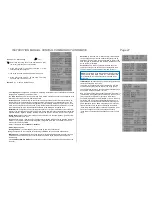
After finishing, (about 10 sec) the MX10 displays the next
step.
After each update, the MX10 has to be disconnected from the power supply and restarted after
about 1 minute, to make sure that all concerned circuit elements are started with the new software.
In case there is no file on the flash drive, the MX10 can use (not available or damaged), the screen
shows:
“NO ZIMO FILES FOUND”
Instead of the list (also lighted
TURQUOISE
) In this case, the flash drive has to be unplugged and
checked for an available (or usable) update. When the flash drive is unplugged, the MX10 automatically
changes to the normal screen (without restart)
BLUE
.
ATTENTION:
Flash drives bigger than 32GB cannot be formatted to FAT32 in Windows 7.
NOTE: In case the rotary knob is turned instead of pressed, or another key is pressed, the up-
date process is cancelled immediately and the MX10 changes to normal operation. In this case,
unplug the flash drive and plug it in again.


