32
ZCM4821-001_v01
If you wish to stop the preparation of a coffee speciality prematurely,
pressing the
menu button stops only the milk preparation. When the
milk preparation has been stopped, pressing the
Menu button again
stops the coffee preparation.
MILK CLEANING SYSTEM AFTER DISPENSING DRINK WITH MILK
The symbol
appears in the top left of the display after dispensing a coffee speciality
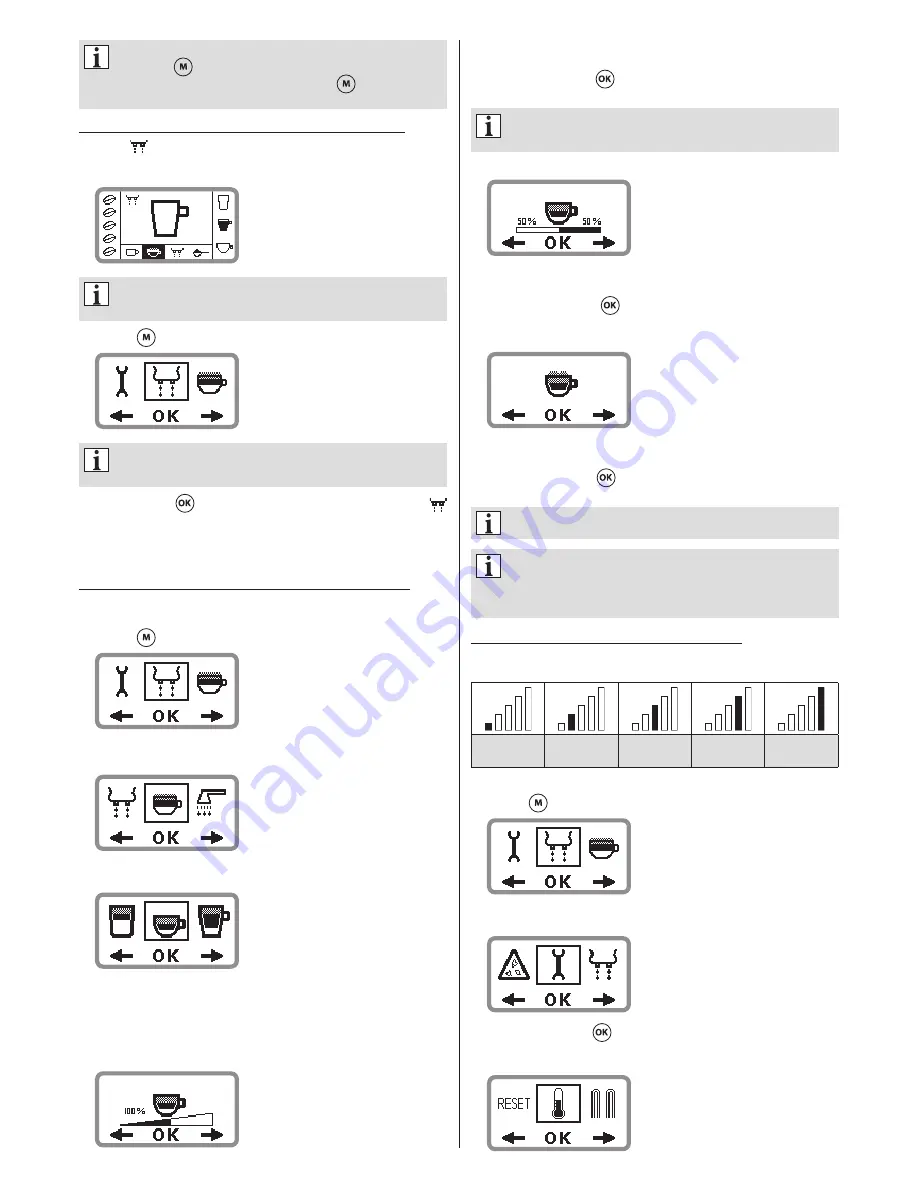
with milk. This will prompt you to run the milk cleaning system. The following appears on
the display:
If several drinks are prepared with milk, the milk system should be
subsequently cleaned. Otherwise the programme will prompt cleaning when
the appliance is switched on again. It is then not possible to select a drink.
●
Press the
menu button. The following appears on the display:
If the milk hose is connected, it must be removed prior to starting the
rinsing cycle on the frothing nozzle. Otherwise milk could be sucked in
unintentionally. See also section “CONNECTING THE MILK SYSTEM”.
●
Press button
B
or
button, to start the milk cleaning system. The symbol
on the top of the display extinguishes and the programme will start. Refer to section
“MILK SYSTEM CLEANING PROGRAMME”.
Milk residue must also be cleaned from the outlets on the dispenser unit each time a milk
coffee speciality is dispensed.
CHANGING AND STORING SETTINGS FOR COFFEE SPECIALITIES
A standard milk-coffee proportion, coffee froth quantity is set by default. These settings
can be individually changed and stored for each coffee speciality. Proceed as follows:
●
Press the
menu button. The following appears on the display:
●
Press button
C
to move the selection into the “Settings for coffee specialities” menu.
The following appears on the display:
●
Press the button
B
to display the “Settings for coffee specialities”. The following
appears on the display:
●
Press the buttons
A
or
C
repeatedly until the desired coffee speciality settings to be
changed appears in the selection menu and then confirm selection by pressing the
button
B
.
The same setting options are available for all coffee specialities. The following illustrates
the possibilities using Café Latte as an example.
The first setting affects the
cup filling quantity
.
The filling quantity can set from 50% to 150%.
●
Press the buttons
A
or
C
repeatedly until the desired coffee filling quantity is displayed.
●
Press the button
B
or the
button to store the settings. The stored filling quantity
briefly appears on the display.
After you have set and stored the cup filling quantity to your personal
preference, always use the same cup size in the future. If you use other
cup sizes, it is possible that the drink could overflow.
The second setting affects the
milk-coffee proportion
.
The milk-coffee proportion can set from 80/20 to 20/80.
●
Press the buttons
A
or
C
repeatedly until the desired milk-coffee proportion is displayed.
●
Press the button
B
or the
button to store the settings. The stored milk-coffee
proportion briefly appears on the display.
The third setting affects the
froth quantity
.
The settings for the froth quantity are: none, little, medium and much.
●
Press the buttons
A
or
C
repeatedly until the desired froth quantity is displayed.
●
Press the button
B
or the
button to store the settings. The stored froth quantity
briefly appears on the display.
Repeat the procedure if you also wish to change settings for other coffee
specialities to your personal preference.
After making the settings, you should always use the same cup size.
All values remain stored even when the coffee machine is switched off.
You can make individual changes to the settings at any time or reset them.
The affected settings are described in section “RESETTING THE COFFEE
MACHINE TO FACTORY SETTINGS”.
SETTING AND STORING THE COFFEE TEMPERATURE
You can select from 5 temperature levels. The coffee temperature levels are displayed as
follows:
moderately
warm
warm
normal
hot
extra hot
To set the coffee temperature, proceed as follows:
●
Press the
menu button. The following appears on the display:
●
Press the
A
or
C
buttons repeatedly until the “Device parameters” menu appears for
selection. The following appears on the display:
●
Press the button
B
or the
button to select the “Device parameters” menu.
●
Press the
A
or
C
buttons repeatedly until the “Temperature” menu appears for
selection. The following appears on the display:
Содержание ZCM4821B
Страница 43: ...ZCM4821 001_v01 ...


