background image

MAXX OPERATIONS                                                                        Bus Routing 


46 


Pressing the Bus Key 


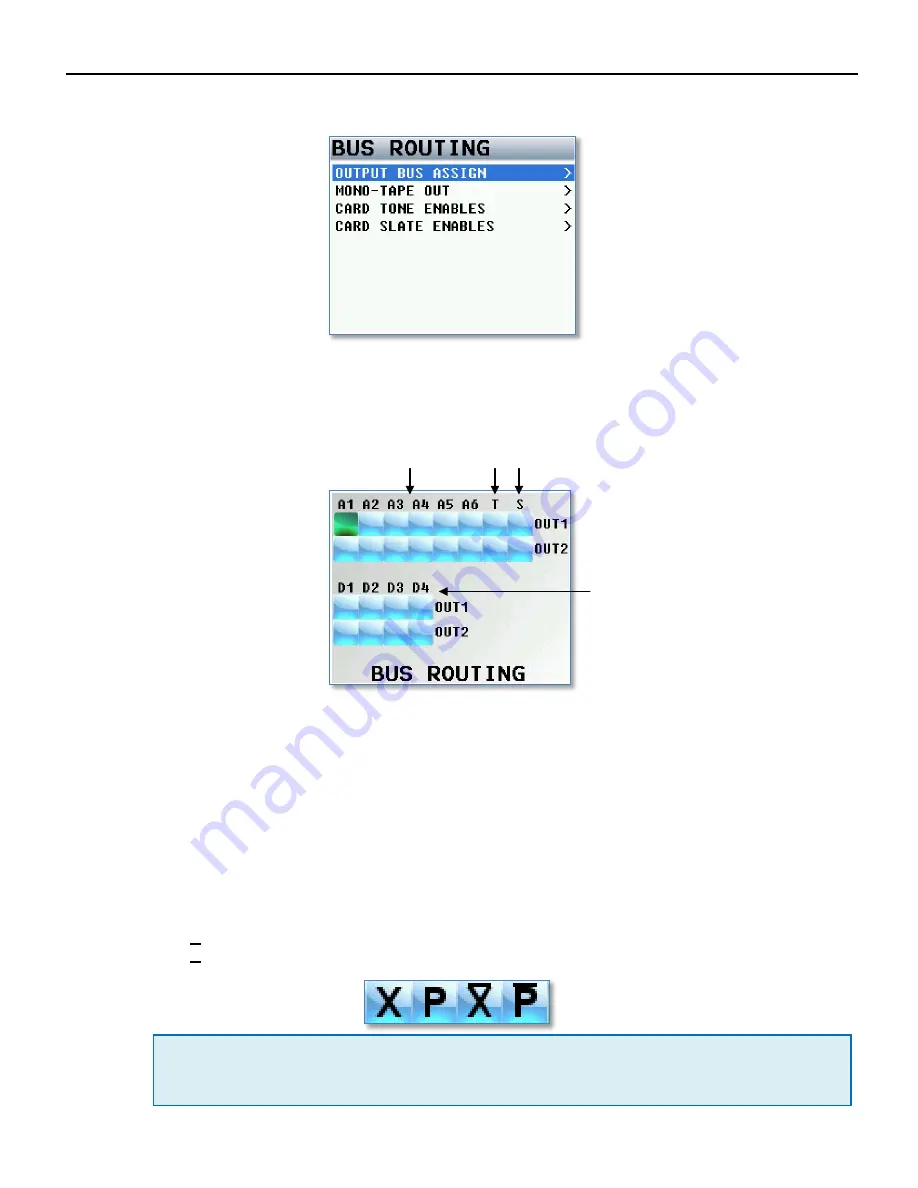
Output Bus Assign Busses 


This matrix assigns your Analog and Digital inputs to your output buses. The output busses can be assigned either pre 

or post fade audio. 


The top line of the three pages indicates the following sources: 


Analog Inputs 1-6 


T

 - Tone 


S - 

Slate 


D - 

Digital Inputs - 

only available when AES option is enabled.


Setting a Crosspoint 

Rotate the 

MENU 

knob to scroll through the matrix. Stop in the matrix, at the intersection of the input channel and 

output channel, where you want to send that specific input. Press the 

MENU 

knob to cycle through the available cross 

points, which are: 


X

  – post-fader 


P

  – pre-fader 


X

  – post-fader, phase inverted 


P

  – pre-fader, phase inverted 


NOTE:

  To add the optional phase invert items to the list, while in this matrix press the 

STAR

 key. Then by 

pressing the 

MENU

 knob, you will now be able to cycle through the selections with phase invert.  

Power cycling the unit will reset it to NO INVERSION mode but keep your phase invert choice.  


                 Analog Inputs         Tone  Slate 

Digital Inputs appear only on 
Maxx with AES option. 

Содержание MAXX

Страница 1: ......

Страница 2: ...d 16 ISO Attenuation 16 ISO Attenuation Enable 17 Edit Current Folder 17 MIRROR ENABLES 18 MIRROR SETTINGS MENU 19 Mirror Mode 19 Folder to Mirror 19 Start Segment 19 End Segment 19 File Type 20 File...

Страница 3: ...Slate Level 37 Return Analog Input 5 and 6 Levels 37 Digital Inputs 1 4 Levels 37 OUTPUT LEVELS 38 XLR AUX TA5 Output Bus Levels 38 Mono Tape Output Bus Levels 38 WARNINGS SETUP 38 LCD Screen Brightn...

Страница 4: ...o Inputs 50 SETTING UP AND ENGAGING TONE 51 ASSIGNING TONE TO OUTPUT BUSSES 51 ASSIGNING TONE TO CARD TRACKS 51 ADJUSTING TONE 51 ENGAGING TONE 51 ENTER TEXT 52 FALSE START 53 ENG EFP BAG OPERATION 54...

Страница 5: ...4 PRODUCT SUPPORT 61 MAXX SPECIFICATIONS 62 ZAXCOM WARRANTY POLICY AND LIMITATIONS 63...

Страница 6: ...ror Mode 4 BUS PLAY key When in the ENG Home Page a single short press allows you to adjust the Quick Pan Matrix A second press or a press from any other Home page takes you into the Bus Routing menu...

Страница 7: ...sten key Press to listen to Pre Fader audio from the corresponding fader When in setup mode press to access the AES input setup menu for the corresponding AES inputs Pressing from the Meta Data menu o...

Страница 8: ...se ONLY NiMH rechargeable or Lithium batteries If you use ANY other batteries they will EXPLODE and can SEVERLY damage or DESTROY the unit 2 AES Input Output connector GPI DE 15F Maxx has AES 2 input...

Страница 9: ...ape bus matrix 4 Output Bus 1 2 TA 5M This is an isolated copy of the XLR bus outputs Levels are independently adjustable 5 Return Line Level Inputs for analog in 5 and 6 TA 5M This is where a camera...

Страница 10: ...9 Rear 1 2 1 Mic Line level Inputs 3 and 4 Combo XLR 3F 1 4 Stereo 2 Mic Line level Inputs 1 and 2 XLR 3F...

Страница 11: ...nel identification If a compressor is engaged a white gain reduction indication will appear at the right side of the meter if the compression threshold has been exceeded ENG Home Screen ENG Home Scree...

Страница 12: ...Meters Explained 11 Input Meter Screen Digital Input Virtual Fader Screen Only on Maxx with AES Option Output Buses Input signal from XLR Inputs Output Busses Digital Inputs with Virtual Faders AutoTr...

Страница 13: ...that channel to the PFL circuit Press the HEADPHONE knob to restore normal headphone monitoring Battery Status Indicator Displays the power source I Internal E External and a numeric display of the c...

Страница 14: ...s you to adjust the Meta Data To adjust the META DATA select one of the data fields and press the MENU knob see Enter Text page Playback Control This menu controls playback of recorded files Sample Ra...

Страница 15: ...port When you select this Maxx will create a Sound Report and write it on the Mirror CF card file The sound report contains the Meta Data information for what was recorded IMPORTANT Mirror mode must b...

Страница 16: ...der Name and press the MENU knob to change the name of the folder NOTE Folder names need to be seven characters or less and can contain no spaces or symbols The primary folder is recorded as a Zaxcom...

Страница 17: ...ese large signals are recorded into a 24 bit WAV or MARF file the advantage of floating point math is lost and these signals can clip if you don t use a card limiter ISO Attenuation allows ISO record...

Страница 18: ...menu allows you to choose which record tracks you choose to attenuate Edit Current Folder To edit the folder name 1 Scroll down to the Edit Current Folder Name 2 Press the MENU knob to highlight the...

Страница 19: ...nly display two mirror tracks SHORTCUT It is not necessary to remove record enable cross points from the Mirror Matrix If a Primary card track is not assigned it will NOT be recorded and not written t...

Страница 20: ...ou want to CONTINIOUS MIRROR this folder needs to match the primary folder If you want to re mirror a folder this folder needs to match the primary folder you want to copy Start Segment This will set...

Страница 21: ...menu sets the bit depth that Maxx will mirror the files as File Name This menu sets the way individual files are named Z001001 is the default way where the file name consists of the Folder Name Z001 o...

Страница 22: ...hoose what source you what to assign and record on that channel You can choose between all 6 analog inputs or the 2 output busses If Maxx is equipped with the AES option you can also assign the digita...

Страница 23: ...matrix at the intersection of the input channel and output channel where you want to send that specific input Press the MENU knob to cycle through the available cross points which are Blank No Assignm...

Страница 24: ...d recall three full setups for different scenarios All user set parameters are saved and can be recalled as needed NOTE If you do a factory restore all of the saved memories will be erased Clear Fader...

Страница 25: ...nd have to be re input Though a factory restore will not erase Note and Track presets To do a full restore including Note and Track names hold the stop key on boot up Store Recall using the Compact Fl...

Страница 26: ...MAIN MENU About Maxx 25 About Maxx Menu This menu gives you information about your Maxx Indicates current CPU Usage Software Version...

Страница 27: ...track 1 input 2 to track 2 input 3 to track 3 and input 4 to track 4 Input and card compressors will be disabled NeverClip will be disabled While Maxx will record time coded files the BNC time code c...

Страница 28: ...e blue LED next to that fader will illuminate indicating the input associated with that channel will be trimmed when you rotate the MENU knob When you adjust another fader the trim function will move...

Страница 29: ...is the most popular choice for most users UNSHIFTED Pressing the REC PLAY or STOP key immediately puts Nomad into Record Playback or Stop To display the pages associated with the TC BUS or SETUP key i...

Страница 30: ...e MENU knob will adjust the mix If the Blue Trim Icon is displayed the MENU knob will control the input Trim of that input Pressing the MENU knob will advance to the next item Folder Change If set thi...

Страница 31: ...op warning option in the ENG Menu there will be an audible beep when a new file is created The beep is heard in the headphones only NOTE Regardless of this setting Maxx will always create a new file w...

Страница 32: ...de This sets the transmit mode of the UHF camera link transmitter MONO Maxx will transmit one output bus STEREO Maxx will transmit both output busses Transmitter Power This sets the transmitter power...

Страница 33: ...control will affect the microphone levels Since the Auto Mixer is before the faders the faders have no affect on the levels Post Fade The Auto Mixer is inserted after the faders in the audio chain an...

Страница 34: ...nput meter This matrix also sets which output buses the Auto Mix will be outputted to Analog Inputs Returns Analog Input 5 and 6 Digital Inputs Selects which output busses the Auto Mix will be routed...

Страница 35: ...additional menu items Scroll for additional menu items Compressor Enable This matrix lets you set which card tracks output busses and if the tape out or mono out will have their compressor limiters en...

Страница 36: ...all Input Channels Output Compressor Parameters This menu lets you set parameters for the Output Compressors The Output Compressor settings are global meaning that the settings adjusted here will the...

Страница 37: ...a recorded track After selecting a track to name pressing the menu knob will open the Enter Text menu which allows you to manually name the track Or by pressing the PFL key allows you to choose from t...

Страница 38: ...xx with AES option Slate Level This adjusts the internal slate microphone level The level is independently adjustable in 1 dB steps from 12dBu to 21dBu Return Analog Input 5 and 6 Levels This adjusts...

Страница 39: ...Live audio will continue to be sent to the outputs ON Playback audio will be outputted from the output busses when playing back Live audio will be muted and the playback audio only will be sent to the...

Страница 40: ...meaning that all LED lights will be set to the same brightness The LED brightness adjusts from 0 to 30 Tone Frequency Adjusts the frequency of the Tone The range is 20 to 20 000 Hz Tone Level Adjusts...

Страница 41: ...der is part of the software that helps boot up Maxx Generally you wouldn t need to update this If the boot loader needs to be updated there will be a note released with the software to do so The boot...

Страница 42: ...ing that would be used With this setting pressing and holding the slate key will activate the slate mic Forced When you activate the slate mic this setting locks the slate mic in the on position Note...

Страница 43: ...g timecode and User Bits from a source that is connected to the timecode in Also displayed are the current running timecode of its internal timecode generator as well as the local user bits NOTE Maxx...

Страница 44: ...he keys to enter a numeric value 4 Once you enter the last digit the TC is entered immediately and jammed NOTE If you don t enter the entire eight digits press the MENU knob to force the jam Manually...

Страница 45: ...displayed is the current point in the take While in Record Time code displayed is the time code being recorded during the take as it happens TC Output This sets what timecode is sent from the time co...

Страница 46: ...Set Date This sets Maxx s internal calendar Timecode Routing This menu sets the function of the BNC timecode connector OUTPUT Maxx will output timecode on the BNC connector INPUT Maxx will receive ti...

Страница 47: ...top in the matrix at the intersection of the input channel and output channel where you want to send that specific input Press the MENU knob to cycle through the available cross points which are X pos...

Страница 48: ...onnector Any of the inputs including digital inputs or output busses can be routed indecently to the tape and or the mono out Maxx without AES option Maxx with AES option Card Track Tone Enable This m...

Страница 49: ...s limiters should be LINKED to insure that the spatial integrity of the signal is maintained Your choices are OFF ON GroupA GroupB and GroupC This allows you to have up to three different groupings Fo...

Страница 50: ...Select the E to enable that setup to be active when toggling through while listening 5 Press the Headphone knob to advance to the next matrix 6 To exit press and hold the HEADPHONE knob 7 You can als...

Страница 51: ...ressed the name in the Headphone Monitor field is replaced with PFL alternating with the selected channel number s that you are monitoring To change the feed press the channel number PFL keys you want...

Страница 52: ...tone is activated Assigning Tone to Card Tracks To assign tone to card tracks press the Bus key and go to the TONE ENABLE matrix to select which card tracks will receive tone Adjusting Tone Tone level...

Страница 53: ...will cause the highlight to move right and left this will also wrap around to the next line Press and rotate the MENU knob will cause the highlight to move up and down Press the MENU knob for 1 secon...

Страница 54: ...a second time after can mark a Take as a False Start or just delete it After you press STOP if you press and hold the STOP key for 1 second the False Start page will be displayed Pressing Menu will m...

Страница 55: ...enter the PAN routing matrix the pan matrix will be highlighted Rotate the MENU knob to select the input you want to PAN Pressing the MENU knob will cycle the assignment as L C and R to each input pai...

Страница 56: ...wer key adjusts the panning for that input Pressing the Power Key the panning for the illuminated channel will cycle from Left to Center to Right to Blank unless Prevent Empty Pan in the ENG Advanced...

Страница 57: ...ge of a faster card is faster downloads Do not use cards from questionable manufacturers or buy from questionable sources Counterfeit cards do exist and can be unreliable and cause crashing If you are...

Страница 58: ...osition 5 In addition if you use Auto Set you will experience a TC drift You don t need to replace your slates The Denecke Slate and Maxx can sync perfectly When setting the slate to receive timecode...

Страница 59: ...Out of Maxx PIN 1 GROUND PIN 2 MONO SIGNAL PIN 3 MONO SIGNAL PIN 4 TAPE SIGNAL PIN 5 TAPE SIGNAL Return Audio Inputs 5 and 6 Uses a Switchcraft TA5 F The return can be wired to receive 2 mono returns...

Страница 60: ...5 connector for the AES Digital input and output connectors Top row pins 5 4 3 2 1 Middle row pins 10 9 8 7 6 Bottom row pins 15 14 13 12 11 DB 15 Pin Number IN OUT AES PAIRS Connects to XLR Pin 1 IN...

Страница 61: ...alled or a stable power supply is connected 3 With Maxx powered down insert the CF card containing the bin file into the card slot Make sure only one bin file is on the card 4 Press and hold the STAR...

Страница 62: ...d the latest Firmware from http www zaxcom com software updates Download the latest User Manuals from http www zaxcom com instruction manuals Submit Technical Questions at http www zaxcom com submit a...

Страница 63: ...Frequency Step 100 KHz RF Bandwidth 200 KHz Channel Separation 500 KHz 700 KHz recommended Antenna Connector 50 SMA Female Emission Designator 180 KV2E FCC Part 75 861 Misc Display Full color sunlight...

Страница 64: ...ited to the repair or replacement of the defective Product Zaxcom may elect which remedy or combination of remedies to provide in its sole discretion Zaxcom shall have a reasonable time after determin...

Отзывы: