YATO YT-83051 Скачать руководство пользователя страница 11

11

GB

O R I G I N A L   I N S T R U C T I O N S
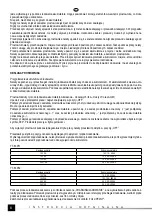
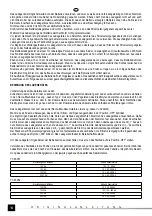
Displayed messages    


Message  

Meaning  

Solution of the problem

000

Standby mode of the rectifier

CHE

Check the condition of the battery before the process of charging 

commences

13.8

Voltage of the battery during testing   

05.8

Charging current in the charging mode of the battery 

F01

No connection with the terminals of the battery;

Short circuit of the terminals of the rectifier;

Reverse polarization.

Connect the terminals of the rectifier to the terminals of the battery 

again

F02

The rectifier lost the connection with the battery during charging. The 

rectifier will stop the charging process and emit a warning signal for 25 

seconds.

Turn the rectifier off and reconnect it, making sure the polarization is 

observed. Use the knob to select the appropriate charging mode. 
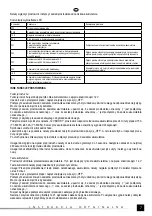
F03

Mode 12 V for a 24 V battery

Mode 24 V for a 12 V battery

Turn the rectifier off and disconnect the terminals of the rectifier from 

the battery, connect a correct battery or select a correct range

F04

The battery cannot be charged

The battery may be used up. Contact the manufacturer or the seller 

of the battery.

r.E.P

The rectifier is repairing (desulfuring) the battery. 

FUL

The battery is charged. The rectifier provides conservative voltage, in 

order to maintain the charge of the battery, until the rectifier is discon-

nected. 

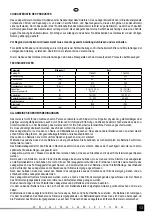
OTHER FUNCTIONS OF THE RECTIFIER

Start-up function

The start-up function is available solely for batteries whose rated voltage is 12 V.

Make sure the current and voltage selector is set to „OFF”. 

Connect the eye clamps to the terminals of the rectifier placed at the back of the housing. Pay attention to the correct colours. 

Tighten the screws of the terminals.

Connect the terminals the rectifier to the terminals of the battery, and make sure the terminal of the rectifier marked with a „+” is 

connected to the terminal of the battery marked with a „+”, and the terminal of the rectifier marked with a „-” is connected to the 

terminal of the battery marked with a „-”. 

Connect the plug of the power cord to the power supply socket. 

Set the knob to „12V BOOST”. The rectifier will start charging the battery for four minutes with a 15 A (YT-83051) current or a 30 

A (YT-83052) current. The end of the charging process will be indicated with a sound. 

Try to start the engine.

If the attempt fails, set the knob of the rectifier to „OFF” in order to reset the mode and start the procedure anew. 

Once the engine has been started, turn the rectifier off and disconnect the cables from the terminals of the battery.     

Attention! Due to the high starting current the start-up time must be limited to the 3 seconds, then wait at least 240 seconds to 

cool the charger circuits.

Attention! If repeated attempts to start the engine fail, the battery may be used up and it should be replaced. 
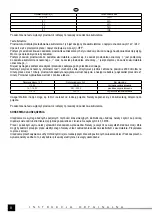
Test of the battery

The rectifier permits to test batteries. The mode is available solely for batteries whose rated voltage is 12 V. Tests of batteries must 

be realised when the engine is off. 

Attention! Before a test of a recently charged battery, it must be connected to the dipped headlights for 6 minutes. 

Make sure the current and voltage selector is set to „OFF”. 

Connect the eye clamps to the terminals of the rectifier placed at the back of the housing. Pay attention to the correct colours. 

Tighten the screws of the terminals.

Connect the terminals the rectifier to the terminals of the battery, and make sure the terminal of the rectifier marked with a „+” is 

connected to the terminal of the battery marked with a „+”, and the terminal of the rectifier marked with a „-” is connected to the 

terminal of the battery marked with a „-”. 

It is not required to connect the plug of the power supply cable to the socket of the power supply network. 

Push the „Battery Test” button; the display will indicate the voltage of the battery. After a sound is heard, read the indicated value 

and check the approximate charge level against the following table. 


Содержание YT-83051

Страница 1: ...N S T R U K C J A O R Y G I N A L N A 1 PL DE RUS LV HU E RO CZ UA LT SK PROSTOWNIK BATTERY CHARGER LADEGER T KROVIKLIS L D T JS NAB JE KA NAB JA KA AKKUT LT REDRESOR RECTIFICADOR GB YT 83051 YT 8305...

Страница 2: ...ductor de carga con borne 4 panel de control RO E HU 1 nab je ka 2 p vodn kabel se z str kou 3 nab jec vodi se svorkou 4 ovl dac panel 1 nab ja ka 2 pr vodn k bel so z str kou 3 nab jac vodi so svorko...

Страница 3: ...ery Art des Akkumulators Akumuliatoriaus tipas Akumulatora veids Typ akumul toru Druh akumul tora Az akkumul tor t pusa Genul acumulatorului Tipo de acumulador Pr d adowania Charging current Ladestrom...

Страница 4: ...ho sb ru opot ebovan ch elektrick ch a elektronick ch za zen Opot ebovan elektrick za zen jsou zdrojem druhotn ch surovin je zak z no vyhazovat je do n dob na komun ln odpad jeliko obsahuj l tky nebe...

Страница 5: ...est przeznaczony do adowania tylko akumulator w kwasowo o owiowych adowanie innego rodzaju akumulator w mo e doprowadzi do pora enie elektrycznego niebezpiecznego dla zdrowia i ycia Zabronione jest ad...

Страница 6: ...o o wiowych tzw typu mokrego nale y sprawdzi poziom elektrolitu i ewentualnie uzupe ni go wod destylowan do poziomu okre lonego w dokumentacji akumulatora Podczas uzupe niania poziomu elektrolitu nal...

Страница 7: ...zony jest pod czony do zacisku akumulatora oznaczonego oraz e zacisk prostownika oznaczony jest pod czony do zacisku akumulatora oznaczonego Pod czy wtyczk przewodu zasilaj cego do gniazdka sieciowego...

Страница 8: ...ty prostownik zapami ta najwy sz warto napi cia a nast pnie bedzie j wy wietla przez okres 1 minuty Por wna wy wietlan warto z poni sz tabel Wskazanie dla aku 12 V Wskazanie dla aku 24 V Stan alternat...

Страница 9: ...rechargeable batteries During charging the accumulator must be placed in a well ventilated area It is recommended to charge the accumulator at a room temperature The rectifier has been designed to be...

Страница 10: ...the battery While replenishing the level of electrolyte observe strictly the recommendations indicated in the documentation of the battery The rectifier has been designed uniquely for charging the so...

Страница 11: ...al of the battery marked with a and the terminal of the rectifier marked with a is connected to the terminal of the battery marked with a Connect the plug of the power cord to the power supply socket...

Страница 12: ...t 2000 rpm for a minute The rectifier will record the highest voltage value displaying it for a minute Compare the displayed value against the following table Indication for 12 V batteries Indication...

Страница 13: ...n dass Kinder nicht mit dem Ger t spielen Das Ladeger t ist nur zum Laden von S ure und Bleibatterien vorgesehen Das Laden anderer Batterien kann zu einem elektri schen Stromschlag f hren der gesundhe...

Страница 14: ...in Folge dessen zu einem gesundheitsgef hrdenden und lebensbedrohlichen elektrischen Stromschlag f hren BEDIENUNG DES LADEGER TES Vorbereitung des Akkumulators zum Laden Zun chst muss man sich mit der...

Страница 15: ...ren mit einer Nennspannung von 12 V zug nglich Man muss sich davon berzeugen dass sich der Strom und Spannungsschalter in der Position OFF befindet Die ringf rmigen Kabelschuhe sind an die hinten am G...

Страница 16: ...Akkumulators und die mit bezeichnete Klemme des Ladeger tes an die ebenso mit gekennzeichnete Klemme des Akkumulators angeschlossen werden Das Anschlie en des Steckers der Stromversorgungsleitung an d...

Страница 17: ...17 RUS YT 83051 YT 83052 a c 230 230 50 50 270 500 d c 12 24 12 2 8 15 12 7 5 24 10 30 12 7 5 15 24 75 12 145 12 10 300 50 600 II II IP20 IP20 7 5 8 1 O I...

Страница 18: ...18 RUS AGM OFF 000 OFF YT 83051 12 2A 12 10 60 12 8A 12 40 200 12 15A 12 60 300 24 7 5A 24 60 300 YT 83052 12 10A 12 50 300 12 30A 12 150 600 24 8A 24 50 200 24 15A 24 60 300...

Страница 19: ...19 RUS CHARGING FULL 000 CHE 13 8 05 8 F01 F02 25 F03 12 24 24 12 F04 r E P FUL 12 OFF 12 BOOST 4 15 A YT 83051 30 A YT 83052 OFF 12 6 OFF...

Страница 20: ...20 RUS Battery Test 10 3 11 9 20 12 1 25 12 3 50 12 5 75 12 7 100 12 24 OFF Alternator test 2000 1 1 12 24 14 0 28 0 14 1 15 0 28 1 30 0 15 1 30 1 0 3 M a...

Страница 21: ...21 UA YT 83051 YT 83052 a c 230 230 50 50 270 500 d c 12 24 12 2 8 15 12 7 5 24 10 30 12 7 5 15 24 75 12 145 12 10 300 50 600 II II IP20 IP20 7 5 8 1 A...

Страница 22: ...22 UA AGM OFF 000 OFF YT 83051 12 2A 12 10 60 12 8A 12 40 200 12 15A 12 60 300 24 7 5A 24 60 300 YT 83052 12 10A 12 50 300 12 30A 12 150 600 24 8A 24 50 200 24 15A 24 60 300 CHARGING FULL...

Страница 23: ...23 UA 000 CHE 13 8 05 8 F01 F02 25 F03 12 24 24 12 F04 r E P FUL 12 OFF 12 BOOST 4 15 A YT 83051 30 A YT 83052 OFF 12 6 OFF Battery Test 10 3 11 9 20 12 1 25 12 3 50 12 5 75 12 7 100...

Страница 24: ...24 UA 12 24 OFF Alternator test 2000 1 1 12 24 14 0 28 0 14 1 15 0 28 1 30 0 15 1 30 1 0 3 M a...

Страница 25: ...auti draud iama Krovimo metu akumuliatorius turi b ti gerai v dinamoje vietoje rekomenduojama akumuliatori krauti kambario temperat roje kroviklis yra skirtas naudoti patalp viduje o jo statymas dr gm...

Страница 26: ...ikt rekomen dacij Lygintuvas yra skirtas tik r g tiniams vino taip vadinamiems lapiesiems bei AGM tipo akumuliatoriams krauti sitikinti kad srov s ir tampos perjungiklis yra OFF pozicijoje Prijungti i...

Страница 27: ...as enklu yra sujungtas su akumuliatoriaus poliumi pa ym tu enklu bei kad lygintuvo gnybtas pa enklintas enklu yra sujungtas su akumuliatoriaus poliumi pa ym tu enklu Prijungti maitinimo laido ki tuk p...

Страница 28: ...ygyje per ma daug 1 minut s laikotarp lygintuvas u fiksuos atmintyje auk iausi tampos vert o po to rodys j per 1 minut Palyginti rodom vert su duomenimis lentel je 12 V akumulatoriaus rodmuo 24 V akum...

Страница 29: ...tam labi ventil t viet rekomend jam uzl d t akumulatoru istabas temperat r L d t js ir paredz ts darbam iek nedr kst to atst t zem mitruma un atmosf risko nokri u ietekmes L d t jus ar elektrisk s izo...

Страница 30: ...ailes pie ier ces spail m korpusa aizmugur j da Iev rot attiec gu kr su Tie i un stipri pieskr v t spailes skr ves Savienot l d t ja spailes ar akumulatora spail m p rbaud t vai l d t ja spaile apz m...

Страница 31: ...akumulatora spaili apz m to ar un ka l d t ja spaile apz m ta ar ir piesl gta pie akumulatora spaili apz m to ar Piesl gt elektr bas vada kontaktdak u pie elektroapg des t klu P rsl dz ju uzst d t po...

Страница 32: ...u p c tam to parad s 1 min u laik Sal dzin t v rt bu ar tabulu R d jums akumulatoram 12 V R d jums akumulatoram 24 V Alternatora st voklis 14 0 V 28 0 V p r k zems l d anas spriegums 14 1 15 0 V 28 1...

Страница 33: ...o Akumul tor mus b t b hem nab jen um st n na dob e v tran m m st doporu uje se nab jet akumul tory p i pokojov teplot Nab je ka je ur en k pou it uvnit m stnost a je zak z no vystavovat ji p soben vl...

Страница 34: ...okr ch a AGM akumul tor Zkontrolujte zda je p ep na proudu a nap t v poloze OFF Kabelov oka nab jec ch vodi p ipojte k v vod m nab je ky nach zej c m se na zadn st n sk n Dodr ujte odpov daj c barevn...

Страница 35: ...ky ozna en p ipojen k p lu akumul toru ozna en mu a svorka nab je ky ozna en k p lu akumul toru ozna en mu Z str ku p vodn ho kabelu zapojte do s ov z suvky Knofl k p epn te do polohy ozna en 12V BOO...

Страница 36: ...n sledn ji bude zobrazovat na displeji po dobu 1 minuty Zobrazenou hodnotu porovnejte s n sleduj c tabulkou daje pro aku 12 V daje pro aku 24 V Stav altern toru 14 0 V 28 0 V p li n zk nab jec nap t...

Страница 37: ...janie bat ri ktor nie s ur en na opakovan nab janie je zak zan Akumul tor mus by po as nab jania umiestnen na dobre vetranom mieste odpor a sa nab ja akumul tor pri izbovej teplote Nab ja ka je ur en...

Страница 38: ...a ka sl i na nab janie kyselinovo oloven ch akumul torov tzv mokr ch a AGM akumul torov Skontrolujte i je prep na pr du a nap t v polohe OFF K blov ok nab jac ch vodi ov pripojte k v vodom nab ja ky n...

Страница 39: ...vorka nab ja ky ozna en pripojen k p lu akumul tora ozna en mu a svorka nab ja ky ozna en k p lu akumul tora ozna en mu Pripojte z str ku k bla nap jania do sie ovej z suvky Gomb k prepnite do polohy...

Страница 40: ...de zobrazova na displeji po dobu 1 min ty Zobrazen hodnotu porovnajte s nasleduj cou tabu kou daje pre aku 12 V daje pre aku 24 V Stav altern tora 14 0 V 28 0 V pr li n zke nap tie nab jania 14 1 15 0...

Страница 41: ...letre vesz lyes ram t st okozhat Tilos olyan nem jrat lthet telepeket t lteni T lt s k zben az akkumul tornak j l szell ztetett helyis gben kell lennie A t lt st szobah m rs kleten aj nlott v gezni Az...

Страница 42: ...osan be kell tartani az akkumul tor dokument ci j ban l v utas t sokat Az akkumul tort lt kiz r lag lomakkumul torok un nedves s AGM t lt s re szolg l Bizonyosodjon meg r la hogy az ram s fesz lts g k...

Страница 43: ...kumul tor sarkaihoz az akkumul tort lt kapcsait vigy zva arra hogy a t lt jellel megjel lt kapcs t az akkumul tor jellel jel lt sark hoz a t lt jellel megjel lt kapcs t pedig az akkumul tor jellel jel...

Страница 44: ...percig Az akkumul tort lt megjegyzi a legmagasabb fesz lts g rt ket majd 1 percen kereszt l megjelen ti a kijelz n Vesse ssze az rt ket az al bbi t bl zattal Kijelz s 12 V os akkun l Kijelz s 24 V os...

Страница 45: ...acumulatori poate provoca electrocutarea i pune n pericol s n tatea i via a utilizatorului Se interzice nc rcarea bateriilor care nu sunt re nc rcabile n timpul nc rc rii acumulatorul trebuie s fie s...

Страница 46: ...atorului Atunci c nd completa i nivelul de electrolit trebuie s respecta i strict indica iile men ionate n documenta ia acumulatorului Redresorul poate fi utilizat doar pentru nc rcarea acumulatorilor...

Страница 47: ...la bornele cumulatorului asigura i v c borna redresorului marcat cu este cuplat la borna acumulatorului marcat cu i c borna redresorului marcat cu este cuplat la borna acumulatorului marcat cu Cupla i...

Страница 48: ...memora cea mai ridicat valoare a tensiunii i apoi o va afi a timp de 1 minut Compara i valoarea afi at cu tabelul de mai jos Valoare pt acum 12 V Valoare pentru acum 24 V Stare alternator 14 0 V 28 0...

Страница 49: ...do para la carga de otro tipo de acumuladores el usuario corre el peligro de un choque el ctrico con potenciales consecuencias peligrosas para la salud y la vida Se proh be cargar bater as no recargab...

Страница 50: ...adas con la bater a En el caso de bater as h medas de cido y plomo es menester revisar el nivel del electrolito y rellenarlo si es necesario con agua destilada hasta el nivel indicado en la documentac...

Страница 51: ...el rectificador a los bornes de la bater a aseg rese que el borne del rectificador marcado con el signo est conectado al borne de la bater a marcado con el signo y que el borne del rectificador marcad...

Страница 52: ...de un minuto El rectificador recordar el valor m s alto del voltaje y luego la indicar en la pantalla por un minuto Compare el valor indicado contra la siguiente tabla Indicaci n para las bater as 12...

Отзывы: