No.
Parameter Name
Setting Range
Default
b1-01
Frequency Reference Selection 1
0 to 5
0
In order to run the drive and motor, the drive must receive a Run command and an Auto Setpoint command. Parameter b1-01
specifies the origin of the Auto setpoint when in AUTO Mode. Switch to AUTO mode by pressing the AUTO button on the
HOA keypad while the drive is stopped.
Note:
If a Run command is input to the drive without a corresponding Auto setpoint, the Run indicator on the HOA keypad will turn on and the
STOP indicator on the keypad will blink.
If the drive should follow the “HAND Reference” set by the HOA keypad, use HAND Mode by pressing the HAND key and
set P5-01 to “1: Hand Reference (P5-02).” The HAND reference can then be entered into the U1-01 monitor parameter in the
“-DRIVE- ” Menu.
The drive offers the ability to provide four types of “Auto Setpoint” reference sources. These Auto Setpoint reference sources
are determined by the setting of b1-01 and the drive set to AUTO Mode by pressing the AUTO key on the keypad.
Prior to programming, it is recommended to select the system units (P1-02) and the feedback device, Scaling (P1- 03) first.
P1-03 will automatically scale the drive setpoint.
Example: P1-02 = 1: PSI
P1-03 = 200, feedback range = 200 PSI.
If the drive should follow an “Auto Set-Point” set by the HOA keypad: Set b1-01 to “0: Operator” (factory default). The Auto
setpoint can then be entered into the U1-01 monitor parameter in the “-DRIVE-” menu.
Setting 0: Operator (HOA keypad)
Using this setting, the frequency reference can be input by:
• switching between the multi-speed references in the d1-
oo
parameters.
• entering the frequency reference on the operator keypad.
This selection will also switch PID setpoint to Q1-01.
Setting 1: Terminals (analog input terminals)
Using this setting, an analog frequency reference can be entered as a voltage or current signal from terminals A1, A2, or A3.
To set the drive to follow an “Auto Setpoint” set by the analog input, set b1-01 to 1 (Terminals) and connect a potentiometer
or external signal to the drive.
Note:
When b1-01 is set to 1 (Terminals) and P5-01 is set to 0 (HAND Mode Reference), the setpoint and the HAND reference are determined
by the external analog signal.
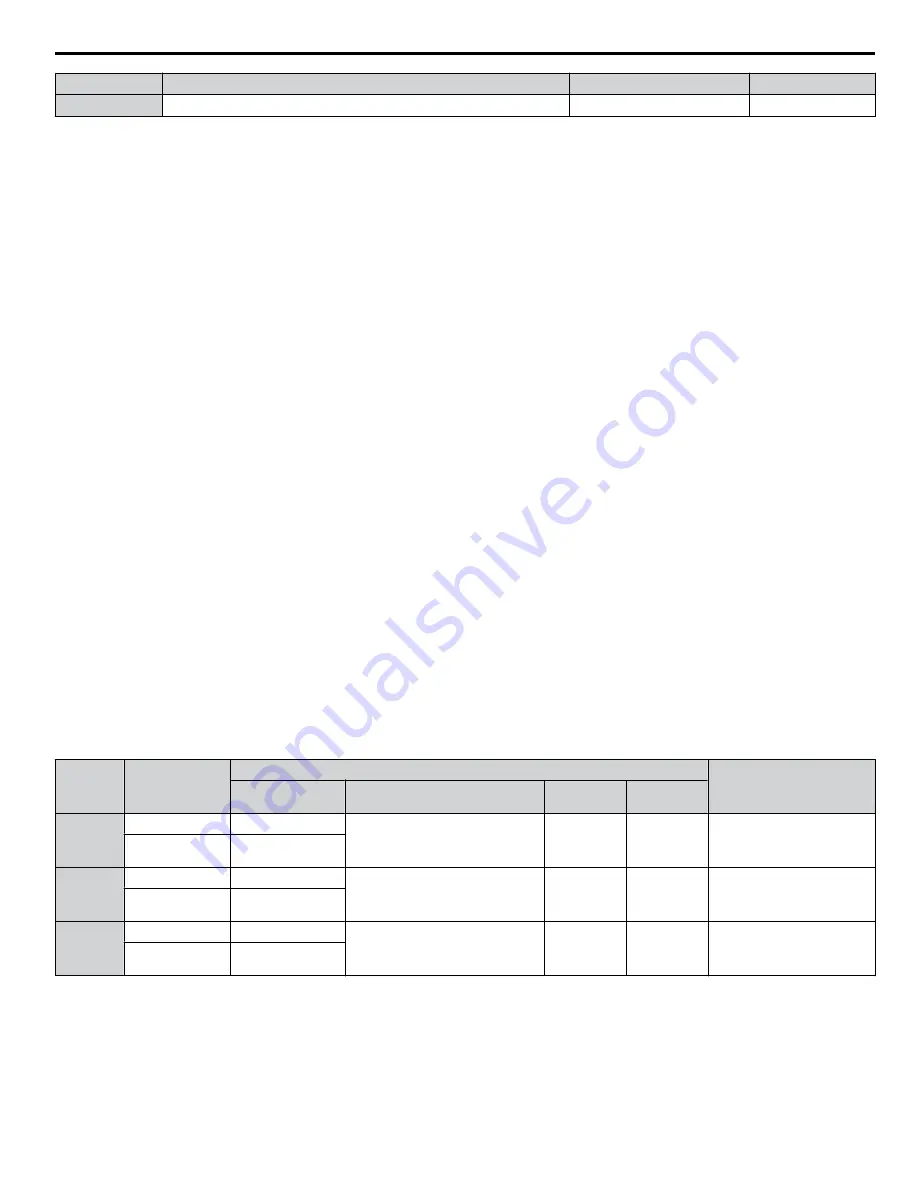
Voltage Input
Voltage input can be used at any of the three analog input terminals. Make the settings as described in
for the input
used.
Table i.20 Analog Input Settings for Frequency Reference Using Voltage Signals
Terminal
Signal Level
Parameter Settings
Notes
Signal Level
Selection
Function Selection
Gain
Bias
A1
0 to 10 Vdc
H3-01 = 0
H3-02 = 0
(Frequency Reference Bias)
H3-03
H3-04
–
0 to 10 Vdc
Bipolar
H3-01 = 1
A2
0 to 10 Vdc
H3-09 = 0
H3-10 = 0
(Frequency Reference Bias)
H3-11
H3-12
Set jumper S1 on the terminal
board to “V” for voltage input.
0 to 10 Vdc
Bipolar
H3-09 = 1
A3
0 to 10 Vdc
H3-05 = 0
H3-06 = 0
(Frequency Reference Bias)
H3-07
H3-08
Set DIP switch S4 on the
terminal board to “AI”.
0 to 10 Vdc
Bipolar
H3-05 = 1
Current Input
Input terminals, A1, A2, and A3 can accept a current input signal. Refer to
for an example to set terminal A2 for
current input.
i.5 Start-Up Programming and Operation
YASKAWA TOEP YAIP1W 02E YASKAWA AC Drive - iQpump1000 Installation & Start-up Guide
53
Содержание CIMR-PW*A Series
Страница 113: ......


