background image

14

Sound Edge Setup

ABOUT THE DRIVER AND MIDI MAPPER

In order for Windows to work with MIDI, a driver and MIDI mapper are required. The Yamaha
Sound Edge software installation procedure automatically places the YAMAHA OPL4 Driver in
the Control Panel and the YAMAHA OPL4 MIDI map into the MIDI Mapper.
When you click to open the driver in the Windows Main group, you can see three different
drivers: OPTi External MIDI Driver, YAMAHA Audio Device Driver and YAMAHA OPL4 Driver.

¢

If you removed a previous sound card before installing the Sound Edge, delete any accompanying driver

programs.

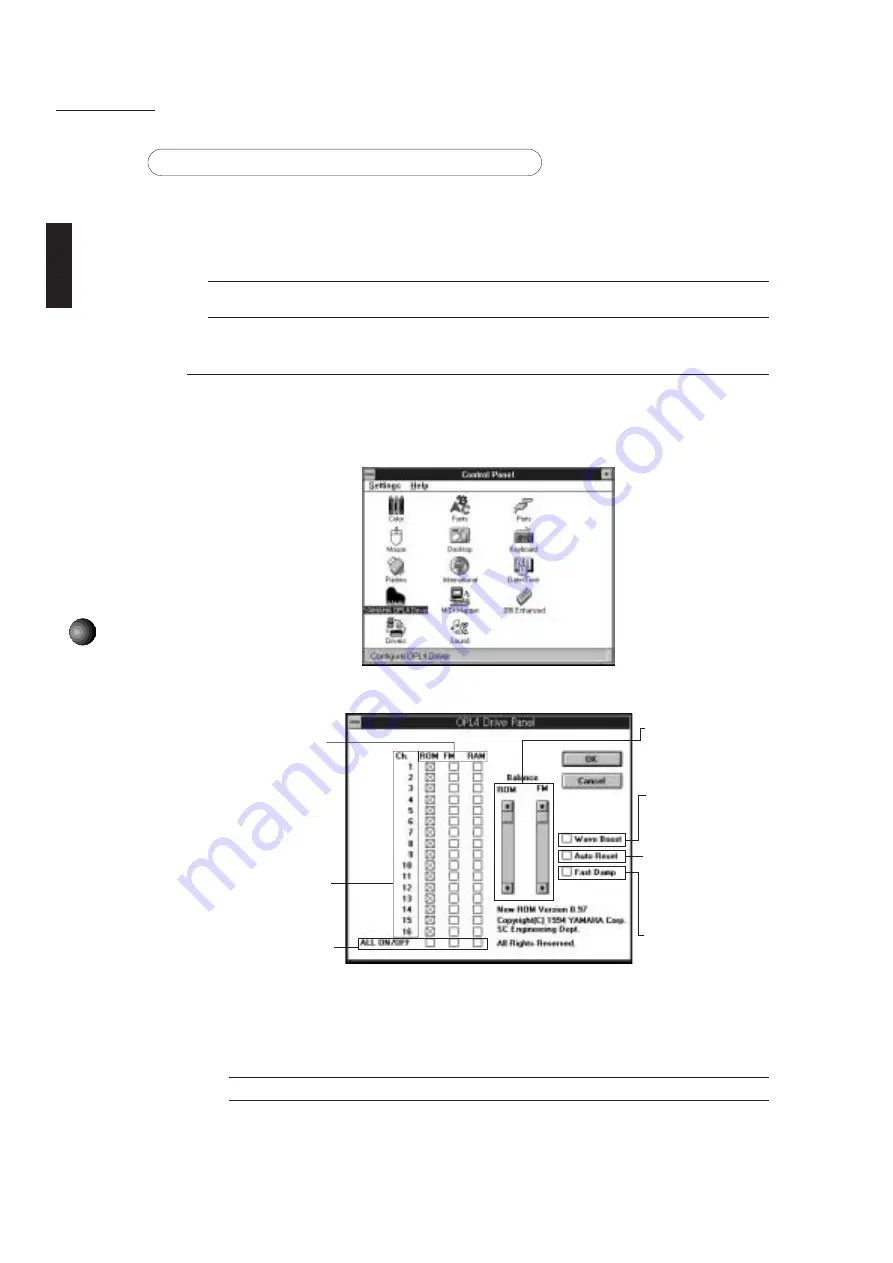
Setting Up the YAMAHA OPL4 Driver

This driver lets you assign instrument voices from the ROM (AWM wave table), FM tone
generator or RAM (sampled sounds) to each of the 16 MIDI channels.

1.

Double click the [Control Panel] icon in the Main group. The following window appears.

2.

Double click the [YAMAHA OPL4 Driver] icon. The OPL4 Drive Panel dialog box appears.

bar up and down to change
the volume balance between
the PCM (ROM/RAM) and
FM sounds.

Wave Boost: 

Click this box

to automatically boost the
melody part by 8dB and the
rhythm part by 10dB.

Auto Reset: 

Click this box to

reset MIDI data
transmission/reception every
time software playback stops
or pauses.

Fast Damp: 

Click this box to

cut off the last portion of
notes in order to prevent
notes from interfering with
proper note on of
subsequent notes. Note on/
off data transmission and
reception may sometimes be
disrupted when using a
computer with a slow CPU.

Type of Tone Generation
ROM: 

GM compatible AWM

wave table.

FM: 

128 musical instrument

voices using high quality 2-
operator FM tone
generation.

RAM: 

WAV files which can

be played on a musical
scale. (See SampleEdit on
pages 47 and 57.)

Ch.: 

Check the appropriate

box beside each MIDI
channel number to select
the type of tone generation
you want.

ALL ON/OFF: 

Click one of

these once to select an
entire column of the desired
type of tone generation.

Balance: 

Move the scroll

£

In the default setting all MIDI channels are assigned to “ROM” (the AWM wave table).

3.

After choosing your settings, click [OK]. Click [Cancel] to cancel the settings.

Содержание Sound Edge

Страница 1: ......

Страница 2: ...ons For information about use of the Voyetra applications please refer to the Voyetra User s Guide To ensure proper installation and use of the hardware and software and in order to obtain many hours of fun and exciting multimedia entertainment from the Yamaha Sound Edge please read this owner s manual carefully and be sure to keep it in a safe place for future reference SYMBOLS USED IN THIS MANUA...

Страница 3: ... PC AT is a trademark of IBM Corporation The company names and product names in this Owner s Manual are the trademarks or registered trademarks of their respective companies PRECAUTIONS Do not expose the sound card to direct sunlight excessive humidity high temperatures excessive dust or strong vibrations Before touching the sound card be sure to touch a metal surface to discharge any static elect...

Страница 4: ...IO Permits high quality stereo sampling at maximum 16 bit 48kHz Lets you input sound with a microphone by direct line input or from a CD Can play WAV files digital audio files using the sequencer program MIDI Orchestrator Plus KARAOKE EFFECTS On board DSP chip effect processor lets you control the effects change the pitch of a song or reduce the volume of the main vocal from a song playing on a CD...

Страница 5: ...s and Functions 19 Operation 20 VoiceMorph 21 Startup Procedure 21 Names and Functions 21 Operation 22 EffectEdit 23 Startup Procedure 24 Names and Functions 24 Controller and Mixer Setup 28 Operation 34 SampleEdit 38 Startup Procedure 40 Names and Functions 40 Operation 51 DOS Applications 63 KPCON 63 KPLOAD 65 Appendix 66 Configuration Setup 66 M16INIT 66 CD ROM Installation 70 Troubleshooting 7...

Страница 6: ... Guide User registration card MINIMUM SYSTEM REQUIREMENTS Proper use of the Yamaha Sound Edge requires at minimum the following COMPUTER HARDWARE Memory Requires an 80486 25MHz or higher internal CPU with a minimum of 8MB RAM Hard Disk Proper software installation and running the Sound Edge requires at least 10MB of free space on your hard disk Floppy Disk Drive To install the Sound Edge applicati...

Страница 7: ...IDI JOYSTICK connector for use with specified applications Supports an IBM PC AT series Dsub 15 pin connector POWER SPEAKERS You can enjoy powerful and dynamic stereo sound by connecting power speakers and other stereo audio components to the OUTPUT jack MIDI ADAPTOR CABLE The MIDI JOYSTICK connector allows connection with external MIDI devices for MIDI data transmission and reception as well as a...

Страница 8: ...the power of each device simply reverse the process Improper connection of microphone and other external devices may cause ear injury or damage to hardware There are various types of audio in and out jacks so make sure to select the proper cables and adaptors according to your respective devices For information about jacks see page 5 OUTPUT MIDI JOYSTICK Dsub 15 pin MIC LINE IN Joystick Yamaha MID...

Страница 9: ...CD ROM connector Allows connection to a CD ROM player CN5 Panasonic 40 pin CN1 Mitsumi 40 pin CN2 Sony 34 pin For connection and installation of a CD ROM drive see page 71 For CD ROM drives other than Sony Mitsumi or Panasonic please use the proper interface for connecting to your computer For details see the owner s manual which came with your CD ROM player When you use a joystick or CD ROM drive...

Страница 10: ...t channel signal is always output to the computer s internal speaker Normally you should leave this as the default to output the right channel signal to the sound card s OUTPUT jack 1 1 2Short Outputstherightchanneltothesoundcard sOUTPUTjack 2 1 2Open Outputstherightchannelonlytothecomputer sinternalspeaker If you wish to use only the computer s internal speaker select 2 as shown above and connect...

Страница 11: ...r sound card while the computer is plugged in This can cause irreparable damage to the sound card and may pose a serious shock hazard 2 Remove the top cover of the computer The proper method for removing the top cover varies depending on the type of computer you use so please see your computer s owner s manual for the proper procedure Wear gloves to avoid cuts by any sharp edges on the cover 3 To ...

Страница 12: ...ith or damage to the circuitry 5 Hold the sound card with two hands as shown and slowly and steadily insert it into the expansion slot making sure to properly line up the connectors in the card with those in the slot To prevent breaking or damaging the sound card during installation do not use excessive force when inserting the sound card into the expansion slot 6 Use the screw from step 3 above t...

Страница 13: ...I Mapper will be overwritten The installation program also overwrites the AUTOEXEC BAT SYSTEM INI CONTROL INI and CONFIG SYS files If you don t want to lose any existing data please save them before you install the Sound Edge application software Installation Procedure Installing for DOS 1 Insert Install Disk 1 into your floppy disk drive 2 Select the floppy disk drive where the Install Disk 1 is ...

Страница 14: ...C drive If you want to use a different drive type in the name of the different drive If you intend to use SampleEdit see page 61 leave the drive name and directory name as their defaults drive C yamaha directory 5 Verify the drive name and press the ENTER key The Installer screen is replaced by the Directory Name screen Type the name of the directory into which you want to install the software or ...

Страница 15: ...ressing N will return you to the beginning of the installation procedure Pressing Y will start copying the files for installation After a few moments a screen appears asking if you wish to change AUTOEXEC BAT file 8 Press Y on your keyboard The original AUTOEXEC BAT file will be saved under a different name and the following screen appears 9 Press any key on your keyboard to continue The following...

Страница 16: ...ssed Y in step 10 above the screen will be replaced by the window shown below This is where you begin the software installation for Windows If the Windows installation does not begin you will need to set up the proper M16INIT configuration according to your computer s specification See page 66 for details 11 Click OK To stop the installation process click Cancel The following window appears and in...

Страница 17: ...8 t2dpt 256 t2mic 512 call C yamaha ymhini bat C yamaha rem CONTROL INI The Sound Edge software program will automatically add the following lines to the CONTROL INI file drivers desc m16midi drv Opti External MIDI Driver mad16c drv YAMAHA Audio Device Driver opldld drv YAMAHA OPL4 Driver Userinstallable drivers midi1 m16midi drv wave mad16c drv midi2 opldld drv mixer mad16c drv m16midi drv Interr...

Страница 18: ...o change the volume balance between the PCM ROM RAM and FM sounds Wave Boost Click this box to automatically boost the melody part by 8dB and the rhythm part by 10dB Auto Reset Click this box to reset MIDI data transmission reception every time software playback stops or pauses Fast Damp Click this box to cut off the last portion of notes in order to prevent notes from interfering with proper note...

Страница 19: ... the button in the dialog box A list appears 3 Select the proper map according to your setup Select YAMAHA OPL4 to play the internal tone generator OPL4 Select YAMAHA Ex MIDI to play an external MIDI tone generator The internal tone generator OPL4 is selected as the default setting When you install the Yamaha Sound Edge application software the MIDI Mapper will be overwritten If you don t want to ...

Страница 20: ...OSMIDIinterface Thedefaultis330 Also select General MIDI from the sound setup window of the DOS game See page 67 for more information on the MIDI Port and IRQ Depending on the external devices you use the games may not run because of a conflict caused by the MIDI Port and IRQ settings If this happens you must change the MIDI Port address and IRQ number to the currently available address and number...

Страница 21: ...us effects to the input signal and synthesizer sounds and acts as a mixer Hello For use with DOS DSP t x dpt y KPCON Let s you control the effects through DOS commands KPLOAD Let s you add various effects through DOS commands DSP SOUND EDGE APPLICATION SOFTWARE Sound Edge application programs can be used with Windows or DOS Running the Sound Edge with Windows allows you to take full advantage of t...

Страница 22: ... you accidentally activate another Sound Edge application at the same time the following warning dialog box appears The Mixer of the Voyetra AudioStation will also perform the same way using the single DSP so you will not be able to start it for the same reason Regarding use of the Voyetra applications see the Voyetra User s Guide for details If you pull the Volume faders down on the Mixer module ...

Страница 23: ...ncrease or decrease the pitch of sound by a semitone 100 cents which will be displayed on the LED Original sound pitch is represented by center position 0 each click will move the LED display 100 cents at a time to a maximum and minimum of 400 cents 9 SLIDERS The function of each slider is represented by an icon located to the left of it Moving the slider toward the right will increase the value o...

Страница 24: ... Room reverbs to unique Alien Voice Devil and others These provide an interesting extra dimension to karaoke sing along or for game sounds These are placed in the YAMAHA DATA directory extension KPE and you can create your own new files using EffectEdit to edit them See page 23 3 To adjust volume balance and level or range of an effect move the sliders right or left Try listening to the input sign...

Страница 25: ... playing back a MIDI song file with the sequencer program Startup Procedure Double click on the VoiceMorph icon and the VoiceMorph application will start Names and Functions 1 Menu Bar Pull Down Menus Source Lets you select the sound source Mic Lets you select microphone input This is the default setting Line In Synth Lets you select the input source either Line In CD or other external sound sourc...

Страница 26: ...vel and LFO Settings You can adjust the output gain level or LFO settings for various effects 1 Select Gain LFO Setup from the Control menu The Control Panel window appears Output Gain Lets you adjust the output gain level by moving the slider to the left Min and right Max LFO Low Frequency Oscillator Lets you control the depth and speed of the LFO The LFO changes sound pitch tone or volume in a c...

Страница 27: ...s Reflection Reflection DSP RIGHT Surround Effect Delay Effect Delay Effect LEFT Original Sound Indicates reflection of sounds The DSP digital effect processor processes sound signals electronically to change the pitch or create artificial ambience or simulated rooms and other sound environments A high quality delay unit is at the heart of the DSP which simulates ambience by delaying the original ...

Страница 28: ...he existing version the file extension is KPE Input Caption When you first save a newly edited file the Input Caption dialog box will appear before the Save As dialog box appears The name you type in here will become the title of your EffectGear file file extension MBJ and will also appear on the title bar of EffectEdit Save As Name file and save Lets you name and save an edited block diagram file...

Страница 29: ... Control and Surround 1 and 2 Key Control s DSP memory allocation and Type1 s DSP memory layout allocation are fixed When you select Memory the Memory Layout setup dialog box appears Move the Balance slider right or left to adjust the memory allocation Assign more memory to Surround to achieve a deeper longer delay About Displays information about this version of EffectEdit ...

Страница 30: ...pecific block diagram The number and kind of controller varies depending on which type you choose Click and open each controller setup dialog box to configure the input signal as you like Four Types of Effect Programs Type0 Sound enters via the Audio MIDI input goes through Voice Cancel then through independent L left R right Key Control pitch shifters then through the Surround delay Voice Cancel ...

Страница 31: ... special sound effects like those in VoiceMorph as well as chorus effects Type2 The Audio MIDI input goes through Voice Cancel then through two independent Surround delays Since Type2 does not include Key Control you can apply more precise Surround effects than with Type0 and Type1 Type3 All available memory in the DSP is assigned to the two Surround delay effects in order to produce higher qualit...

Страница 32: ...sing along using a microphone MIC ECHO To apply an echo effect to the MIC IN or LINE IN mono signal such as to your own voice KEY CONTROL To shift the pitch or transpose the key of the input signal Key Control also lets you apply a delay effect Type1 only You can adjust the key to match your voice range and create harmonies harmonizer effect by using two independent Key Controls one set to a highe...

Страница 33: ...as that in Windows Double click the Control Menu box to close the Input Mixer setup dialog box when you are finished making settings Every Control Menu box acts the same way as in the controller setup dialog boxes described above therefore such explanations will be eliminated hereinafter About the Types of Input Channels You should select the appropriate input channel according to your needs Be su...

Страница 34: ...s two mixers which remix the sound from the two Key Controls located in the center of the block diagram Voice Cancel You can set Voice Cancel to either cancel the vocal part or pass the signal through unaffected Type3 does not have the Voice Cancel function Click the Voice Cancel box to display the Voice Cancel setup dialog box 1 T h r u Passes the original input signal without applying Voice Canc...

Страница 35: ...etermine the point of frequency cutoff in hertz Hz Click a z to modify the value 100 Hz at a time with each click or highlight the fc box and type in a new value 1 2 type Click the type button to select the type of filter you want Thru Passes the original sound through the IIR Filter unaltered H P F High Pass Filter Lets the high frequencies pass and cuts off the low frequencies as shown below Fre...

Страница 36: ...You can use the Key Control filter to modify the input signal frequency characteristics or transpose the input signal as well as apply delay or adjust the delayed sound and transposed sound with Type1 Click on the Key Control box and the Key Control setup dialog box appears The L R channel setups will be displayed on the same dialog box 1 IIR Filter Type0 See Mic Echo above for information about t...

Страница 37: ...ultaneous echo effect You can set the time volume and number of delays See Mic Echo above for information about the Delay Design Box Reverse from the Surround box indicates signal sound loop Output which feeds back into input indicates signal sound loop for each setup window Surround 2 in Type2 and Type3 has an input channel exclusive to the signal sound loop as well as other inputs The number of ...

Страница 38: ...t a microphone to the MIC jack of the Sound Edge sound card 1 Select New from the File menu on the menu bar The Type Select dialog box appears Select Type1 then click OK The Type1 block diagram will apply Key Control to the microphone input sound 1 Transpose To make the voices one octave higher and one octave lower from the original voice you ll need to modify the Pitch pitch of the input voice us...

Страница 39: ...lick the Key Control box The Key Control setup dialog box appears 6 On the right side of the Key Control setup dialog box click and drag the output level fader for both upper and lower KeyShift to maximum 7 Modify the pitch one octave higher in the upper 1 Key Shift by clicking to 1200 Listen to your voice to verify the value while modifying the pitch 8 Modify the pitch one octave lower in the low...

Страница 40: ...s 11 On the left side of the setup dialog box increase the input level by clicking and dragging both L R level faders to maximum positions 12 Drag the red point on the left side of the upper R Delay Design box to the position on the right as shown in the above illustration The red colored graph indicates feedback delay time and volume Time location unit ms millisecond will be displayed on the uppe...

Страница 41: ...ile with EffectGear select Make MBJ file from the File menu and the Save As dialog box appears 18 Make sure the YAMAHA DATA directory is selected then save the file using MBJ as the file extension Save MBJ files in the YAMAHA DATA directory If a MBJ file is in another directory you cannot use it with EffectGear EffectEdit has powerful sound sculpting capabilities The graphic DSP editing features l...

Страница 42: ... MIDI Orchestrator Plus that are included with Sound Edge as tone generators for sequencers such as the MIDI Orchestrator Plus in the same way as the Sound Edge synthesizer AWM FM The following diagram shows the organization of SampleEdit Read the wave file Waveform editing window Parameters dialog box Mapping window MIDI soft keyboard audition feature MIDI Orchestrator Plus For a list of the OPL ...

Страница 43: ...rs dialog box to set various parameters of the wave data For example you can change the instrument voice by setting the envelope parameters or you can add vibrato or tremolo effects by setting the effect parameters Also SampleEdit provides parameters to control tuning and volume so that you can finely tailor the wave data as an instrument sound Mapping Window In the Mapping window you can assign e...

Страница 44: ...plays various statuses of wave data Toolbar 1 New OMP file button Creates a new OMP file To open a new Mapping window click this button 2 File Open button Opens a dialog box that is used to select the file to be read You can select the WAV OPL and OMP file types 3 Save button Saves by overwriting the currently active file If the file has not been previously saved the Save As dialog box appears 4 U...

Страница 45: ...fore the zoom in 14 Unzoom button Displays the entire waveform 15 Stop button Stops playback of the active wave data 16 Start button Plays back the active wave data 17 OPL4 Driver button Opens the OPL4 Drive Panel window For details on the OPL4 Drive Panel see pages 14 and 42 Most of the features in the toolbar can also be executed by clicking the relevant menu in the menu bar and then clicking th...

Страница 46: ...evels between ROM and FM 3 After finishing the settings click OK to apply the settings or click Cancel to cancel the settings 1 Ch Lets you choose the tone generator that you wish to use for each MIDI channel 2 Type of tone generator 2 1 ROM AWM Wave table for standard GM 2 2 FM 2 operator FM tone generator with 128 instrument voices 2 3 RAM Uses wave tables read by SampleEdit as tone generators 3...

Страница 47: ...een previously saved the Save As dialog box appears Save As Displays the Save As dialog box in which you can name and save the file In the Save As dialog box you can save an existing file under another name File List 1 2 3 4 Displays the names of the files that were most recently opened Up to 4 filenames can be displayed You can open one of these files without using the Open dialog box by clicking...

Страница 48: ...isplayed by clicking on the button in the toolbar MIDI Menu Instrument Patch Selects the program change number Patch number When you choose Instrument from the MIDI menu the various types of voices are displayed along with the names of the instrument voices within each category You can select any of the displayed instrument voices You can use the active MIDI soft keyboard or the Start button to au...

Страница 49: ...you raise or lower the scale of the entire keyboard which enables you to change the range of sound produced by the MIDI soft keyboard You can raise or lower by a maximum of three octaves in full octave units For example selecting 1 raises the scale by one octave selecting 1 lowers the scale by one octave The default value is the normal scale without any octave change 3 Velocity Sets the velocity t...

Страница 50: ...e selected area to the clipboard and deletes the selected area from the window The waveform area to the right of the selected area moves to the left when the selected area is deleted Copy Copies the selected area to the clipboard but does not affect the selected area in the window Paste Pastes the contents of the clipboard into the specified position The waveform area following the specified posit...

Страница 51: ...ersed so that the sound plays backwards Inverse Inverts the selected area The top and bottom of the selected waveform area are inverted Normalize Normalizes the selected area by maximizing the peak value as a result the rest will be scaled automatically by the same factor This allows non distorted correction of data that was recorded at an extremely low level One Play Adds silent data to the end o...

Страница 52: ...arameters menu is available only when the waveform editing window is active Click the Parameters menu to display the Parameters dialog box In the Parameters dialog box you can choose the settings for each parameter of the currently active wave data Envelope These parameters let you shape the sound of each voice i e set how the level of the sound changes over time You can use these parameter settin...

Страница 53: ...time The initial value is 0 5 Release Rate Sets the time it takes the sound to sustain after a key is released The higher the value the faster the sound cuts off The initial value is 15 Common Parameters common to the entire waveform 6 Sample Note Assigns the original pitch of the wave data to a note number Valid values are from 0 to 127 The initial value is 60 7 Fine Tune Permits precise tuning V...

Страница 54: ... value is 0 14 OK To apply any parameter setting changes click the OK button 15 Cancel To cancel any parameter setting changes click the Cancel button Window Menu Cascade Displays the windows organized as a series of overlapping windows Tile Displays the windows organized as a series of side by side top and bottom windows Arrange Icons Displays the iconized windows organized as in rows Help Menu C...

Страница 55: ......

Страница 56: ... window For details on OPL files see page 60 SampleEdit is compatible with the following wave data 8 or 16 bit 11 015 22 050 or 44 1 kHz sampling monaural If the wave file that was read is a stereo sample only the left channel data is read and displayed Reading Procedure 1 Choose Open from the File menu The File Selection dialog box appears 2 Select the desired wave file Click OK When a WAV file o...

Страница 57: ...ed 1 Move the cursor to a point on the waveform Press the mouse button at the start point of the area that you want to edit 2 Drag to the right and release the mouse button at the end point of the area that you want to edit The selected area is displayed in reverse video highlighted The Region box in the status bar displays the sampling number from the beginning for both the start point and end po...

Страница 58: ...right to accommodate the new data You can also paste the clipboard data to another currently activated wave file In this case the data in the source file such as bit length and sampling frequency will be replaced by the one in the destination file If you make a mistake while editing you can undo the mistake To undo the most recent editing operation choose Undo from the Edit menu Editing Effects Yo...

Страница 59: ...he entire waveform choose Unzoom from the Zoom menu Waveform Audition Click the Start button in the toolbar to play the wave data to be edited Click the Stop button to stop playing the wave data Concerning the MIDI channel velocity transpose and program change number items set in the MIDI menu take effect For details on the MIDI menu see page 44 By clicking on the MIDI soft keyboard you can auditi...

Страница 60: ...he Loop box in the status bar displays the sampling number from the beginning of the waveform The loop start point must be set at one or more samplings from the beginning of the waveform The size of the loop from the loop start point to the end point of the waveform must be 1992 samplings or more The initial value of the loop start point is set at 1 sampling Setting Parameters for the Internal Ton...

Страница 61: ...d When you click on the MIDI soft keyboard while it is active the note name of the corresponding pitch is displayed in the Note box in the status bar The items set in the MIDI menu for the MIDI channels velocity transpose and program change numbers take effect You can choose the tone generator RAM AWM or FM that is to produce the sound or change the volume balance between RAM AWM and FM in the OPL...

Страница 62: ...rwrite the file on the hard disk Click YES to overwrite the original file and replace it with the new file Click NO if you do not want to overwrite the original file Operations in the Mapping Window You can create a OMP file by assigning the OPL files to each program change number in the Mapping window This enables the edited wave data to be downloaded to RAM and used as a tone generator for music...

Страница 63: ...d OPL filename and directories When no OPL file is assigned None is displayed 3 Audition While clicking and holding down this button plays the currently assigned OPL file Produces sound in pitch C3 in accordance with the settings of with Parameters in the MIDI menu 4 Size Displays the size in Bytes of the currently assigned OPL file The maximum size of a file that can be downloaded is 64KB for one...

Страница 64: ...lected OPL file is assigned and the full pathname filename and directories is displayed To delete an already selected file from the dialog box click the No select button 3 Repeat the above steps 1 and 2 to assign all the necessary OPL files to desired patch numbers Downloading After assigning the OPL files to patch numbers click the Download button in the Mapping window The data is downloaded to R...

Страница 65: ... sound of a drum laughing opl Sound of a man laughing mcin_gun opl Sound of a machine gun firing mello opl Sounds constructed from a diminished arpeggio oildr opl Sounds like the bottom of an oil drum being beaten orexk opl Metallic sound of a snare drum File Name Contents p_scrape opl Sound of a distorted guitar scratch noise punch opl Sound of a punch r2d2 opl Sounds like a robot talking rezzo o...

Страница 66: ...tenoughRAMmemoryisavailable during an attempt to do one of the following Play wavedatawiththeMIDIsoftkeyboardorPlaybutton assign a OPL file in the Mapping window click the Download button Out of memory Displayed when not enough memory could be reservedduringanattempttodooneofthefollowing openafile execute Cut Undo or Paste fromthe Edit menu play wave data with the MIDI soft keyboard or Play button...

Страница 67: ...DSP from DOS The symbol _ indicates a space in a command KPCON KPCON lets you control the DSP from the DOS command line KPCON s function is similar to EffectEdit in Windows Startup Procedure Start KPCON in the YAMAHA directory KEY OPERATION CD_ YAMAHA ENTER KPCON ENTER A list of commands will appear on screen ...

Страница 68: ...input volume t x d i l y Left channel digital input volume t x a i r y Right channel analog input volume t x a i l y Left channel analog input volume t x m i c y Microphone input volume t x a o r y Right channel analog output volume t x a o l y Left channel analog output volume Parameters include x as the effect program type values are 0 3 and y as the volume value values are 4095 4095 COMMAND CON...

Страница 69: ...up Procedure Access the KP directory by typing the following command on the DOS command line KEY OPERATION CD_ YAMAHA Operation Type in the following command on the DOS command line KEY OPERATION KPLOAD_DATA ______ MBJ long underline indicates the MBJ file name You can check the effect type by moving to the DATA directory then using the DIR command KEY OPERATION CD_ YAMAHA DATA ENTER DIR_ W ENTER ...

Страница 70: ...adjust your computer s configuration using the Opti M16INIT program This will allow you to set the configuration of the Digital Sound Controller Opti 82C928 built into the Sound Edge s sound card M16INIT Startup Procedure Move to the MAD16 directory then start M16INIT KEY OPERATION CD_ YAMAHA MAD16 ENTER M16INIT ENTER The following screen appears KEY OPERATION Use the keys to select a menu ...

Страница 71: ...r LINE input MIC Port The I O Input Output port facilitates transmission and reception of computer data between the CPU and external devices The CPU determines the setup address of the sound card using this port You cannot select an address for a device if you have already assigned that address to other devices IRQ The IRQ Interrupt Request number allows external devices to transmit or receive dat...

Страница 72: ...dently for each input source Use the keys to select a channel and the keys to set the volume then press ENTER to execute Press the ESC key to exit from the VOLUME SETTINGS dialog box VOLUME SETTINGS MASTER Sets the left and right overall output volume levels independently VOICE Sets the WAV file left and right output volume levels independently MUSIC Sets the MIDI file synthesizer left and right o...

Страница 73: ...figuration screen and configure the setup once again Quit Test To exit M16INIT KEY OPERATION Select Quit Test then press ENTER to exit M16INIT Initialization In case the Sound Edge does not execute or produce sound properly you may want to initialize the Opti 82C928 On the DOS command line execute the command M16INIT B to initialize Opti 82C928 The screen below will appear KEY OPERATION CD_ YAMAHA...

Страница 74: ...CRMC FX001 001D CD ROM Connection Connect your CD ROM drive to the Sound Edge SW20 as shown below CD ROM connector To connect the CD ROM CD IN connector To connect the audio from the CD ROM Please note that the CD ROM connector and the CD IN connector port varies depending upon the type of CD ROM player you use so take care that your CD ROM is connected properly PANASONIC CD IN connector MITSUMI C...

Страница 75: ...CD ROM makers Select the maker and press Enter The appropriate CD ROM setup window appears 5 Use the key to move among items to select the setup you desire Press the Enter key to execute the setup then click OK to complete the setup In general you should leave the default settings of the CD ROM setup window as they are However if you have a conflict problem with another card such as a video card i...

Страница 76: ...k if EffectGear s Volume slider is set to minimum thus preventing sound output Game does not respond If the DOS program is running properly but the game does not respond there may be a conventional memory problem DOS can only manage memory up to a maximum of 640KB Remove any unnecessary drivers not used by CONFIG SYS or activate the game disk by creating a Startup disk for the game Remember to add...

Страница 77: ...rings 2 53 Choir Aahs 54 Voice Oohs 55 Synth Voice 56 Orchestra Hit Brass 57 Trumpet 58 Trombone 59 Tuba 60 Muted Trumpet 61 French Horn 62 Brass Section 63 Synth Brass 1 64 Synth Brass 2 Category No Patch Name Reed 65 Soprano Sax 66 Alto Sax 67 Tenor Sax 68 Baritone Sax 69 Oboe 70 English Horn 71 Bassoon 72 Clarinet Pipe 73 Piccolo 74 Flute 75 Recorder 76 Pan Flute 77 Blown Bottle 78 Shakuhachi 7...

Страница 78: ...log Tom 4 Jazz Tom 4 Brush Tom 4 Jazz Tom 4 48 C 2 C4 Mid Tom H Room Tom 5 Power Tom 5 E Tom 5 Analog Tom 5 Jazz Tom 5 Brush Tom 5 Jazz Tom 5 49 C 2 C 4 Crash Cymbal 1 Hand Cym Open L 50 D 2 D4 High Tom Room Tom 6 Power Tom 6 E Tom 6 Analog Tom 6 Jazz Tom 6 Brush Tom 6 Jazz Tom 6 51 D 2 D 4 Ride Cymbal 1 Hand Cym Closed L 52 E 2 E4 Chinese Cymbal 53 F 2 F4 Ride Cymbal Cup 54 F 2 F 4 Tambourine 55 ...

Страница 79: ...urce MIC LINE CD AUDIO Effects Yamaha DSP YSS205 F Mic Echo Surround Voice Cancel Key Control Pitch Change Terminals OUTPUT jack Stereo mini jack Nominal Output 760mV r m s Maximum Output 3 5V r m s 4Ω 10 THD LINE IN jack Stereo mini jack Nominal Input 200mV r m s MIC IN jack Mono mini jack Nominal Input 150mV r m s MIDI JOYSTICK connector Dsub 15pin CD ROM connector Recommended CD ROM drives Pana...

Страница 80: ...ult Changed Note ON Note OFF Key s Ch s 1 7 6 38 10 11 64 100 101 120 True voice 1 16 1 16 9nH v 1 127 Mode 3 0 127 0 127 0 24 semi Modulation Volume Data Entry Panpot Expression Sustain RPN LSB MSB All Sound Off 12 bit resolution Date 18 JAN 1995 Version 1 00 MIDI Implementation Chart Default Messages Altered MIDI Implementation Chart ...

Страница 81: ...00 101 120 121 Clock Commands Local ON OFF All Notes Off Active Sense Reset Song Pos Song Sel Tune Mode 1 OMNI ON POLY Mode 3 OMNI OFF POLY 0 127 123 127 Expression Sustain RPN LSB MSB All Sound Off Reset All Controls Program number 1 128 YES NO True Mode 2 OMNI ON MONO Mode 4 OMNI OFF MONO ...

Страница 82: ...NING BnH 64H 01H 65H 00H 06H mmH 26H llH mm ll 00H 00H 40H 00H 7FH 7FH 100cents 100cents COARSE TUNING BnH 64H 01H 65H 00H 06H mmH mm 28H 00H 58H 24 0 24 Semitones NULL BnH 64H 7FH 65H 7FH PROGRAM CHANGE GM VOICE 0 127 VOICE1 VOICE128 DRUM SET CAH xxH xx 0 Standard xx 8 Room xx 10 Power xx 18 Electronic xx 19 Analog xx 20 Jazz xx 28 Brush xx 30 Orchestra Other Ignore Default Standard Set SYSTEM EX...

Страница 83: ...79 Appendix MEMO ...

Страница 84: ...cho 23 Edit Menu 46 Effect Menu 47 Effect Programs 26 Effect s 19 20 49 54 56 EffectEdit 23 EffectGear 18 Envelope 48 56 Error Messages 62 Exit 24 43 Expansion slot 7 8 F Fast Damp 14 fc frequency cutoff 31 File List 1 2 3 4 43 File Menu 24 43 File Open button 40 Fine Tune 49 FM tone generator 14 42 Free RAM 59 G Gain LFO Setup 22 Game Port 67 GM 45 GM VOICE MAP 73 H H P F High Pass Filter 31 Help...

Страница 85: ... RESTART 71 Reverse 47 Reverse button 41 RIGHT CHANNEL OUTPUT 6 ROM AWM wave table 14 S SampleEdit 38 Sample Files 39 61 Sample File List 37 61 Sample Frequency 49 Sample Note 49 Save 24 43 68 Save As 24 43 Save button 40 Saving the Effect Program 37 Scrollbar 59 Search for Help on 50 Select All 46 Setting Output Level and LFO Settings 22 Setting Up the YAMAHA OPL4 Driver 14 SETUP 5 Sign 29 Sign L...

Страница 86: ...u retain no copies and the recipient agrees to the terms of the licensing agreement 3 TERMINATION The licensing condition of the software program becomes effective on the day that you receive the SOFTWARE If any one of the copyright laws or clauses of the licensing conditions is violated the licensing agreement shall be terminated automatically without notice from Yamaha In this case you must dest...

Страница 87: ...and MEDIA TECHNOLOGY DIVISION TEL 1908366700 FAX 1908368872 Ifyouencounterproblemswiththisproductthatcannotbesolved by referring to this manual please contact the MEDIA TECHNOLOGY DIVISION ofYamaha KembleMusic U K Ltd Sound general E05 PM 01 1 29 11 45 AM Page 2 PageMaker 5 0J ...

Отзывы: