


Copyright © 2019 Xflight Technologies LLC, Florida, USA
36
P.
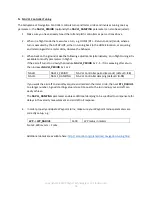
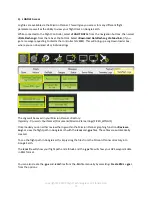
NAV Mode
1.
Power up the AUTOPILOT (Leave the SERVO circuit powered down).
2.
Select
AP ON
. This will enable the Servo PWM signals and start flight logging.
3.
Wait a second or two, then select
NAV ON
to enter NAV mode. The Button should show
NAV
WAIT.
The AUTOPILOT is now waiting for a mission to be uploaded and initiated from the
QGroundControl app
4.
Once the mission has been uploaded, and initiated from the app, the button will show
NAV ON
,
indicating that the AUTOPILOT is now following the mission in AUTO flight mode and will
navigate to the first waypoint.
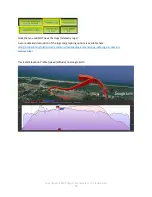
Note that since the AUTOPILOT does not have control of the throttle, if you have defined
waypoints at different altitudes, you will need to manually control power as appropriate to
assist the AUTOPILOT in making altitude changes.
•
For an overview of the NAV function see:
https://www.youtube.com/watch?v=ZSrYHrVK_7s&t=2s
5.
If modifying a mission in flight, it is recommended to drop out of NAV mode, back to manual
mode, before re-uploading, and initializing the modified mission, otherwise QGroundControl
may enter you into a loiter circle while the mission is being modified.