Service Parts Disassembly
8-43
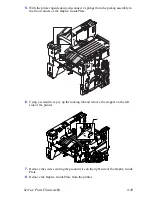
3.
Remove 9 screws and slightly lift the Duplex Assembly from its mounting
location.
Note
The screw that secures the ground wire to the back edge of the assembly is
the short machine screw.
Caution
Do not attempt to remove the Power Supply Board Assembly from the
printer until you first disconnect all 5 connectors.
-
Содержание Phaser 3425
Страница 1: ...Service Manual P h a s e r L a s e r P r i n t e r 3425 ...
Страница 2: ......
Страница 14: ...xii Phaser 3425 Laser Printer ...
Страница 20: ...xviii Phaser 3425 Laser Printer ...
Страница 29: ...General Information 1 9 Consumables 1 Print Cartridge 1 ...
Страница 48: ...2 14 Phaser 3425 Laser Printer Service Manual ...
Страница 93: ...6 Chapter Adjustments and Calibrations In this chapter Margin Calibration Resetting NVRAM ...
Страница 98: ...7 4 Phaser 3425 Laser Printer Service Manual ...
Страница 144: ...8 46 Phaser 3425 Laser Printer Service Manual ...
Страница 145: ...9 Chapter Parts Lists In this chapter Using the Parts List Print Engine Parts Xerox Supplies ...
Страница 175: ...10 6 Phaser 3425 Laser Printer Service Manual ...
Страница 179: ......
Страница 180: ......


