CS200
Control Systems
46
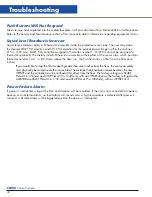
Troubleshooting
• Press FILL button to re-open fill solenoid valve.
• Continue to lower the sensor until the STOP FILL thermistor is immersed in the LN
2
. The fill should
stop after a slight delay.
• Simulate an over fill by lowering the HIGH LEVEL Alarm thermistor into the LN
2
. HIGH LEVEL
alarm should sound within 10 seconds.
• Re-install sensor assembly and thermocouple into sensor tube as before. Open supply valve on
LN
2
supply.
Indicates Low LN
2
Supply
When the START FILL thermistor is uncovered, the controller opens the Fill solenoid valve. If the STOP FILL
thermistor is not covered with LN
2
in the pre-determined amount of time, the controller is programmed to
interpret this as a LN
2
supply shortage.
1. Check contents gauge and pressure gauge of supply cylinder. Both liquid contents and pressure
(15 to 22 psi - 0.7 bar/69 kPa to 1.4 bar/138 kPa) are required to complete a fill.
2. Confirm that no other transfer hose or apparatus is attached to the supply cylinder. Either could
compromise adequate tank pressure required to complete a standard fill in 30 minutes.
• Check the distance that the LN
2
must travel to reach the freezer. Observe the time it takes for
Liquid LN
2
to reach the Freezer through the usual piping conditions (Pipe-Temperature at start
fill). Liquid should be entering the chamber within 4 minutes under normal (usual) line
temperature conditions.
3. Confirm that the solenoid valve is open when a fill is called for.
• If no flow is detected, the solenoid valve is not getting the signal to open, or it is opening and
there is a blockage in the line. Check the connections on the leads near the solenoid itself, as
well as the connection at the controller.
• Confirm that the wires have not been pinched, creating a short circuit.
4. If a longer fill time is desired, change the setting by selecting: MENU, CHANGE SETTINGS, SYSTEM,
SYSTEM ALARMS, LN2 SUPPLY ALARM DELAYS.
Indicates Open Sensor
1. Normally, this message is associated with a loose plug or connector. Check all connections.
2. To determine this select: MENU, LEVEL SENSING, TEST LEVEL SENSORS. An “L”, “G”, or “O” (open) will
indicate individual thermistor status.
3. Thermistor assembly is not repairable. Replacement assembly is required.
Temperature Reading 10° to 20° Warm
• Prepare an ice water slurry with crushed ice and tap water. Dip or pour LN
2
into a styrofoam cup to
prepare an LN
2
bath. Calibrate the controller. Select MENU, TEMPERATURE, CALIBRATE TEMPERATURE.
Follow the on-screen instructions. Hold the thermocouple in each bath until the control completes its self-
calibration.
Содержание CS200
Страница 2: ......

