11
Important:
Do not forget to fix the fire stop spacer as the
assembly of the system proceeds.
5.9 FIX THE FLUE TERMINAL ASSEMBLY
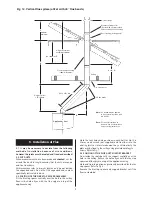
Fit the roof flashing loosely to the roof.
From outside, pass the terminal assembly through the roof
flashing.
From inside the roof space align the assembly with the air
and flue ducts. If required, loosely fit the support bracket
ensuring that the assembly is located correctly. Refer to Fig. 6.
Drill two holes through the holes in the air duct. Separate the
assembly and apply silicone sealant to the outside of the air
duct.
Re-connect the assembly and fix with the screws provided.
Note:
The sealant and screws are not required for the flue
duct. Refer to Fig. 13.
5.10 SEAL THE TERMINAL ASSEMBLY TO THE ROOF
From outside the building make good the roof structure and
ensure the roof is weather sealed by fixing the roof flashing.
Apply sealant around the air duct at the top of the flashing.
Lower the weather-sealing collar over the roof flashing and
tighten the self tapping screws provided and apply sealant
around the top edge of the weather sealing collar.
Refer to Fig. 9, 10, 11,12.

