51
warning line when setting warning line, please don’t set it near the obstacle.
Application scene
: it can only be applied to the scene where the target is sparse and it is basically blocked
between targets, such as the perimeter protection area without security guard.
The config steps are shown as follows:
Step 1
,
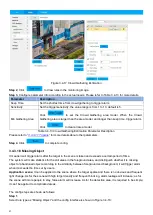
Select rule type as “Tripwire” and the config interface is shown in Figure 3.4-11
Figure 3.4-11 Tripwire
Step 2
, Click
and draw rules in the monitoring image.
Note
: Click
to clear all the rules which have been drawn.
Step 3
, Configure parameter info according to the actual needs. Please refer to table 3.4-7 for more details.
Parameter
Description
Working period
Click
to pop out setting interface of “Working Period”.
● You can input time number value or press the left mouse button, and drag on the
setting interface directly.
● There are totally six periods to set every day, click the check box in front of the period,
and then the period can be valid.
● Select week number (default is Sunday, if users select the whole week, it means
setting can be applied to the whole week; users can also select the check box in front of
the day to make separate setting for some days).
Click
button after setup is completed, return to rule config setting
interface, click
to complete period setting of tripwire.
Direction
S
et the direction of tripwire, you can select A→B
、
B→A
、
A↔B.
Record
Check it and so when alarm occurs, system will auto record. You shall set record period
of alarm in “Storage>Schedule” and select auto record in record control interface.
Record delay
System can delay the record for specified time after alarm ended. The value ranges
from 10s to 300s.


