background image


https://www.XPOtool.com 


Item 63003


Page 12


The Tool Experts


01 2022

-1


Tip!

 Trigger gun after starting the stroke. Re-

lease the trigger before ending the stroke. The 
spray gun should be moving when the trigger 
is pulled and released.


Overlap  each  stroke  by  about  30


%.  This 

will ensure an even coating.


If you expect to be away from your sprayer 
for more than one hour, follow the Short-
term storage instructions.


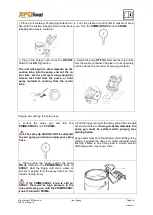
Spraying troubleshooting – unclogging the spray tip


If the spray pattern becomes distorted or stops completely while the gun is triggered, follow 
these steps.


 Do not attempt to unclog or clean the tip with your finger.


Note!

 Do not use a needle or other sharp pointed instrument to clean the tip. The hard tungsten 

carbide can chip.


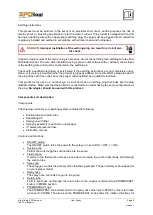
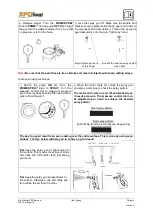
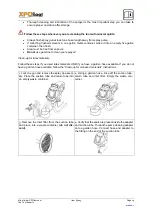
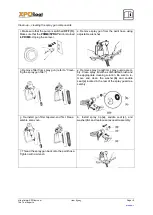
1. Release the trigger and lock the gun off. Rotate the reversible 
tip arrow 180° so that the point of the arrow is toward the rear of 
the gun (

CLEAN

 position).


Under pressure, the spray tip may be very difficult to turn. 
Turn the PRIME/SPRAY knob to PRIME and trigger the gun. 
This will relieve pressure and the tip


will turn more easily.


Gun locked


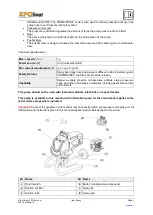
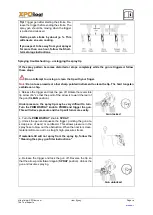
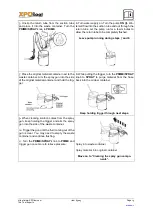
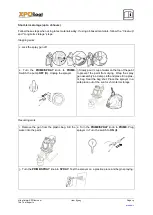
2. Turn the 

PRIME/SPRAY

 knob to 

SPRAY.


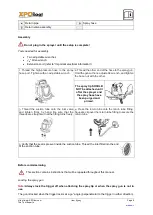
3. Unlock the gun and squeeze the trigger, pointing the gun at a 
scrap piece of wood  or cardboard. This allows pressure in the 
spray hose to blow out the obstruction. When the nozzle is clean, 
material will come out in a straight, high-pressure stream.


If material still will not spray from the spray tip, follow the 
“Cleaning the spray gun filter instructions.”


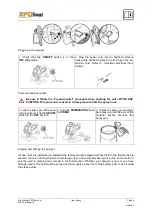
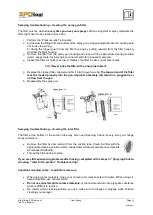
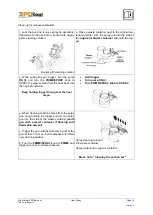
4. Release the trigger and lock the gun off. Reverse the tip so 
that the arrow points forward again (

SPRAY

 position). Unlock the 

gun and resume spraying.


Gun unlocked


Содержание XPOtool 63003

Страница 1: ...ting instructions and safety information before using for the first time Technical changes reserved Due to further developments illustrations functioning steps and technical data can differ insignific...

Страница 2: ...r contact form https www wiltec de contacts The most recent version of this manual in various languages can be found in our online shop via https www wiltec de docsearch Our postal address is WilTec W...

Страница 3: ...and the injury to persons read and understand all instructions included in this manual Be familiar with the controls and proper usage of the equipment Indicates a hazardous situation which if not avoi...

Страница 4: ...ed or in case they come in contact with the body Vapours can cause severe nausea fainting or poisoning Prevention Use a respirator or mask if vapours can be inhaled Read all instructions supplied with...

Страница 5: ...AFETY INSTRUCTIONS Can cause severe injury or property damage Prevention Read all instructions and safety precautions before operating the tool Follow all appropriate local national and international...

Страница 6: ...ied electrician This product is for use on a nominal 230 V circuit and has an earthing plug that looks like the plug illustrated below Make sure that the product is connected to an outlet having the s...

Страница 7: ...50 Hz Safety features Spray gun trigger lock and pressure diffuser built in tip safety guard PRIME SPRAY knob for safe pressure release Capability Sprays a variety of paints oil base latex primers sta...

Страница 8: ...fter the sprayer and the spray hose have been purged and primed 3 Thread the suction tube onto the inlet valve and tighten firmly by hand Be sure that the threads are straight so that the fitting turn...

Страница 9: ...Lock the spray gun off see di rections above Flip the ON OFF switch to the OFF position 2 Turn the PRIME SPRAY knob to PRIME 3 Unlock the spray gun and trig ger spray gun into the side of the materia...

Страница 10: ...praying material Purging and priming the spray hose 1 Unlock the spray gun and turn the PRIME SPRAY knob to PRIME The spray tip SHOULD NOT be attached to your spray gun when purging your spray hose 2...

Страница 11: ...knob to SPRAY Turn the pressure control dial to maximum pressure The spray hose should stiffen as paint be gins to flow through it 2 When the motor shuts off unlock the spray gun and spray a test area...

Страница 12: ...carbide can chip 1 Release the trigger and lock the gun off Rotate the reversible tip arrow 180 so that the point of the arrow is toward the rear of the gun CLEAN position Under pressure the spray ti...

Страница 13: ...ousing The tapered end of the filter must be loaded properly into the gun Improper assembly will result in a plugged tip or no flow from the gun 6 Reassemble the spray gun Spraying troubleshooting cle...

Страница 14: ...Clean up for latex materials Follow these steps if you used latex materials AND if you have a garden hose available If you do not have a garden hose available follow the Clean up for oil based materia...

Страница 15: ...ay gun into the side of the original material container and hold the trig ger 8 While pulling the trigger turn the PRIME SPRAY knob to SPRAY to purge material from the hose back into the original cont...

Страница 16: ...to purge material from the hose back into the original container Keep holding trigger throughout the next steps Hold trigger Turn pump ON I Turn PRIME SPRAY knob to SPRAY 4 When cleaning solution come...

Страница 17: ...ean thread the suc tion tube back into the inlet valve and replace the return tube onto the return tube fitting Re place clip 4 Submerge the suction set into a bucket of NEW cleaning solution 5 Turn t...

Страница 18: ...from spray gun refer to Clean ing the spray gun filter 4 Remove spray tip a from spray guard assem bly Clean spray tip with a soft bristled brush and the appropriate cleaning solution Be sure to re m...

Страница 19: ...F O Unplug the sprayer 3 Slowly pour cup of water on the top of the paint to prevent the paint from drying Wrap the spray gun assembly in a damp cloth and place it in a plas tic bag Seal the bag shut...

Страница 20: ...ntainer with separating oil approx 2 ounces supplied with the unit and submerge the inlet valve into the oil Separating oil 2 Place a rag over the spray hose port and turn the switch ON l When the oil...

Страница 21: ...to follow the pressure relief procedure when shutting the unit down for any purpose including servicing or adjusting After performing the pressure relief procedure be sure to unplug the unit before se...

Страница 22: ...wn Lubricate the seal on the piston seal assembly as you did with the top seal Place the piston seal assembly into the bottom of the housing Insert the plastic inser tion tool and thread into position...

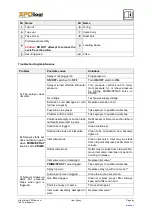
Страница 23: ...lified workshop B Sprayer starts but does not draw in paint when PRIME SPRAY knob is set to PRIME Paint bucket empty or suction tube not totally immersed in paint Refill bucket or immerse suction tube...

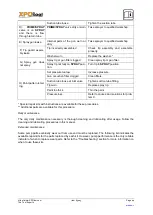
Страница 24: ...rease pressure Gun or suction filter clogged Clean filters Suction tube loose at inlet valve Tighten suction tube fitting Tip worn Replace spray tip Paint too thick Thin the paint Pressure loss Refer...

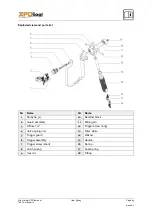
Страница 25: ...s list Name Name 1 Spray tip 517 10 Retainer block 2 Guard assembly 11 Sliding pin 3 Diffuser 12 Trigger screw long 4 Valve spring unit 13 Filter white 5 Trigger guard 14 Washer 6 Trigger assembly 15...

Страница 26: ...eparate col lection system for these appliances The logo on the article or on its packaging points out that this article must not be treated as normal house hold waste but must be disposed to a recycl...

Отзывы: