Wake N Grill Page 15
Pin on the Lower Tube. Pull and twist the Pull-Pin
shaft 90 degrees to lock in the
open
position.
Slide the Mid Arm Assembly into the Lower
Tube until the smooth screw heads seat into the
locating slots on the Lower Tube.
Again, twist the Pull-Pin 90 degrees and allow the
spring and shaft to return to its closed position.
The pin should seat on its own, if it does not,
push the pin firmly to fully seat it.
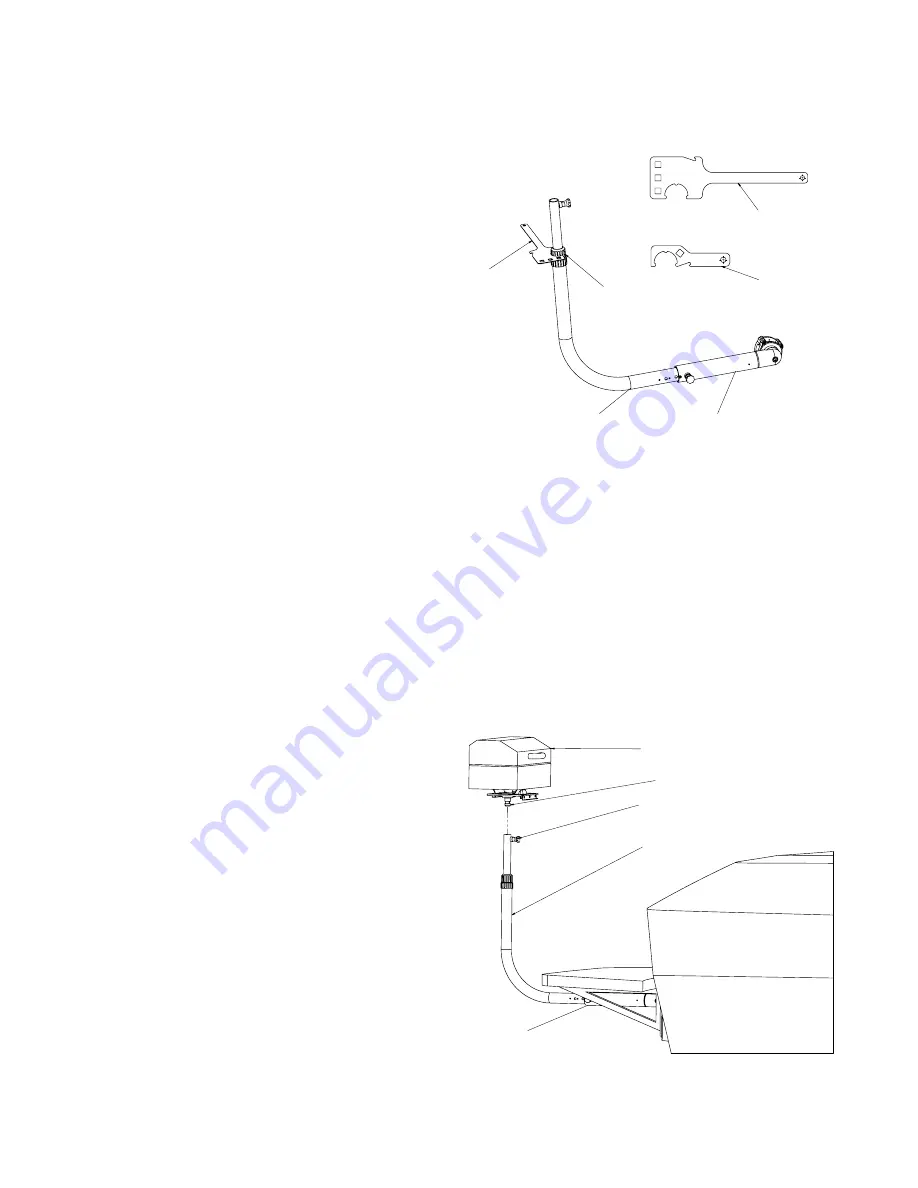
Step 3:
Adjusting the grill position using the
Twist-Lock
(WNG-TWST-LK). The height feature
allows the grill to be adjusted for comfortable
heights (seated or standing position e.g.). The
rotational feature allows the grill to be rotated and
locked in any position. This is especially useful
for maximizing grill position for optimal burger
slanging.
See Figure 30.
Using the Multi-Tool (WNG-MULTI-TOOL) provided,
or optional Spatula (WNG-SPATULA), position the
tool over the grooves of the Twist-Lock. Slightly
turn counter-clockwise to loosen.
See Figure 30.
Position the Upper Slide Tube assembly into the
desired position.
HINT:
The upper tube Pull-Pin is designed to
align with the front of the grill. Whichever way
the logo on the pin faces, the front of the grill will
face also.
Again, using the Multi-Tool provided, or optional
Spatula, position over the grooves of the Twist-
Lock. Tighten by turning Twist-Lock clockwise.
Snug is good but snugger is better to keep the
position tight.
NOTE:
Failure to properly snug the Twist-Lock
could result in a sudden height drop, most often
during a critical step in the cooking process. Use
your best judgment, but don’t go bananas and let
Goliath do it as it will be difficult to unlock or may
cause damage to the tools.
Step 3:
Installing the Grill.
Make sure the grill
lid is secured and locked so you don’t lose any
internal grill parts.
Pull and twist the upper Pull-Pin 90 degrees to
lock in the
open
position.
While holding the Grill by it’s handle, position Grill
assembly with both hands so that the Grill Plug
slides into the Upper Tube. Confirm Grill Plug is
fully seated into the Upper Tube. Twist the upper
Pull-Pin shaft 90 degrees to allow the shaft and
spring to return to its
closed
position. The pin
should seat into the Grill Plug groove on its own,
if it does not, push the pin firmly to fully seat it.
See Figure 31
.
HINT:
The Grill Plug has a safety groove that
allows the Pull-Pin to partially engage in any
position, preventing the grill from unintentionally
2SWLRQDO
6SDWXOD
0LG$UP$VVHPEO\
/RZHU7XEH$VVHPEO\
7ZLVW/RFN
2SWLRQDO6SDWXOD
0XOWL7RRO
0LG$UP$VVHPEO\
/RZHU7XEH
$VVHPEO\
3XOO3LQ
3XOODQG7ZLVWWRORFNRXWORFNLQ
*ULOO$VVHPEO\
*ULOO3OXJ
Tightening Twist_Lock
Figure 30.
Install Grill Assembly
Figure 31.


