background image


VOH SA 

GU-04-06-01 

PAViX - User Guide 

Version 3.2 

Created 10.2017 

Page 7 / 48 


PAViX – HMI 

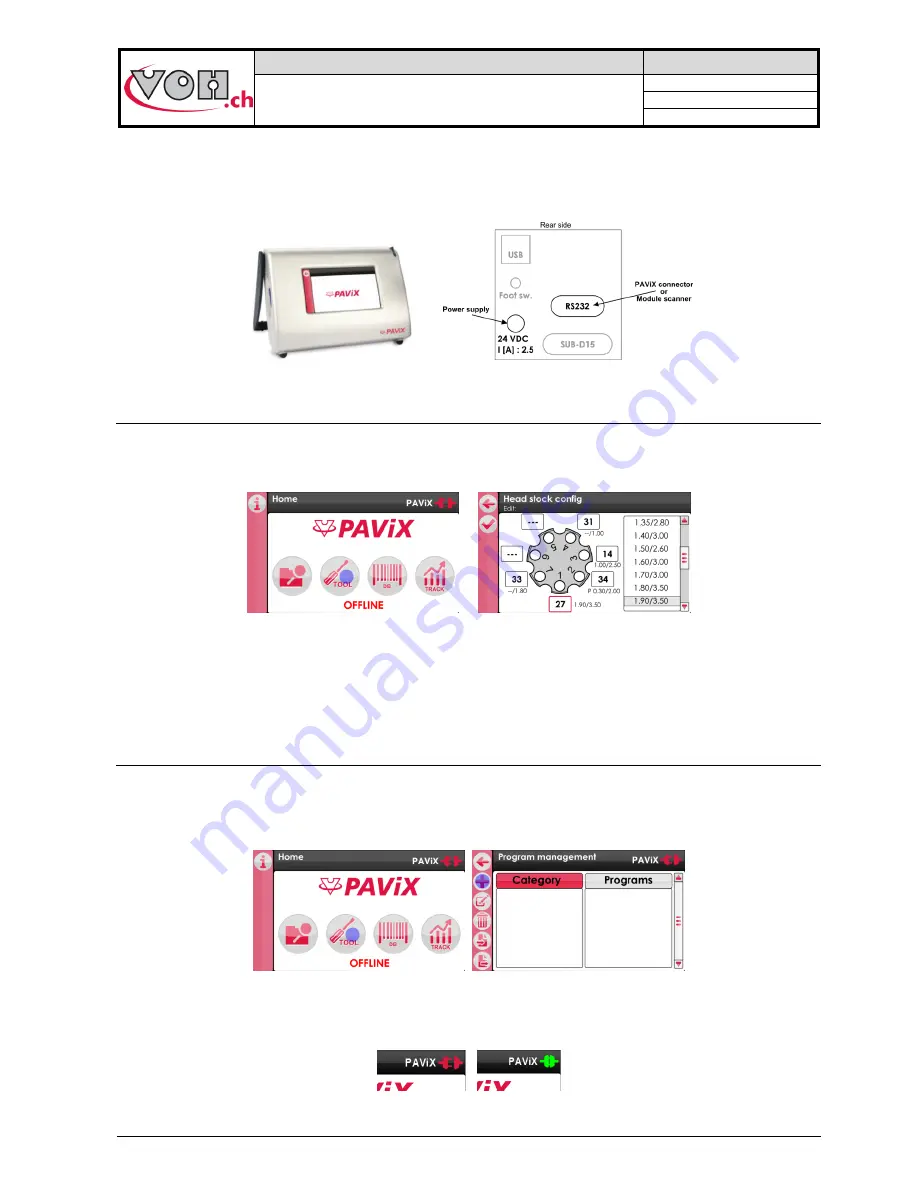
The  generation,  edition  and  management  of  PAViX  programs  is  conducted  via  an  HMI.  A  unique  HMI  screen 
allows for the management of an unlimited number of PAViXs. 


Figure 4: HMI and connectors 

4.1  Barrel configuration 

The programs use a common barrel configuration. It is managed from the PAViX HMI that is then automatically 
transferred to the SD card when the programs are exported. 


Figure 5: Barrel configuration management 

In  order  to  change  the  numbers  of  the  cleats  present  on  the  barrel,  simply  click  on  the  fields  located  around 
them then link a standard cleat by clicking in the list located on the right-hand side of the screen. 
 
To “remove” a cleat, simply double-click on the corresponding field. The number then becomes ‘---‘ meaning: no 
cleat mounted in this position of the barrel. 

4.2  Generation and creation of hand-setting programs 

Program  management  and  creation  is  conducted  via  the  PAViX  HMI.  The  transfer  of  programs  on  the  PAViX 
staking-tool is performed with an SD card. 
 
Hand-setting programs are classified by family then by program. 


Figure 6: Home screen and program management 

In order to create programs, the PAViX may or may not be connected to the HMI using the supplied cable. La 
status of the staking-tool <-> HMI connection is displayed on the top right-hand corner of the screen. 


Figure 7: Unconnected staking-tool / Connected staking-tool 

Содержание PAViX

Страница 1: ...User Guide Patented V3 2 01 02 2018 ...

Страница 2: ...or QR code 10 4 3 3 Scanner 10 4 3 4 Pairing a scanner to the HIM 12 4 3 5 Bar codes program link 13 4 4 Strategic management of traceability 14 4 5 Program import export 15 4 5 1 Exporting 15 4 5 2 Importing 16 4 6 Software update 17 5 PAViX staking tool 18 5 1 Cleat loading changing 18 5 2 Battery change and recharging 19 5 3 Battery change CR2032 19 5 4 PAViX LCD 19 5 5 Start up 21 5 6 Configur...

Страница 3: ...4 Height corrections 40 7 Exclusion of liability guarantee 41 8 Maintenance and service 41 8 1 Cleaning of the spindle 41 8 2 Cleaning of spindle smooth bearings 42 8 3 Replacement of the backup battery CR2032 42 8 4 Sensor inspection 43 8 4 1 Access to the Maintenance menu 43 8 4 2 Verifying force measurement accuracy 44 8 4 3 Force calibration 46 8 4 4 Distance validation 47 9 Representation dis...

Страница 4: ...DIRECTLY FROM A BREACH OF THE GUARANTEE EXPRESS OR IMPLIED OR ANY OTHER FAILURE OF THIS PRODUCT THIS GUARANTEE IS THE ONLY EXPRESS GUARANTEE PROVIDED BY VOH SA FOR THIS PRODUCT This guarantee only covers the initial buyer and is not transferable If you have any questions regarding the guarantee please write to VOH SA at the following address VOH SA La Praye 5a CH 2608 Courtelary Telephone 41 32 94...

Страница 5: ... The PAViX must be stored in a dry and dust free environment Storage temperature must be between 10 C and 40 C It is recommended to cover the device in order to protect it from dust and moisture 2 Product description The PAViX is a staking tool with smart and universal hands It enhances operator skills while supplying in a non intrusive way the technical means required for hand setting operations ...

Страница 6: ...VOH SA GU 04 06 01 PAViX User Guide Version 3 2 Created 10 2017 Page 6 48 3 Content accessories and options Figure 3 PAViX and accessories ...

Страница 7: ...nd them then link a standard cleat by clicking in the list located on the right hand side of the screen To remove a cleat simply double click on the corresponding field The number then becomes meaning no cleat mounted in this position of the barrel 4 2 Generation and creation of hand setting programs Program management and creation is conducted via the PAViX HMI The transfer of programs on the PAV...

Страница 8: ...ting the parameters to record the working program reference 4 2 3 Editing the program Once the working reference is recorded the user can enable the stages of the sequence required to set the hands A program allows for the setting of up to 14 different hands Each stage has the following settings Tolerance of min and max force mandatory Stop height mandatory Barrel position mandatory Type of hands ...

Страница 9: ...The edition process can be performed with or without a connected staking tool 4 2 5 Authorisation to correct hand fitting heights Once the programs are created on the HMI it is generally no longer necessary to correct hand fitting heights when using the staking tool However it is possible for the operator to authorise a temporary height correction simply activate the Ht correction radio button on ...

Страница 10: ... SP 09 Figure 13 Adapter assembly Note In order to work the Bluetooth interface for HMI must be powered with the supplied USB power supply The small white button on the LM module must be placed on the DCE side 4 3 2 Bar codes or QR code Below can be found the minimum dimensions in order for the QR codes ISO 18004 and bar codes Code 128 to be readable by the PAViX Scanner Figure 14 Bar code and QR ...

Страница 11: ...16 scan and blue strips By varying the distance between the scanner and the target it becomes possible to make both strips overlap in the centre in order to read the code it must be located at the intersection of the 2 strips When reading is successful a bip from the scanner can be heard To facilitate the scan start close to the bar code and gently move away until a long bip can be heard Battery l...

Страница 12: ...B power supply OFF Click on the DB button to access the bar codes programs linking pages OFF Select any program The number of bar codes already linked to the various programs is specified in brackets ON Blue LED flashes By clicking on the left hand side button the HMI will start searching for a Bluetooth scanner ON Blue LED flashes The search may take up to 30 seconds ON Blue LED flashes The list ...

Страница 13: ...signed to the same program family program Management is conducted via the HMI Press the DB button to access then select the desired program Figure 17 Accessing the bar code management section If it isn t the case connect the staking tool or the scanner s interface module to the HMI and then scan the bar code to be assigned to the selected program Figure 18 Scanning a bar code Note Linking the same...

Страница 14: ...tivation being specific to the staking tool Traceability by movement serial numbers is guaranteed for numbers containing up to 10 characters Activation of serial number traceability is done in the programs via the TRACK ID radio button on the program s main page Unique or continuous ID If TRACK ID is activated in the program it is possible to set a continuous or unique traceability Unique the ID i...

Страница 15: ...column in the program management page Figure 20 Import and export commands in the navigation pane 4 5 1 Exporting After having pressed the Export button on the Program Management page confirmation of export is requested Figure 21 Exporting Exporting program related bar codes is optional Figure 22 Export question NOTE 1 barrel configuration is always exported to the external SD card NOTE 2 non init...

Страница 16: ...the HMI the operator is required to reply to the question below Figure 24 Import question By clicking on Yes the program present on the SD card replaces the one present on the HMI The operator can specify whether he wishes to perform the action Yes or No for all future cases which may arise NOTE When importing the barrel configuration is always imported from the external SD card The SD cards used ...

Страница 17: ...on Do turn off or remove the SD card during the update Once the update complete the HMI automatically displays the home screen Caution After the update is successfully completed restart the HMI Various error screens may be displayed PAViX screen Comment s The HMI is not programmed please insert a SD card with the corresponding BL folder The SD card was removed during the programming process Replac...

Страница 18: ... has an adjustable stop driven by a motor a force sensor and a cleat selection system Figure 26 PAViX 5 1 Cleat loading changing The PAViX is equipped with a barrel that can accommodate up to 7 cleats Figure 27 Cleat properly positioned in the barrel position no 1 cleat NOTE Be careful not to soil the end of the cleats when handling them so as to avoid transferring dirt to set hands ...

Страница 19: ...the stop This sensor is powered by a CR2032 battery located at the back of the staking tool To change this battery simply remove its holder by unscrewing both its retainer screws Figure 29 CR2032 battery holder NOTE After having replaced the battery recording the spindle reference again is required as per the procedure set out in 5 6 4 Spindle reference page 23 Note The lifespan of a CR2032 batter...

Страница 20: ...on left To enable the PAViX settings function press and hold down the button The following buttons and icons are used on the PAViX display Buttons Description Validation Back to the previous page ON OFF Guest identification Expert identification Manual program selection Height change Back to the previous operation Exit the program Back Edition of part holder reference Icons Description Barrel sele...

Страница 21: ...ocated on the right hand side of the LCD screen Figure 32 Starting the PAViX press and hold the right hand side button 5 6 Configuration of PAViX settings PAViX basic settings are accessible through the settings icon during startup of the staking tool Figure 33 PAViX settings icon to the left Navigation in the settings menu is done with the barrel Figure 34 PAViX configuration menus The icon locat...

Страница 22: ... heights by teaching NOTE Cleat references cannot be recorded before the spindle reference refer to 5 6 4 Spindle reference page 23 PAViX screen Comment s PAViX Teaching of cleat heights is done from the cleat references menu Select the barrel position for which a cleat reference is required Once selection is made the staking tool will move the stop to the low position Place the standard cleat PAV...

Страница 23: ...m the operation on all active positions 5 6 3 Time Date The PAViX offers extended traceability options For these to be relevant it is required to set the time on the PAViX clock This setting is done from the Time Date menu The selected field is underlined To change its value use the barrel and validate with the right hand side button Figure 36 Setting the time and date 5 6 4 Spindle reference The ...

Страница 24: ...ed Remove a cleat or place an empty barrel slot under the spindle Place the standard spindle on the plate PAViX EB Manually lower the stop using the wheel and validate when this operation is complete Press the spindle down so the cleat comes into contact with the movement and the light turns green meaning the force has been reached When it is green for 2s the PAViX records the reference The user m...

Страница 25: ...ured from the Buzzer menu Figure 39 Sound signals on force a on stop b Depending on the selected settings a sound is released When the min force is reached and when the maximum force is exceeded When the maximum force is exceeded When the stop is reached 5 6 7 LED The PAViX also provides the option to indicate the hand fitting status in three different colours orange if the force is below toleranc...

Страница 26: ...function It can be configured so as to be used in different ways Off Used with a scanner Used with a PC tablet Figure 43 Bluetooth adjustment options 5 6 11 Use of a bar code reader Bluetooth scanner If the user wishes to use a bar code scanner he she must first connect it to the PAViX This operation can be done using the Scanner menu Before starting the staking tool ensure the scanner is in Bluet...

Страница 27: ...ending on their distance to the PAViX NOTE If no scanner is detected an error message is displayed The user then selects the scanner s corresponding MAC address he she wishes to pair up The PAViX then establishes the connection with the scanner and informs the user on the outcome of the operation success or not NOTE The scanner emits a sound when the connection is established The PAViX can only pa...

Страница 28: ...e users USER manufacturing orders MO and continuous ID traceability by entering the administrator password 1234 Movement serial number traceability is enabled in each program via the PAViX HMI Figure 47 Traceability summary NOTE Traceability settings can also be managed from the PAViX HMI Refer to 4 4 Strategic management of traceability page 14 Note Continuous ID traceability allows the scanned I...

Страница 29: ...esetting the memory erases all hand setting programs as well as traceability data contained in the device Access to the Admin mode is done using the following password 1234 PAViX screen Comment s PAViX The ADMIN menu is accessible via one of the configuration pages press and hold the PAViX left hand side button to enter the setting mode Then by rotating the barrel to the left the ADMIN menu will a...

Страница 30: ...ory are updated and hand fitting data is automatically transferred to the SD card The PAViX memory can contain up to 1 000 programs The PAViX memory can be erased using the Trash icon from the ADMIN menu When updating the programs movement holder height references are erased The SD cards used must be formatted to FAT32 allocation unit size 1024 for full formatting 5 7 3 Recovery of hand fitting re...

Страница 31: ...erred to the SD card The results are exported in a csv format that can be opened in an Excel type spreadsheet Results are sorted by staking tool and by program If a program is already present data is added at the end of the file Below is an overview of a PAViX export opened on a Windows PC Figure 48 SD on PC and SD tree structure Figure 49 Example of a csv file content exported from the PAViX ...

Страница 32: ...when the staking tool is turned on Figure 50 Staking tool software version Do turn off or remove the SD card during programming Once the update complete the PAViX automatically displays the home screen Various error screens may be displayed PAViX screen Comment s PAViX The staking tool is not programmed please insert a SD card with the corresponding BL folder The SD card was removed during the pro...

Страница 33: ... is empty When the staking tool is used and the traceability data is stored the graph gradually fills out When the memory is full the oldest data is replaced by the newest data NOTE Users can identify themselves as guests using the right hand side button In this case user traceability will be replaced by GUEST 6 2 Selection of the hand setting program Starting a hand setting program can be done tw...

Страница 34: ...am The link between a bar code and a program is done in the PAViX HMI Refer to 4 3 Management of the bar code database page 10 PAViX screen Comment s After identifying himself herself the user scans a bar code corresponding to the program he she wishes to call NOTE The bar code can contain up to 20 characters maximum NOTE If the bar code read by the scanner matches a program the program is automat...

Страница 35: ...Taking a reference without an active scanner PAViX screen Comment s When the program has started and no scanner is active the user is invited to use the 0 reference Start by placing the part holder then validate with the button located on the right hand side of the staking tool Select the requested barrel position here no 1 Confirm selection with the right hand side button The system automatically...

Страница 36: ...fer to 6 3 1 1 page 35 2 Scan a part holder bar code NOTE If the bar code is known the PAViX places itself directly in Hand setting mode By pressing and holding the left hand side button it is possible to change the height of a part holder whose bar code is already known Once the button is pressed down simply follow the information on the screen If the bar code of the scanned part holder is not kn...

Страница 37: ... the one defined in the program Figure 54 Hand fitting result screen When the user selects an active cleat by turning the barrel the PAViX automatically adjusts the stop height as well as the information displayed on the screen During the adjustment of the height the luminous surface flashes blue Figure 55 Flashing luminous surface during height adjustment and other automatic operations The user p...

Страница 38: ...e hand fitting operation is complete its result is displayed Of everything is OK the result is automatically validated after 3 seconds and the following instruction is displayed In the event of a KO the operator will need to validate the operation with the right hand side button then a simple short impulse on the left hand side button will repeat the operation with a compliant hand The PAViX then ...

Страница 39: ... within the tolerance range without exceeding the max tolerance The following situations may also occur Figure 58 KO operation F max tol If during the operation the max tolerance is exceeded the operator is supposed to stop what he she is doing The result of the operation is then KO F max tol and stop not reached The light signal is fixed red If the operator continues to the stop the result will b...

Страница 40: ... Fmin Fmin F Fmax F Fmax Stop reached Stop not reached N A N A The results in red must be acknowledged by the operator using the right hand side button OK operations are automatically validated after a period of 1 5 seconds 6 3 4 Height corrections If the Ht correction option has been enabled in the HMI when creating the programs or when the Operator mode is selected in the staking tool it is poss...

Страница 41: ...e device and opening of the casing are forbidden and lead to exclusion of liability Guarantee rights expire when it is proven that the detected faults are not from origin 8 Maintenance and service 8 1 Cleaning of the spindle Frequency Once a week depending on use Equipment required Light Benzine Clean cloth Stage Description 1 Remove the spindle 2 Dampen the cloth with light Benzine 3 Clean the en...

Страница 42: ...t of the backup battery CR2032 Frequency Once a year depending on the staking tool s signals Equipment required CR2032 battery Watchmaker s screwdriver 140 Spindle height standard Stage Description 1 Turn the staking tool off 2 Remove the main battery 3 Unscrew the two retaining screws of the CR2032 holder 4 Remove the battery holder 5 Replace the used battery with a new one 6 Insert the battery h...

Страница 43: ... using the following password 7426 PAViX screen Comment s PAViX The Maintenance menu is accessible via one of the configuration pages press and hold the PAViX left hand side button to enter the Setting mode Then by rotating the barrel twice to the left the Maintenance menu will appear Confirm access using the right hand side button The barrel allows the user to select the number to display the rig...

Страница 44: ...1001 SP04 Fitting procedure PAViX screen Comment s PAViX Remove the spindle and cleat in position under the spindle To facilitate cleat removal the spindle automatically moves to a high position during initialisation Start by placing the standard spindle SP 04 EB on the plate Confirm with the right hand side button Then place the calibration plate in place of the spindle resting on the standard sp...

Страница 45: ...m placement using the right hand side button 2 Once the measurement is stable confirm using the right hand side button These 2 operations must be performed with 1 2 and 5kg masses If the measures are correct the screen displays OK Upon the first measure with an out of machine tolerance value the operator is invited to recalibrate the force Refer to 8 4 3 Force calibration page 46 ...

Страница 46: ...measurement system Remove the spindle and cleat in position under the spindle Then place the calibration plate in place of the spindle resting on the standard spindle Confirm with the right hand side button Once the measure is stable the check mark button appears It allows the operator to move to the next step Like on the image below with no weight Repeat the operations opposite for 1 2 5 and 10kg...

Страница 47: ...AViX Remove the cleat in position under the spindle Place two 20mm wedges next to one another on the plate On top in the centre of the plate and perpendicularly a 4 5mm wedge Follow staking tool instructions identical to that of taking a spindle reference Apply minimum force and wait for contact with the stop Repeat the height reference taking operation for a 10mm wedge as subsequently specified b...

Страница 48: ...6 01 PAViX User Guide Version 3 2 Created 10 2017 Page 48 48 If the measures are correct the screen displays OK When the measures do not meet machine specifications please contact VOH SA 9 Representation distribution ...

Отзывы: