A
DJUSTING
THE
S
ETTINGS
IN
THE
S
CAN
M
ANAGER
P
RO
53
■
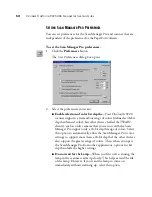
Show standard metric paper sizes
—Select this option if you
use metric paper to print images. When you select the scan size
output options, the width and height dimensions are then for
metric paper sizes.
■
Show standard US paper sizes
—Select this option to set the
paper sizes for standard US paper.
■
Units
—Select the measurement units for the ruler around the
preview window. The x and y coordinates of the pointer position
are relative to the units.
■
AutoScan Resolution
—You can scan an item by clicking the
AutoScan button on the Scan Manager Pro. The scanner uses
these resolution settings for the respective configurations: Color,
Grey Scale and Black and White.
■
Folder for Temporary Images
—When you scan an item, its
scanned image is initially stored in a folder before being sent to
the PaperPort desktop or some other application. Instead of
using the default folder specified by the Scan Manager Pro, you
can select another folder on your computer. Usually the only
reason to select this option is if the default folder is on a hard
disk with limited storage space. Click the folder icon and the
Browse for Folder dialog box opens. Select the folder you want to
use and click
OK
. That folder name is then listed on the
Preferences dialog box.
3. Click
OK
to save your preferences.
C
REATING
A
N
EW
S
CAN
M
ANAGER
P
RO
P
ROFILE
You cannot change the settings of the preset profiles in the Visioneer
Scan Manager Pro. However you can create new profiles and save them
for future use.
To create a new profile:
1. On the Visioneer Scan Manager Pro, select one of the preset
profiles, for example, Black&White Configurations>Custom.
2. Adjust the settings as required and then click the
Save As
button.

