151
P
LANTING
A
UTO
S
WATH
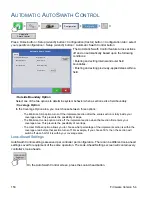
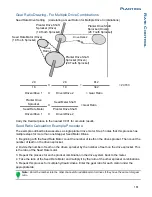
• Turn-On
This setting determines how far ahead the
system looks to turn the sections back on. This
setting compensates for delay in the planting
control system when the implement sections are
turned on.
• Turn-Off
This setting determines how far ahead the
system looks to turn the sections off. This setting
compensates for delay in the product control
system when the sections are turned off.
Note: To use AutoSwath for planting operations, you are required to use a 5 Hz or higher GPS output rate.
AutoSwath control will not allow sections to be turned on until the master and planting section switches are
on. If you have less than a 5 Hz GPS output rate and you select AutoSwath, a warning appears, telling you
that AutoSwath Control is not available at less than 5 Hz.
C
HECKING
A
UTO
S
WATH
P
ERFORMANCE
FOR
R
OW
S
HUTOFF
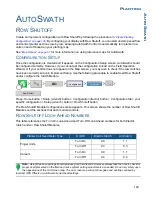
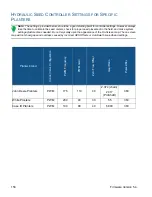
The settings given in the above AutoSwath look-ahead table shown previously have been tested with
each clutch and seed meter combination to work for your planter. However, always take the time to
check for proper seed placement in the field and make system setting adjustments as needed. Do not
rely solely upon the appearance of the On-Screen map. The on screen map will not show gaps and
overlaps caused by incorrect GPS Offsets or AutoSwath Look-Ahead settings. Verify settings with the
following procedure:
1. Stop the planter within 20 feet of the planted headland.
2. Select one row unit from each planter swath section to observe.
3. Remove the down pressure from the closing wheel of each selected row unit.
4. Hold the closing wheels off the ground by attaching a chain or strap from the hopper support panel to
the closing wheel arm. (This prevents the closing wheels from closing the seed trench).
Securing these closing wheels up allows you to observe the planted seed in the trench so that you can
observe when the AutoSwath is turned off and on during the seed application.
5. Resume planting in your normal fashion, then stop when you are 20 feet out of the headland of the
next pass.
6. Stop the planter and observe the AutoSwath shutting off and turning on to see if the results are
acceptable.
• If the results are correct, then return the closing wheels to their previous operational state. Close the seed
trench on the observed rows and return to planting.
• If you suspect the results are incorrect, then adjust the appropriate look-ahead setting one-tenth (.1)
second per trial. When making changes to the look-ahead settings, make sure to adjust these settings
only one-tenth (.1) second per trial. Larger adjustments can cause unintentional large changes in the
AutoSwath’s performance. When adjusting the look-ahead numbers from the suggested settings, it is
recommended that you observe multiple trials to confirm the operations’ accuracy.
• If you encounter overplanting or underplanting problems, see
“Fixing Overplanting and Underplanting in
Look Ahead Settings
Turn-On
Planting
Planting
Row Shutoff
Turn-Off
1.1 s
0.4 s
Содержание ag leader
Страница 1: ...Operators Manual Firmware Version 5 4 Ag Leader PN 4002722 Rev G ...
Страница 2: ...Firmware Version 5 4 ...
Страница 20: ...6 Firmware Version 5 4 ...
Страница 38: ...24 Firmware Version 5 4 For more information see Legend Settings on page 52 ...
Страница 55: ...41 SETUP M ANAGEMENT S ETUP Remove button Press to remove a business ...
Страница 56: ...42 Firmware Version 5 4 ...
Страница 78: ...64 Firmware Version 5 4 ...
Страница 82: ...68 Firmware Version 5 4 Press to Export All Log files Export All Log Files ...
Страница 84: ...70 Firmware Version 5 4 ...
Страница 94: ...80 Firmware Version 5 4 ...
Страница 108: ...94 Firmware Version 5 4 ...
Страница 140: ...126 Firmware Version 5 4 ...
Страница 154: ...140 Firmware Version 5 4 ...
Страница 158: ...144 Firmware Version 5 4 ...
Страница 162: ...148 Firmware Version 5 4 ...
Страница 222: ...208 Firmware Version 5 4 ...
Страница 244: ...230 Firmware Version 5 4 ...
Страница 260: ...246 Firmware Version 5 4 ...
Страница 289: ...275 HARVEST H ARVEST M ONITORING M APPING Motor Current Measure of Elevator Mount Unit EMU current shown in amps ...
Страница 290: ...276 Firmware Version 5 4 ...
Страница 304: ...290 Firmware Version 5 4 ...

