132
Firmware Version 5.4
•
OnTrac2 ECU Tilt Zero Measurements 1 and 2:
The ECU has a tilt sensor in it to help take into account
side hills and bumps while the vehicle is AutoSteering. While the vehicle is sitting still on a flat location,
the sensor averages its readings to get an idea of what “level” is. The driver then drives the tractor and
turns it so it is facing the opposite direction at the same location and lets it average itself again. These
two steps allow the system to correct any tilt differences.
•
OnTrac2 Minimum Output:
This step determines the minimum power needed for the MDU to turn the
steering wheel. This value is critical to ensure proper AutoSteering performance.
Note:
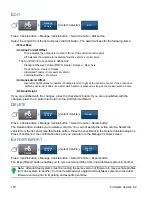
All steps of the Auto Calibrate procedure must be completed and the changes saved before
any attempt is made to AutoSteer the vehicle.
• You can press Pause and Resume (or manually turn the steering wheel) at any time during the Auto
Calibrate procedure if needed.
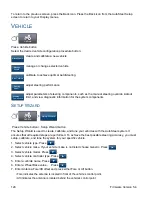
• The correct vehicle must be selected in the Manage Vehicle section prior to calibrating the vehicle. Verify
that the correct vehicle has been selected.
• Your vehicle should be moving at normal operating speed before you begin the Calibration
Verification process.
• The vehicle will execute a series of maneuvers during the Calibration Verification process including
driving in a straight line and slight left and right turns.
• You can press Pause and Resume (or manually turn the steering wheel) at any time during the
Calibration Verification procedure if needed to ensure safe vehicle operation. However, the timer
for the current step is reset each time you press the Pause button.
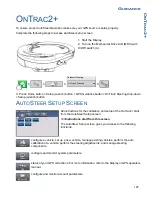
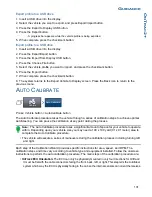
1. Press the Auto Calibrate button.
2. Press the Right Arrow button.
3. Select the orientation that matches your installation, and then press the Next button.
4. Follow the on-screen prompts for OnTrac2 Tilt Zero Measurements 1 and 2.
5. Follow the on-screen prompts for the OnTrac2 Minimum Output screens.
6. Press the checkmark button to save the calibration data.
7. Drive the vehicle to a location where it can be driven in a straight line for a long distance. Set the speed
of the vehicle within the speed range indicated, and then press the Resume button to begin the Calibration
Verification process. Follow the on-screen prompts to complete the calibration.
8. When the Calibration Verification procedure is complete, press the checkmark button to return to the
Vehicle screen.
9. After the vehicle has been calibrated and verified, you must confirm the accuracy of the lateral offset.
Adjust Lateral Offset
After the vehicle has been calibrated, perform the following procedure. This procedure will detect and
eliminate skips and overlaps due to an incorrect lateral offset.
1. Set an AB line, engage AutoSteering, and AutoSteer for at least 50 yards (46 meters).
2. Stop your vehicle, place it in park, and turn off the AutoSteer system. Use a plumb bob to place a flag
in the ground directly beneath the center of the draw bar.
3. Return to the vehicle, start the AutoSteer system, and engage AutoSteer for at least 50 yards (46
meters) on the same AB line.
4. Disengage AutoSteer, turn the vehicle around, and begin AutoSteering back down the same AB line
in the opposite direction.
Содержание ag leader
Страница 1: ...Operators Manual Firmware Version 5 4 Ag Leader PN 4002722 Rev G ...
Страница 2: ...Firmware Version 5 4 ...
Страница 20: ...6 Firmware Version 5 4 ...
Страница 38: ...24 Firmware Version 5 4 For more information see Legend Settings on page 52 ...
Страница 55: ...41 SETUP M ANAGEMENT S ETUP Remove button Press to remove a business ...
Страница 56: ...42 Firmware Version 5 4 ...
Страница 78: ...64 Firmware Version 5 4 ...
Страница 82: ...68 Firmware Version 5 4 Press to Export All Log files Export All Log Files ...
Страница 84: ...70 Firmware Version 5 4 ...
Страница 94: ...80 Firmware Version 5 4 ...
Страница 108: ...94 Firmware Version 5 4 ...
Страница 140: ...126 Firmware Version 5 4 ...
Страница 154: ...140 Firmware Version 5 4 ...
Страница 158: ...144 Firmware Version 5 4 ...
Страница 162: ...148 Firmware Version 5 4 ...
Страница 222: ...208 Firmware Version 5 4 ...
Страница 244: ...230 Firmware Version 5 4 ...
Страница 260: ...246 Firmware Version 5 4 ...
Страница 289: ...275 HARVEST H ARVEST M ONITORING M APPING Motor Current Measure of Elevator Mount Unit EMU current shown in amps ...
Страница 290: ...276 Firmware Version 5 4 ...
Страница 304: ...290 Firmware Version 5 4 ...


