background image

0

Futura FHD2/FMD2 E6

DIAGNOSIS

Systems

2 - 6

2

DD1020_01

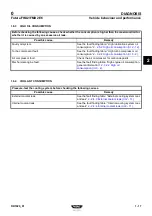
2.2.2

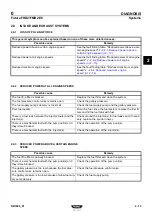
CAN NETWORK ISO 11992/1

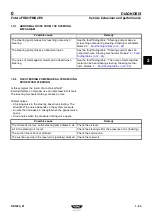
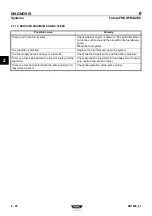
CAN communication is not possible

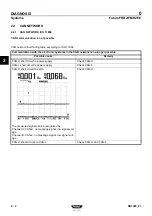
CAN network fault finding table according to ISO 11992/1

Faults in the CAN communication

CAN network fault finding table according to ISO 11992/1

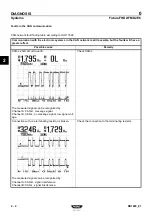
Communication with the electronic systems in the CAN network is not possible.

Possible cause

Remedy

CAN-H and CAN-L interrupted in the same location.

Check CAN-H and CAN-L

CAN-H short-circuits to CAN-L.

Check CAN-H and CAN-L

CAN-H and CAN-L have been switched over.

Check CAN-H and CAN-L

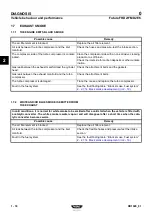
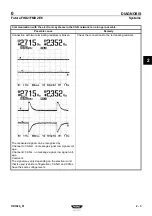
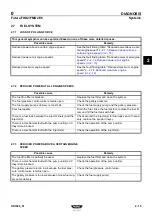
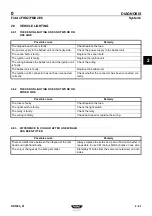
Communication with the electronic systems in the CAN network is still possible, but the faults will have a 
greater effect.

Possible cause

Remedy

CAN-H interrupted.

Check CAN-H.

CAN-L interrupted.

Check CAN-L.

CAN-H short circuit to power supply.

Check CAN-H.

CAN-L short circuit to power supply.

Check CAN-L.

CAN H short circuit to earth.

Check CAN-H.

CAN-L short circuit to earth.

Check CAN-L.

Содержание Futura FHD2 E6

Страница 1: ...Futura FHD2 FMD2 E6 1525 DD1020_01 Main Group 0 WORKSHOP MANUAL...

Страница 2: ...ics The technical information and the explanations of the repair work stated in this workshop manual have been compiled with the utmost care Whilst compiling this workshop manual it has been assumed t...

Страница 3: ...ghting 2 21 Disc brake construction 2 22 Steering mechanism 2 24 Components 3 1 Introduction 3 1 Engine 3 2 Driven axles 3 12 Axle mounting and suspension 3 13 Driver s seat 3 16 Repair guidelines Gen...

Страница 4: ...jacking up and supporting the vehicle Lifting jacking up and supporting 1 1 General information 1 1 Wheel lifts 1 4 Central lifting columns 1 6 Placing axle supports under the frame 1 8 Jacking up 1...

Страница 5: ...l be governed by and applied in accordance with the laws of the Netherlands Any dispute here under shall be referred to the decision of the District Court of s Hertogenbosch in the Netherlands Next re...

Страница 6: ...0 Futura FHD2 FMD2 E6 2 4 DD1020_01...

Страница 7: ...0 Futura FHD2 FMD2 E6 GENERAL INFORMATION 0 DD1020_01 GENERAL INFORMATION...

Страница 8: ...0 Futura FHD2 FMD2 E6 GENERAL INFORMATION 0 DD1020_01...

Страница 9: ...ded connections to be accurately observed Always use a torque spanner to accurately tighten the threaded connections to the correct torque 1 1 3 THREADED CONNECTIONS GENERAL INFORMATION The following...

Страница 10: ...are usually only tightened to the stand ard tightening torques See Tightening torques for the standard tightening torques If one of these threaded connections must be tightened to a different tighteni...

Страница 11: ...ts do not visibly have lubricant applied to them then lubricant must be applied to them To obtain the correct pretension when using new bolts the following procedure must be followed 1 Apply one drop...

Страница 12: ...tening torques for flange bolts and nuts with strength class 10 9 10 Bolt length L is the length of the bolt between the head of the bolt and the nut If a component is secured using more than one bolt...

Страница 13: ...M5 x 0 8 5 5 0 4 M6 x 1 9 6 0 7 M8 x 1 25 23 2 M10 x 1 5 46 4 M12 x 1 75 79 6 M12 x 1 25 87 6 M14 x 2 125 9 M14 x 1 5 135 9 M16 x 2 195 14 M16 x 1 5 210 14 M18 x 2 5 213 15 M18 x 1 5 315 20 M20 x 2 5...

Страница 14: ...htening torques for banjo bolts Overview of the tightening torques for clamping ring cap nut connections for air lines Thread indication Tightening torque Nm M12 x 1 25 178 14 M14 x 1 5 274 22 M16 x 1...

Страница 15: ...average breaking strength Can be unlocked using nor mal tools For locking threaded con nections 40068197 Loctite 262 Locks with a high breaking strength Difficult to unlock For locking threaded con n...

Страница 16: ...ffect on the effectiveness of the sealant Therefore the general rule is that after fixings and components have been cleaned with a cleaning agent they must be treated with a cleaning liquid to ensure...

Страница 17: ...stant to water coolant and oil For sealing aluminium components 41441339 Loctite 5910 Silicon sealant resistant to oil Withstands temperatures up to 200 C For sealing flush connec tions such as the fr...

Страница 18: ...untreated metal components against corro sion Components that have been installed with a close fit such as wheel hub units 41443160 Loctite 401 Comment Drying time of a couple of seconds Hardening ti...

Страница 19: ...rication grease which is water resistant and which prevents corrosion For the sealing rings of the MX engine cylinder lining 41738904 Renolit HLT2 Lubrication grease white Disc brake adjustment mechan...

Страница 20: ...235 294 n n x 1 202 n cm sec m sec km h feet sec mile h 1 0 01 0 036 0 03281 0 02237 100 1 3 6 3 281 2 237 27 78 0 2778 1 0 9113 0 6214 30 48 0 3048 1 097 1 0 6818 44 70 0 4470 1 609 1 467 1 no Celsi...

Страница 21: ...rds m2 1 0 01 0 00155 0 00001076 0 000001196 0 000001 100 1 0 155 0 001076 0 0001196 0 0001 645 2 6 452 1 0 006944 0 0007716 0 0006452 92900 929 144 1 0 1111 0 09290 836100 8361 1296 9 1 0 8361 100000...

Страница 22: ...6 10 01 0 9678 6894 76 51 715 2 036 0 7037 0 068046 101322 3 760 29 92 10 337 1 133 32 1 0 03937 0 01361 0 0013158 3386 23 25 40 1 0 3456 0 3342 9797 82 73 49 2 893 1 0 09668 248 89 1 867 0 07349 0 02...

Страница 23: ...0 Futura FHD2 FMD2 E6 SAFETY REGULATIONS 1 DD1020_01 SAFETY REGULATIONS...

Страница 24: ...0 Futura FHD2 FMD2 E6 SAFETY REGULATIONS 1 DD1020_01...

Страница 25: ...may also cause serious damage to the vehicle or may even create a dangerous situation This symbol gives useful tips to simplify the work This symbol indicates a situation which requires extra attentio...

Страница 26: ...d if necessary apply pro tective cream to unprotected parts of your body Long hair must be tied back or placed in a hairnet Do not wear jew ellery when carrying out work Use approved ear protection wh...

Страница 27: ...trical power source In order to prevent people from starting the engine when work is being carried out on the vehicle always disconnect the battery s earth connection Place a sign that reads DO NOT OP...

Страница 28: ...ary use wheel adaptors to prevent damage to the wheel bolts When charging the batteries make sure there is good ven tilation and avoid sparks or a naked flame Only use a quick charger in the event of...

Страница 29: ...Safety data sheet See the product s safety data sheet for the properties risks and safety information The SCR unit must be removed and disposed of in accordance with Directive 91 689 EEC 160802 and th...

Страница 30: ...gnition sources cannot come into contact with inflammable or explosive liquids and gases If possi ble keep these substances fully protected Diesel Diesel fuel is toxic and may therefore have a damagin...

Страница 31: ...stance When adding AdBlue the Webasto and the engine must be turned off and the main switch must be turned to the off position If the AdBlue cap is opened at a high exterior temperature then it is pos...

Страница 32: ...k charger should only be used if absolutely necessary Disconnect the battery cables when quick charging Wear protective clothing gloves and a mask when carrying out work where it is possible to come i...

Страница 33: ...he vehicle is started using separate batteries approximately 24 V or with the aid of another vehicle with a running engine approximately 28 V then the battery cables must not be disconnected When the...

Страница 34: ...he vehicle with the aid of auxiliary batteries turn on as many energy consumers as possible in order to avoid a load dump when the start cables are removed If another vehicle is used to start the vehi...

Страница 35: ...ge to the engine encapsulation when spray ing it maintain a minimum distance of 50 cm between the engine encapsulation and the sprayer nozzle Clean the engine compartment and in particular the encapsu...

Страница 36: ...ese compo nents is also not permitted Failure to observe these instructions may result in serious damage to bearings springs etc The accessory or contact position of the contact lock con tact switch m...

Страница 37: ...n the chassis must also be discon nected Welding work on the bodywork Follow the guidelines given in Welding work on the chas sis Also follow any special welding instructions given for performing weld...

Страница 38: ...cted by VDL Bus Coach or replaced if there has been a collision which may have affected the steering box or other parts of the steer ing mechanism This also applies if no external damage can be observ...

Страница 39: ...ure the joins are watertight Never remove sealing washers from connectors Fit the connectors in the correct manner Good earth connections are essential There must be no paint or oxidation between the...

Страница 40: ...s the rear wheels spinning Since a reduction in acceleration is not applicable in this instance the system will try to neutralize this spinning by braking the rear wheels The result is that the vehicl...

Страница 41: ...electronics without a bulb being fitted This will lead to a voltage surge to the fitting Wear safety glasses and safety gloves The light is pressurized risk of breaking Never touch the light bulb s gl...

Страница 42: ...0 Futura FHD2 FMD2 E6 SAFETY REGULATIONS General information 1 18 1 DD1020_01...

Страница 43: ...0 Futura FHD2 FMD2 E6 DIAGNOSIS 2 DD1020_01 DIAGNOSIS...

Страница 44: ...0 Futura FHD2 FMD2 E6 DIAGNOSIS 2 DD1020_01...

Страница 45: ...of diagnosis equipment Every possible cause of a complaint by the driver leads you to a solution and the repair work that it involves As shown in the diagram the diagnosis information is divided into...

Страница 46: ...engine immediately after an unsuccessful attempt was made to start the engine 4 Can the driver or the customer reproduce the fault Discuss the results with the customer or the driver 1 2 2 THE STARTE...

Страница 47: ...symptom with the aid of the diagnosis equip ment There is air in the fuel system Check whether the fuel system draws in air The fuel filter is blocked Replace the fuel filter The fuel pressure in the...

Страница 48: ...ism 1 The clutch is not released correctly Check whether the clutch is released There is a mechanical fault in the gearbox See the fault finding table below Faulty mechanical gearbox mechanism 2 There...

Страница 49: ...ating and hinged points for excessive play and or sufficient lubrica tion The gearbox mechanism is not configured correctly Check the gearbox mechanism s configuration There is too much play in the si...

Страница 50: ...Servoshift unit is faulty Check the shift valve in the Servoshift unit The gearbox jumps out of gear 1 Possible cause Remedy The gearbox mechanism is not configured correctly Check the gearbox mechani...

Страница 51: ...Wear of the tread Is this symptom the result of a technical fault External fac tors or improper use can also lead to this fault Wear of the middle of the tread can also be the result of driv ing too f...

Страница 52: ...river The edge of the tread is feather like and is worn more on one side than the other The edges of the worn areas can be felt when a hand is rubbed over the tread Possible cause Remedy The toe in is...

Страница 53: ...bsorbers Unbalanced tyre wheel combination Check the wheel balance Sudden and heavy braking the wear pattern covers the entire tread Inform and instruct the driver Separation in the tyre as a result o...

Страница 54: ...present Possible cause Remedy Too large negative wheel camber Check the camber Too large kingpin inclination Check the kingpin inclination The wear only occurs on the outer shoulder The wear pattern...

Страница 55: ...ow Correct the tyre pressure This type of wear almost only ever occurs on non driven non steered axles The wear pattern shows itself as feather like wear on the shoulder of the tyre The wear edges can...

Страница 56: ...tyre due to a heavy knock that has resulted in separation of the tyre which has resulted in a lump on the wall Possible cause Remedy A knock against a sharp edge on a stone kerb or hole in the road Ch...

Страница 57: ...tyre sizes The tyre often comes into contact with the kerb or guide rails Instruct the driver The tyre has been used for a long period of time whilst the tyre pressure was too low Change the tyre bec...

Страница 58: ...the engine manage ment electronic unit Check the engine management software and if neces sary alter the master card Possible cause Remedy Mechanical fault steering column s switch broken Check the st...

Страница 59: ...The tachograph discs of journeys 2 Reliable fuel consumption information from journeys Discuss the results with the customer or the driver If the complaint related to high fuel consumption is justifi...

Страница 60: ...use of AdBlue Long lasting idling can result in a reduced use or no use of AdBlue Low ambient temperatures can result in a reduced use or no use of AdBlue High ambient temperatures can result in an in...

Страница 61: ...fault See the fault finding table High turbo compressor oil consumption 2 3 2 2 High oil consumption 3 2 Air compressor fault Check the air compressor for carbon deposits Mechanical engine fault See...

Страница 62: ...bolts and the gaskets Gas leak between the exhaust manifold and the turbo compressor Check the attachment bolts The turbo compressor is damaged Trace the cause and replace the turbo compressor Fault...

Страница 63: ...old engine etc Ask for reliable information concerning consumption during journeys Ask for tachograph cards of journeys Can the customer or driver reproduce the problem Has the customer or a third par...

Страница 64: ...igned Check the alignment of the vehicle The wrong type of tyre is used Check the type and size of the tyres The brakes drag See the fault finding table Brakes drag Disc brake con struction General in...

Страница 65: ...ses 2 3 3 2 Vibrations and noises 3 12 Noises in the rear axle See the fault finding table Noise in the rear axle Driven axles Vibrations and noises 2 3 3 2 Vibrations and noises 3 12 Possible cause R...

Страница 66: ...SE IN THE DISTRIBUTION BOX Possible cause Remedy The distribution gear wheel is damaged Check the distribution gear wheel The distribution gear wheel play is not correct Check the distribution gear wh...

Страница 67: ...se when steering See the fault finding table Steering pump makes a screeching noise during steering Steering mechanism Noises 2 Fault finding tables 2 24 The steering pump makes an abnormal noise See...

Страница 68: ...always makes a noise Normal noises A hissing noise in the steering box when steering The strength of the noise depends on the system pressure A noise that increases in strength when the poppet valve o...

Страница 69: ...ause of a complaint by the driver leads you to a solution and the repair work that it involves As shown in the diagram the diagnosis information is divided into three separate sections Besides this se...

Страница 70: ...tronic systems in the CAN network is no longer possible Possible cause Remedy CAN H short circuit to power supply Check CAN H CAN L short circuit to power supply Check CAN L CAN H short circuit to ear...

Страница 71: ...ignal low signal volt age Channel B CAN L no message signal low signal volt age Comment The signal may vary depending on the electronic unit that is used vehicle configuration CAN H and CAN L have the...

Страница 72: ...lts will have a greater effect Possible cause Remedy CAN L short circuit to earth The measured signal can be recognized by Channel A CAN H message signal Channel B CAN L no message signal low signal v...

Страница 73: ...inating resistors Possible cause Remedy CAN H interrupted Check CAN H CAN L interrupted Check CAN H Communication with electronic systems that have been separated by the break in the CAN network is no...

Страница 74: ...CAN H and CAN L interrupted in the same location Check CAN H and CAN L CAN H short circuits to CAN L Check CAN H and CAN L CAN H and CAN L have been switched over Check CAN H and CAN L Communication w...

Страница 75: ...booster Replace the clutch booster The thrust bearing has been fitted incorrectly Check whether the thrust bearing has been fitted cor rectly Fit the thrust bearing correctly The clutch housing has c...

Страница 76: ...nd or main cylinder Repair or replace the clutch booster main cylinder Comment If the seal has expanded clean the system and fill with new fluid Possible cause Remedy The bleed opening in the reservoi...

Страница 77: ...he clutch release assembly is not released correctly Check the clutch release assembly The splines have corroded Replace the clutch plate and or clean and apply grease to the splines Possible cause Re...

Страница 78: ...cap The thermostat opens insufficiently or does not open Check the thermostat and its operation The coolant filter is contaminated Check the coolant filter If necessary replace the filter and clean th...

Страница 79: ...ace the expansion plug s Possible cause Remedy The cylinder head gasket s is are faulty Check the cylinder head gasket s The cylinder head s or cylinder block are cracked Check the cylinder heads and...

Страница 80: ...cessary repair the lines The oil pump does not work well enough Check the oil pump Worn main bearings and or big end bearings Check the main bearings and the big end bearings Loose piston cooling grea...

Страница 81: ...control valve remains open Check the gallery pressure The fuel supply pump s delivery is too small Check the fuel supply pump and the gallery pressure Poor fuel quality Drain the fuel rinse the fuel s...

Страница 82: ...tted in the wrong position Check whether the butterfly valve has been fitted cor rectly The butterfly valve is partially operated by a residual pressure in the operating cylinder Check the operating c...

Страница 83: ...valve remains open Check the gallery pressure The fuel supply pump s delivery is too small Check the fuel supply pump and the gallery pressure Poor fuel quality Drain the fuel rinse the fuel system re...

Страница 84: ...he pump unit s or it they is are blocked Check the operation of the pump unit s Possible cause Remedy There is air in the fuel system Check whether any air is drawn in Pay particular atten tion to the...

Страница 85: ...of the pump unit There is a mechanical fault with the injector or it is blocked Check the operation of the injector Possible cause Remedy Incorrectly programmed pump unit s injector s Check the calib...

Страница 86: ...e operation of the pump unit s There is a mechanical fault with the injector s Check the operation of the injector s Incorrectly programmed pump unit s injector s Check the calibration codes and if ne...

Страница 87: ...Drain the fuel rinse the fuel system replace the fuel fil ters and fill the fuel tank with fuel There is air in the fuel system Check whether any air is drawn in Pay particular atten tion to the suct...

Страница 88: ...pump Bleed the fuel system The fuel filter is blocked Replace the fuel filter and clean the system The fuel supply pump s delivery is too small Check the fuel supply pump and the gallery pressure Ther...

Страница 89: ...it and the ignition unit is faulty Check the wiring The ballast unit is faulty Replace the ballast unit The ignition unit s connector has not been connected correctly Check whether the connector has b...

Страница 90: ...e movement of the brake shoes clean the brakes Different or incorrect brake lining quality Check the brake lining Slack or broken return spring Check the return spring Faulty automatic slack adjuster...

Страница 91: ...he trailer brake system The brake pad is stuck in the brake caliper Check the play between the brake pads and the brake caliper Incorrect play between the brake pads and the brake cal iper Check the p...

Страница 92: ...ering oil line is bent or pinched Check the steering oil lines The steering pump s delivery is too small Check the steering pump s delivery Fault Possible cause Remedy Noises Air in the oil The oil le...

Страница 93: ...teering column runs heavily Rectify the heavy run ning The steering mechanism is faulty Repair Replace It is not possible to drive for wards in a straight line The oil level in the reservoir is too lo...

Страница 94: ...0 Futura FHD2 FMD2 E6 DIAGNOSIS Systems 2 26 2 DD1020_01...

Страница 95: ...e cause of a complaint by the driver leads you to a solution and the repair work that it involves As shown in the diagram the diagnosis information is divided into three separate sections Besides this...

Страница 96: ...ling sys tem Check the oil cooler The oil temperature is too high Check whether the correct oil cooler has been fitted Too high sump pressure as a result of a too high blow by Check the compression pr...

Страница 97: ...n the compressor side The turbo compressor is damaged Trace the cause of the damage and replace the turbo compressor Possible cause Remedy The engine distribution is incorrectly configured Check the e...

Страница 98: ...ure is too high cooling system The coolant temperature is too high 3 4 Possible cause Remedy Faulty intake system Check the intake system Incorrect poly V belt tension Check the poly V belt tension If...

Страница 99: ...long period of time Check the air filter and the entire air intake system Damaged piston s Check the piston s The cylinder lining has become worn due to poor cylinder lubrication Check the lubricatio...

Страница 100: ...he problem Bore polishing smooth surfaces without a visible regular honing pattern A B and C have disap peared The cylinder bore must be replaced if there is any degree of bore polishing Possible caus...

Страница 101: ...of the injector s Possible cause Remedy If only the exhaust valve tappets have been broken the engine speed is too high Check the engine protection data in the engine manage ment system Instruct the...

Страница 102: ...m Too little lubricating oil due to The oil level being poorly checked Too low oil level Not topping up the oil Excessive oil use An external oil leak Air bubbles in the lubrication system due to a lo...

Страница 103: ...the camshaft gear wheel are in the wrong position Check the position of the camshaft gear wheel Possible cause Remedy During work a foreign object has got into the combustion chamber via the inlet ex...

Страница 104: ...he entire air intake system Damage caused by the piston pin lock spring or springs that has or have been driven out Possible cause Remedy The lock spring for the piston pin is broken or has been fitte...

Страница 105: ...n places due to a leaking dripping partially blocked fuel injector Check the operation of the injector The entire surface of the piston barrel Possible cause Remedy Overheating of the cylinder due to...

Страница 106: ...s of the differential housing Clean the contact surfaces and apply new sealant Possible cause Remedy Damaged or broken spider with stuck or seized ring gear Caused by long lasting excessive wheel spin...

Страница 107: ...ymptom can be the result of overloading the vehicle Possible cause Remedy Internal fault in the shock absorber Replace the shock absorber Too little oil in the shock absorber due to an oil leak Replac...

Страница 108: ...ck Not enough shock absorption See the fault finding table Shock absorber damping too soft Axle mounting and suspension Shock absorber Shock absorber damping too soft 3 13 The shock absorber is broken...

Страница 109: ...every correction that is made and if necessary correct the alignment Possible cause Remedy Incorrectly adjusted or faulty height control Check the height control Bent torque rod Replace the torque ro...

Страница 110: ...urface Raise the chair to the highest position Possible cause Remedy There is a leak in the pneumatic system Check the level control valve the air suspension and the air lines for leaks The cylinder i...

Страница 111: ...0 Futura FHD2 FMD2 E6 REPAIR GUIDELINES 3 DD1020_01 REPAIR GUIDELINES...

Страница 112: ...0 Futura FHD2 FMD2 E6 REPAIR GUIDELINES 3 DD1020_01...

Страница 113: ...ten based on the assumption that the repair and maintenance work will be car ried out by an experienced well trained mechanic This mechanic must be qualified to carry out the work in a respon sible an...

Страница 114: ...nce 50 Nm in the example is for the use of the torque spanner These tightening torques deviate from the standard tighten ing torques given in the standard tightening torques over view The threaded con...

Страница 115: ...s which pollute the environment Therefore make sure the drained oils greases and liquids as well as the used oil filters and fuel filters are collected in appropriate separate containers When working...

Страница 116: ...e components that are considered to be chem ical waste 1 3 2 DISPOSAL OF COMPONENTS Pay attention to the following when disposing of components Non chemical waste Chemical waste Overview of components...

Страница 117: ...air because it will result in mechanical damage Place clean disassembled components in a dry location and cover them with a dry suitable cover Plug the areas where components have been removed so that...

Страница 118: ...e behind them will be flushed away As a result the spider may get stuck and cause the steering mechanism to jam A bleed valve is fitted to the steering mechanism s power steering reservoir Water may e...

Страница 119: ...nnections etc Make sure no water can enter the air intake system via the air inlet or its flexible seals When the vehicle has been cleaned it must be lubricated again with a grease gun or via the cent...

Страница 120: ...psulation is dirty A certain quantity of fuel may be released when removing engine components or fuel system components To keep this quantity of fuel to a minimum unscrew the tank cap to allow any exc...

Страница 121: ...le s correct driving behaviour Check the warn ings and the vehicle s driving behaviour during a test drive Also check the brake system for leaks if repairs have been carried out on the brake system Th...

Страница 122: ...0 Futura FHD2 FMD2 E6 REPAIR GUIDELINES General information 1 10 3 DD1020_01...

Страница 123: ...iew this applies to compo nents such as the windscreen wiper blades air dryer ele ment gaskets V belts and filters If for example non original VDL Bus Coach filters are used insufficient protection ma...

Страница 124: ...aking fuel or air line must be repaired as soon as possible A leaking fuel line may constitute a fire hazard while a leak ing air line may affect the vehicle s braking performance In the event of a le...

Страница 125: ...use a rubber or mallet 4 Push the air line together with the clamping ring con struction into the connection coupling until it touches and tighten the cap nut on to the coupling by hand 5 Tighten the...

Страница 126: ...able for lines with a diameter of 6 mm 10 mm and 22 mm The line clamps can be joined together Rubbing through can sometimes be prevented by unscrew ing an elbow piece or a T piece and then retightenin...

Страница 127: ...rfaces and is resistant to oil water and heat 5 There are different instructions for cylinder head gaskets 6 Always tighten the attachment bolts evenly 2 3 2 LIQUID GASKETS The instructions give infor...

Страница 128: ...INSTALLING OIL SEALS Removing an oil seal 1 If possible use the special tools VDL Bus Coach no 41329458 and VDL Bus Coach no 40694928 or VDL Bus Coach no 40694928 A and VDL Bus Coach no 40484899 B to...

Страница 129: ...itted with a liquid gasket and an oil seal with a rubber sleeve is fitted with oil or liquid soap 6 Unless otherwise stated always fit unitized oil seals in a dry condition 7 Always apply a small amou...

Страница 130: ...ns specify that the bearing should be heated before it is fitted avoid exceeding the specified tempera ture Also avoid local overheating Raise the temperature of the bearing evenly by heating it in an...

Страница 131: ...0 Futura FHD2 FMD2 E6 LIQUID AND LUBRICANT GUIDELINES 4 DD1020_01 LIQUID AND LUBRICANT GUIDELINES...

Страница 132: ...0 Futura FHD2 FMD2 E6 LIQUID AND LUBRICANT GUIDELINES 4 DD1020_01...

Страница 133: ...1 2 ALTERNATIVE FUELS The worldwide demand for less polluting engine emissions and the increased use of renewable energy sources in order to reduce our dependence on fossil fuels are the most impor ta...

Страница 134: ...with normal diesel it practically becomes non biodegradable The disadvantages include Biodiesel is unstable and degrades at higher tempera tures Poor cold starts at low ambient temperatures Lower vap...

Страница 135: ...tanks of vehicles that are temporarily not in use 6 months for storage in storage tanks and supply sys tems Comment Biodiesel has solvent properties so that changing from diesel to biodiesel may cause...

Страница 136: ...emissions deposits in combustion chambers and a reduction in performance and the useful life of fuel injection equipment The use of PPO is not permitted as a fuel in combustion engines because the as...

Страница 137: ...asured using a refractometer Use a soft lint free cloth to clean the prism and the flip lid and apply a few drops of the liquid to be measured on the prism 1 Closing the lid 2 will cause the liquid to...

Страница 138: ...the tank must not be refilled with the liquid that has been pumped out because the purity is then no longer guaranteed Avoid bodily contact In the event of skin contact rinse with plenty of water In...

Страница 139: ...0 Futura FHD2 FMD2 E6 CLEANING INSTRUCTIONS 5 DD1020_01 CLEANING INSTRUCTIONS...

Страница 140: ...0 Futura FHD2 FMD2 E6 CLEANING INSTRUCTIONS 5 DD1020_01...

Страница 141: ...n this protection it is important for the vehicle to be regu larly cleaned This should be done at least once a year It is important to do so at the end of the winter Gritting salt has a negative effec...

Страница 142: ...e behind them will be flushed away As a result the spider may get stuck and cause the steering mechanism to jam 10 Be careful not to damage the lamellae when cleaning the cooling unit s radiator inter...

Страница 143: ...m distance to the chassis bodywork is 30 cm 5 It is not permitted to use additives 6 The pH value must be between 6 and 8 7 Always rinse the vehicle with clean water 8 When the vehicle has been cleane...

Страница 144: ...pray directly at the electrical components such as the starter motor and the alternator 3 Do not spray directly at electrical connections such as the motor management system s connectors 4 Make sure n...

Страница 145: ...e because this can result in the penetration of moisture Comments Give special attention to the strengthening ribs on the top of the gearbox because water could remain behind them Make sure no water t...

Страница 146: ...dashboard and other plastic parts The following must be taken into consideration when the dashboard or other plastic components must be cleaned 1 Remove the excess dirt using a vacuum cleaner 2 Clean...

Страница 147: ...ation a steam cleaner may also be used 3 If a steam cleaner is used do not aim the spray too long at the same place because this can result in the pene tration of moisture 1 5 2 CONTAMINATED WITH DIES...

Страница 148: ...ossible Older stains are more difficult to remove Cleaning metal or plastic components contaminated with AdBlue 1 In the event of contamination with AdBlue the AdBlue must be removed from the metal or...

Страница 149: ...0 Futura FHD2 FMD2 E6 STORAGE AND PRESERVATION 6 DD1020_01 STORAGE AND PRESERVATION...

Страница 150: ...0 Futura FHD2 FMD2 E6 STORAGE AND PRESERVATION 6 DD1020_01...

Страница 151: ...tteries must be removed Store the batteries in a dry location During storage connect the batteries to a trickle charger so that the batteries remain continuously charged Contact VDL Bus Coach for the...

Страница 152: ...t open if the air pressure drops Storage period of more than 3 months For a storage period of more than 3 months the measures given below must be taken into consideration in order to avoid a decline i...

Страница 153: ...the tachograph back into operation If the vehicle has been stored for more than a year the tachograph s backup battery must be replaced Test all the functions Contact VDL Bus Coach for the measures t...

Страница 154: ...t water hose to a maximum pressure of 100 bar and a maximum temperature of 90 C Never direct the jet too long at the same area because the high pressure and high temperature may damage the paintwork o...

Страница 155: ...0 Futura FHD2 FMD2 E6 PAINT TREATMENT 7 DD1020_01 PAINT TREATMENT...

Страница 156: ...0 Futura FHD2 FMD2 E6 PAINT TREATMENT 7 DD1020_01...

Страница 157: ...e a two component epoxy or polyester based filler Use a two component PUR finishing coat with a gloss level of 70 units for a chassis finishing coat measured at 60 degree geometry Maximum drying tempe...

Страница 158: ...treatment 1 2 7 DD1020_01 Leave the rust removal agent to work for the time specified by the manufacturer Rinse the area where rust has been removed at least twice with plenty of clean tap water Dry t...

Страница 159: ...and the area to be treated using P80 sandpaper so that it is completely clean and free of rust 5 Remove any dust from the sanded area with a tack rag 6 Remove any grease and dirt from the area to be t...

Страница 160: ...for dry sanding and P600 P800 sandpaper for wet sanding Remove any dust from the sanded area with a Tack rag and clean the area with a solvent 2 Apply the topcoat over the primer and the sanded areas...

Страница 161: ...per Use a Tack cloth to remove any dust from the area to be treated Degrease the surface to be treated and the surround ing area with a solution of for example paint thinner 2 Applying zinc paint Prim...

Страница 162: ...0 Futura FHD2 FMD2 E6 PAINT TREATMENT Paint treatment 1 6 7 DD1020_01...

Страница 163: ...ts They should be re treated every three years Hollow cavities and the inside of beams should be treated for corrosion after repair to prevent them from rusting on the inside 2 1 1 PRODUCT Only use Wa...

Страница 164: ...Check all the external components for damage and check the attachment of the protective layers such as the antichip coating and the paint 3 Thoroughly check the corners where dirt can collect and if n...

Страница 165: ...ith the paint instructions 2 2 4 COMPONENTS NOT TO BE TREATED A coating must not be applied to the following components because this may have an adverse effect on their operation Wheel suspension Air...

Страница 166: ...f dirt and moisture The seal ant may be burnt in the event of repair work close to the sealant seams It is very important that the sealant seams are carefully repaired so as to prevent corrosion betwe...

Страница 167: ...ealant at a temperature below 5 C or above 40 C The optimal application temperature is between 15 C and 25 C 5 Apply sealant Sikaflex 221 and smooth out the joins using Sika Tooling Agent N as shown i...

Страница 168: ...0 Futura FHD2 FMD2 E6 PAINT TREATMENT Anticorrosion antichip coating 2 6 7 DD1020_01...

Страница 169: ...0 Futura FHD2 FMD2 E6 INSTRUCTIONS FOR JACKING UP AND SUPPORTING THE VEHICLE 8 DD1020_01 INSTRUCTIONS FOR JACKING UP AND SUPPORTING THE VEHICLE...

Страница 170: ...0 Futura FHD2 FMD2 E6 INSTRUCTIONS FOR JACKING UP AND SUPPORTING THE VEHICLE 8 DD1020_01...

Страница 171: ...ed In the situations given below the equipment and the instruc tions are linked to individual work tasks 1 1 1 SITUATION I Inspection or work on the underside of the vehicle while the air bellows rema...

Страница 172: ...ifting equipment does not provide sufficient safety The following conditions apply The air bellows are emptied 0 5 bar prior to lifting After lifting the vehicle is supported by axle supports People a...

Страница 173: ...and supporting 8 DD1020_01 1 1 4 SITUATION IV Removing a wheel from a vehicle The following conditions apply Only one wheel is raised off the ground Nobody is under the vehicle Equipment Jack jack sta...

Страница 174: ...le vehicle place the six synchronized wheel lifts under the front axle the 2nd axle and the 3rd axle 5 Lift the vehicle so that all the tyres are a couple of centi metres off the ground Check the posi...

Страница 175: ...Stop lowering when the vehicle is a couple of centimetres off the ground 3 Turn off the unconditional kneeling function so that the vehicle returns to the driving height 4 Lower the vehicle to the gr...

Страница 176: ...dule where the transverse beam crosses the longitudinal beams and raise the front module so that the tyres come off the ground 6 Unconditionally kneel the vehicle see 1 6 Unconditional kneeling 1 13 I...

Страница 177: ...ring when the vehicle is a couple of centimetres off the ground 3 Turn off the unconditional kneeling function so that the vehicle returns to the driving height 4 Lower the vehicle further until the w...

Страница 178: ...pports with a spindle First read the instructions concerning 8 1 2 Wheel lifts 1 4 and 8 1 3 Central lifting columns 1 6 Read the instructions provided with the lifting equipment to see whether the li...

Страница 179: ...e is lowered horizon tally Next rotate the spindles of the two rear axle sup ports until the supports touch the support points 5 For extra stability an axle support can be placed under support point C...

Страница 180: ...e supports at the rear of the vehicle under the support points C Use work shop axle supports with a spindle 5 Make sure the axle supports under support points A support the vehicle first if the vehicl...

Страница 181: ...g chassis the jack must never be placed in the area between the two steering stubs When the contact switch is turned on the height control system produces too much movement causing the vehicle to beco...

Страница 182: ...up the trailing axle place the jack under the axle beam as indicated Read the accompanying documentation before using the jack ILAz0082 To prevent deformation of the axle beam the jack must not be pl...

Страница 183: ...in the fuse box in the driver s sleeping compart ment Manually bleeding the air bellows If the vehicle does not have the function described above the air bellows must be bled manually After doing so...

Страница 184: ...heel rim cannot get between the support bracket 1 7 2 AUXILIARY TOOLS FOR CENTRAL LIFTING COLUMNS Use suitable supports with the appropriate separate auxiliary tools for the axles and slide them suffi...

Отзывы:

Похожие инструкции для Futura FHD2 E6