


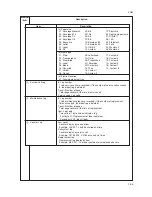


Maintenance
Description
item No.
2GM
1-4-14
U403
Adjusting margins for scanning an original on the contact glass
Adjustment
See page 1-6-48.
U404
Adjusting margins for scanning an original from the DP
Adjustment
See page 1-6-53.
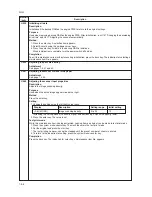
U411
Adjusting the scanner automatically
Description
Uses the original for adjustment (P/N: 2A668011) to carry out the automatic adjustment of scanner (scanner
center line adjustment, scanner leading edge registration adjustment, magnification of the scanner in the
auxiliary scanning direction adjustment, monochrome/color input
γ
adjustment, and color correction).
Purpose
To run after replacing the engine PWB, ISU unit, exposure lamp or platen glass (shading plate). Before carrying
out automatic adjustment, input the target values using U425 “Setting the target.”
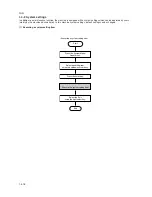
Method
1. Run U425 “Setting the target” to input the target values.
2. Set the original to be used for adjustment on the platen.
3. Set five or six sheets of blank paper on the original for adjustment that has been set.
4. Press the enter key. A selection item appears.
5. Select Execute using the up/down cursor keys.
6. Press the enter key. Adjustment is carried out.
* Do not turn the power switch OFF or open/close the cover (turning the safety switch OFF/ON) before
automatic adjustment is complete.
7. If the adjustment is successful, OK is displayed. If not, NG is displayed.
* If NG is displayed, set the original for adjustment properly again, gently close the original cover, and then
carry out the adjustment again.
Completion
Press the back key. The indication for selecting a maintenance item No. appears.
Содержание CD 1018
Страница 1: ...Service Manual MFP Copy CD 1018 Date 17 03 2005 ...
Страница 2: ...Service Manual MFP Copy DC 2018 Date 17 03 2005 ...
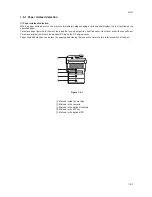
Страница 70: ...2GM 1 5 2 2 Paper misfeed detection conditions Registration sensor Exit sensor Figure 1 5 2 ...
Страница 110: ...2GM 1 6 17 15 Remove four screws 16 Remove the drive unit Figure 1 6 20 Removing the drive unit Screws Drive unit ...
Страница 124: ...2GM 1 6 31 Eraser lamp 9 Remove the eraser lamp Figure 1 6 35 Removing the eraser lamp ...


