background image

Introduction

1-11

Creating and Saving a Scene

S

ec

ti

o

n

 1

7.

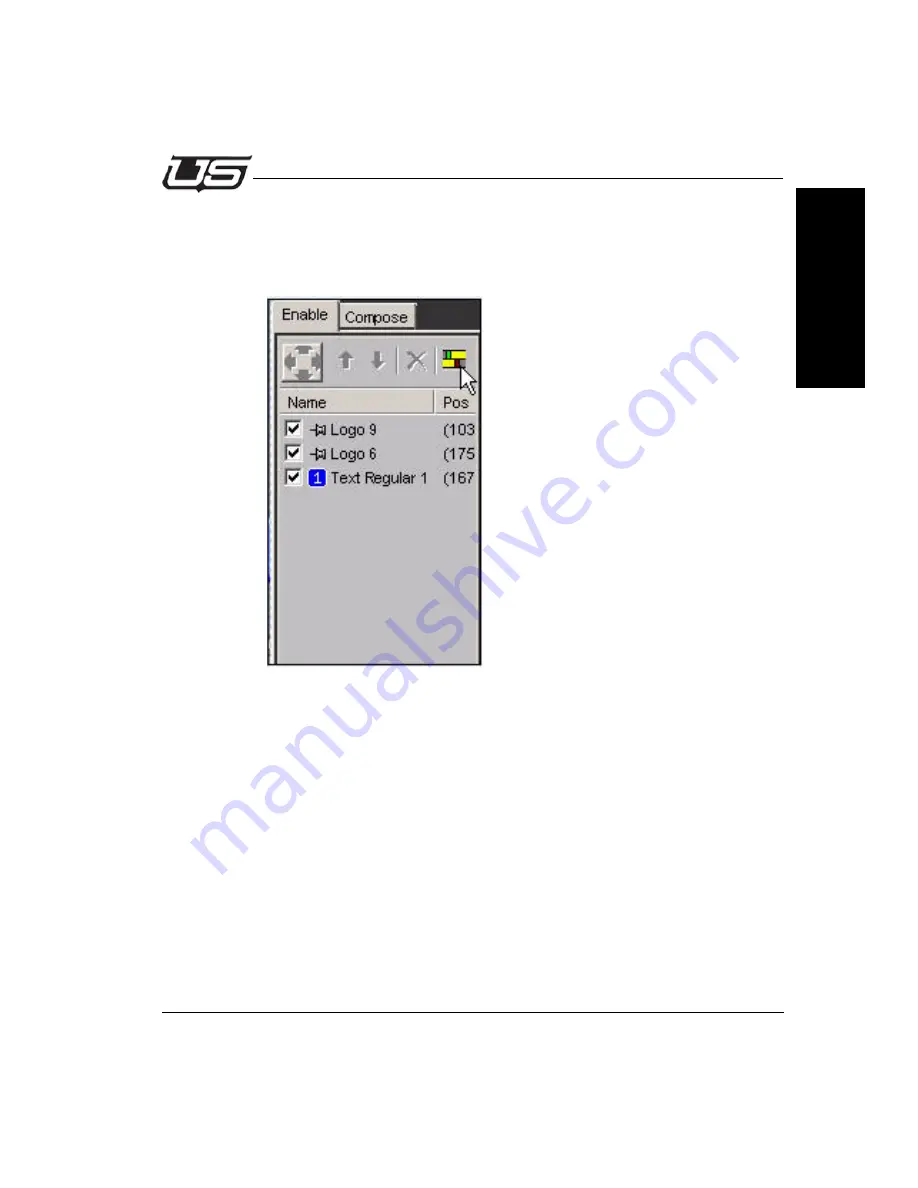
To generate a Timeline for the field, recall or create a scene containing 2 or more 
objects. We want one of the objects to appear 150 frames after all the other 
elements in the scene and we want it to stay on the screen for 450 frames. In 
Enable, click the TimeLine button.

Figure 1-7.

Содержание Graphic Station 4000

Страница 1: ...Graphic Station 4000 System Setup and Operations ...

Страница 2: ... accurate as of the publication date Utah Scientific Inc assumes no liability for errors or omissions In addition Utah Scientific Inc assumes no responsibility for damages resulting from the use of this guide FCC Compliance USA and Digital Equipment Compliance Canada This equipment has been tested and found to comply with the limits for a Class A digital device pursuant to Part 15 Subpart B of the...

Страница 3: ...n conformance with the following standards Emission EN55022 1994 A1 A2 Immunity EN55024 1998 EN61000 3 2 EN61000 3 3 Safety IEC 60950 1 2001 EN 60950 1 2001 Following the provisions of the Directive s of the Council of the European Union EMC Directive 89 336 EED Low Voltage Electrical Directive 72 23 EEC Utah Scientific Inc hereby declares that the product specified above conforms to the above Dir...

Страница 4: ...quire opening the chassis changing a power supply or removing a board should be performed by qualified personnel only To reduce the risk of electric shock do not perform any service unless you are qualified to do so Heed all warnings on the unit and in the operating instructions Do not use this product in or near water Disconnect AC power before installing any options or servicing the unit unless ...

Страница 5: ...ge and current rating as referenced in the appropriate parts list for this product Always refer fuse replacement to qualified service personnel Have qualified personnel perform safety checks after any service Cautions Please observe the following important cautions When installing this equipment do not install power cords to building surfaces To prevent damage when replacing fuses locate and corre...

Страница 6: ...S A Telephone 1 801 575 8801 FAX 1 801 537 3098 Technical Services voice 1 800 447 7204 Technical Services FAX 1 801 537 3069 E Mail General Information info utsci com E Mail Technical Services service utsci com World Wide Web http www utahscientific com After Hours Emergency 1 800 447 7204 Follow the menu instructions for Emergency Service ...

Страница 7: ...s For the first one 1 year after purchase of the software and the first two 2 years after the date of purchase of the hardware Utah Scientific s and its suppliers entire liability and purchaser s exclusive remedy shall be at Utah Scientific s option either Return of the price paid or Repair or replacement of the software or hardware that does not meet the above warranties and is returned to Utah S...

Страница 8: ...tain states jurisdictions No liability for consequential damages To the maximum extent permitted by applicable law in no event shall Utah Scientific or its suppliers be liable for any damages whatsoever including without limitation damages for loss of business profits business interruption loss of business information or any other pecuniary loss arising out of the use of or inability to use Utah S...

Страница 9: ... 1 6 Logo Bug 1 6 Field 1 6 Snap point 1 6 TimeLine 1 7 Scene 1 7 Hot spot 1 7 Hotkey 1 7 The Basics 1 8 Creating and Saving a Scene 1 9 Saving a scene 1 14 Recalling a Scene 1 15 Clearing the Canvas 1 15 The LogoMaster Library 1 16 Backgrounds Tab 1 17 Library Editor 1 17 Cursors Tab 1 19 Logos Tab 1 20 Fields Tab 1 23 Field Text Style Function 1 26 Layers 1 27 Text Style Edit Color Function 1 28...

Страница 10: ...ispatcher 1 44 Serial to Telnet Bridge 1 49 Section 2 CrawlMaster Overview 2 1 Messages Overview 2 1 CrawlMaster 2 2 Crawl Tab 2 3 Crawl Channels Incoming Tab 2 5 Crawl Channels Query Tab 2 6 Database Setup Example 2 7 Revert Query 2 12 Crawl Channels Scheduler Tab 2 13 Channel Messages 2 14 Promo Tab 2 14 Manual Messages 2 14 Add a Manual Message 2 15 Incoming Messages 2 15 Schedule Tab 2 16 Edit...

Страница 11: ...rough a serial port connection which allows master control to recall the graphic pages manually or through MC 4000 automation control The GS 4000 includes two primary applications that are used together to combine graphics and crawls into scenes that are saved for quick recall by the master control switcher The two main applications are LogoMaster and CrawlMaster LogoMaster provides a method of ma...

Страница 12: ...1 2 GS 4000 LogoMaster The Chassis Rear Panel Connections Figure 1 1 The GS 4000 rear view ...

Страница 13: ...master allows text fields to be added which can be used for text only scenes or combined with graphic elements The text fields can be updated manually or automatically with information from data connections The clock and up down timer are two examples of automatically updating data Installation and Overview The GS 4000 Splash Screen is loaded when the GS 4000 is powered up and provides a quick way...

Страница 14: ...r from 0000 to 9999 is the name of a particular scene Newly composed scenes displayed on the work canvas can be saved using the Numeric Keypad on the right side of the keyboard To save a newly composed or modified scene the operator can use the shortcut in the keypad area of the keyboard Note If there is an existing scene with the same number a dialog box appears to ensure the change is to be made...

Страница 15: ...lays the name size and X Y position of each object in the scene 8 Logos and Bugs A Logo is a static graphic and a Bug is an animated graphic 9 Command buttons CGKey On Off controls whether or not the canvas appears on the SDI output II Intelligent Interface Execute Ignore is used to enable automated recall of LogoMaster scenes using the Chyron Intelligent Interface protocol SS Server Sockets Enabl...

Страница 16: ... connections A Field can also be married to a static or animated background graphic Snap point Allows predefining positions characterized by the coordinates x y for logos persistent from one session to another Snap points for logos are saved with each graphic in the library and can be used in any future scenes containing that logo Snap points are saved to the library for their respective element L...

Страница 17: ...h the appearance disappearance of an object from the scene Logo Bug or Field Scene The saved ensemble of one or more static or animated objects together with their positions and possibly with a timeline Hot spot Reference coordinates center of an object used when positioning the object on the canvas Hotkey User defined keystrokes that result in an action such as placing a particular object on the ...

Страница 18: ...of the screen 4 in page 3 small tns the same static scene with a size smaller than that of the previous one that can be loaded in the rolling menu from the left side of the screen 4 in page 3 The scene itself scene file a collection of links to the objects from the library that compose it logos bugs backgrounds fields and the timelines All of the imported graphics files backgrounds logos and field...

Страница 19: ...rom the GS 4000 Launch Screen 2 From the LogoMaster Main Toolbar click on Library then select Open The Open LogoMaster Library dialog box will appear allowing us to select the Library containing the desired objects Figure 1 4 3 The objects in the Library will be displayed under the Main Toolbar Figure 1 5 ...

Страница 20: ...t can be a logo bug a background or a field We repeat the action with the other objects 5 To reposition an object we need to be working in Compose with the Cursor button selected We can then left click drag and release the object at the desired location on the canvas Figure 1 6 6 To add text to our scene we will need to use a text field In Compose left click on a Field text icon and then left clic...

Страница 21: ...e a Timeline for the field recall or create a scene containing 2 or more objects We want one of the objects to appear 150 frames after all the other elements in the scene and we want it to stay on the screen for 450 frames In Enable click the TimeLine button Figure 1 7 ...

Страница 22: ...uration to set the frames for the appearance and the disappearance of the object Click on the green Marker to open the Time In entry window Enter 150 and click OK Figure 1 8 Click on the yellow marker to open the Duration window Enter 450 and click OK The Time line Editor window will now display the start duration and end frame ...

Страница 23: ...on the TimeLine Editor window will look like this Result When loading that scene from the rolling menu the field with the text will appear 150 frames delayed and after another 450 frames it will disappear Use the Copy Keyframes and Paste Keyframes functions to apply the same settings to any other object in the scene Click X to close the Time Line Editor window and the Timeline changes will be auto...

Страница 24: ...the NumPad it will be displayed in the Scene number display area of the screen To save it press the minus key If that number has already been attributed to another scene from our library a dialog box will appear Note Scene 0 is always left blank It is used to clear the canvas by recalling Scene 0 on the Num Pad Selecting Del on the NumPad then pressing Enter will also recall Scene 0 Figure 1 10 Th...

Страница 25: ...n the rolling menu Clearing the Canvas Clearing the current scene from a Canvas can be accomplished in 3 ways 1 Recall Scene 0 from the Num Pad Note Scene 0 is only used to provide a blank canvas Never store anything to Scene 0 2 Select Del on the Num Pad and press Enter Del automatically selects Scene 0 3 Click on the Clear All icon in the Compose section or in the Visual Library section of the s...

Страница 26: ... no longer appear in the recalled scene If the library is saved before closing the LogoMaster application the changes will apply to all future sessions If the changes are not saved the Library objects will revert to the original state the next time the LogoMaster application is opened To open a library click Library at the top of the application In the drop down window click on Edit This will open...

Страница 27: ...rder and export functions This pane also includes the list of available backgrounds The list includes the background name position size and description The Name column contains a thumbnail of the background graphic and the name the user has given the background The Size Pos column contains the size and XY starting positions for the graphic The Hotkey column contains the keyboard shortcut to recall...

Страница 28: ... Show as Toolbar Button Will place a graphic thumbnail in the visual workspace and Compose sections Name and Desc Provides the ability to give the background a Name and Description which is shown in the backgrounds list X Y Start Used to offset the background graphic with respect to the display area Center Returns the X Y Start fields to their original settings Hotkey For setting up a quick keyboa...

Страница 29: ...user has given the graphic The Cell Size column contains the size of the graphic The Hotkey column displays the keystrokes that have been assigned to a cursor The Cells Mem column contains the number of cells and how much memory the cursor uses The Description initially contains the graphic name but can be edited in the right hand pane The right hand pane contains the tools to change the cursor at...

Страница 30: ...and reorder the Logos list This pane also displays a list of the Logos currently loaded into the LogoMaster library The list includes the graphic name graphic size the number of cells 1 for a static graphic and description The Name column contains a thumbnail of the graphic and the name the user has given the graphic The Cell Size column contains the XY pixel size of the graphic The Description co...

Страница 31: ...pot to the original values Fields to Run Sets the number of fields that a bug animated graphic will run before stopping A value of 0 will cause the animation to run continuously Persistent Determines whether or not the graphic remains visible after it has run its allotted number of fields Play Causes the bug to animate in the display window located at the bottom of the pane if the Persistent box i...

Страница 32: ...he cursor is currently located Figure 1 13 The Resize Picture application can be used to resize any background logo or bug graphic in the Library Changesaremadetoanimage whilepreservingtheoriginal height Filtersarebasedon mathematical functionsthat candeterminethequalityof theimageafter scaling resizing Changesaremadetoanimage whilepreservingtheoriginalwieth ...

Страница 33: ...e fields list This pane displays a list of the Fields currently loaded into the LogoMaster library Each Field entry includes a Name Style Hotkey and Description columns The Name column includes a thumbnail of the font the information entered into the Name field in the right hand pane of the Field window and if used the data link port number The Style column includes the font type font size and the...

Страница 34: ...xt Text entered into this box will be displayed as part of the visual library icon Auto Increment Used when the Text box above contains a number such as 1 Each time an instance of that Field is placed on the screen the system will automatically increment the number First field placed on screen will display a 1 The next Field placed on the screen will display 2 etc Right to Left Reading Order N A C...

Страница 35: ...th entry field narrowing functions will be activated The function follows these rules assuming that both the Adj Aspect and Adj Height boxes are checked in the order shown in trying to reduce the width 1 Kerning is first reduced by 30 2 The width of the character is then reduced by 30 3 The size of the character is then reduced by 30 After all three rules have been used the text will no longer be ...

Страница 36: ...ame Times New Roman Arial etc the font style weight and posture Regular Bold Italic Bold Italic the size the aspect the color the transparency alpha together with various graphic effects such as Edge Border Background Blur Bevel etc The text style is automatically saved after editing and is persistent for that Field A Field is built for each text style required A Field s text style can always be c...

Страница 37: ...r characteristics of the characters outline Edge Color Alpha Type Size Style Direction Blur characteristics of the characters edge Expanded Body font is the same as Body font but allows for the adjustment of the thickness of the character Color Offset Thick Blur Background Color Offsets Thick Width Height and Blur X Y Offsets Allows the positioning of the layer object to be changed Thick Allows th...

Страница 38: ...ox Preview Provides a resultant view of the Alpha RGB and Value settings Text Styles Aux Colors Function The Aux Colors button opens the Aux Colors window This window allows the operator to apply multiple colors vertically to the Body Outline or Edge Position Corresponds to the vertical position on the character where the color is to be applied Adjust the relative vertical position on the characte...

Страница 39: ... window with available fields by pressing the Locale button a window will appear here we can select the language used in writing Using this function the text is transformed from ASCII format or DBCS into Unicode using an algorithm specific for the selected geographical area Figure 1 15 ...

Страница 40: ... of the window provides access to configuration options for the selected shape Clip Player Option The GS 4000 Clip Player option allows the use of MOV and AVI animations within scenes These can be used for animated bugs snipes and animated background banners for crawls and text fields To import clips for use within the GS 4000 there will be a Clips tab within the Library Editor Figure 1 16 Library...

Страница 41: ...d looping Once a clip is imported in to the Library it can the be used within a scene just like Logos or other graphics Master Keys Tab Figure 1 17 User definable shortcuts Example Load Selected Scene after selecting a scene from the rolling menu using the Alt L key the scene is loaded in the composition area canvas Merge Selected Scene after selecting a scene from the rolling menu using this shor...

Страница 42: ...ode Disable Compose Scenes can only be called up for playout and can t be modified with this option selected Main Window Sizeable Border The buttons used to Minimize Maximize and Close the window will be displayed Show Status Bar Located at the bottom of the Logomaster application ...

Страница 43: ...size of the thumbnails for the rolling menu Snap Radius pixel Determines how close an object must be to a snap point before snapping to it Preview Aspect Ratio Aspect ratio for the Preview window Preview is a separate independent window from the Canvas Preview is used to display larger version of the scene thumbnails To display a scene in the Preview window left click on the desired scene thumbnai...

Страница 44: ...he Folders tab you can change the directories where LogoMaster stores and recalls elements such as scenes and backgrounds By default LogoMaster stores these elements within their own folders inside the LogoMaster program directory Figure 1 19 ...

Страница 45: ...Introduction 1 35 Environment Settings Editor Section 1 Intl Intf Client Tab Figure 1 20 Crawl Tab Sets the transition speed and whether an Auto Slide On Off screen is in effect ...

Страница 46: ...cts bugs logos and fields The level of priority for a Background is 0 Priorities range from 0 to 9999 An object with a level of priority will always be hidden by an object of the same category with a superior level ex a logo with priority 1 will be hidden by a logo with priority 2 If we have a logo and a field with equal levels of priority the logo will be hidden by the field The channels for craw...

Страница 47: ...he time and or date is to be displayed Use Time Code Switches the clock source from the PC clock to an optional internal time code reader Edit Formatting Activates the Format controls Timer Server The Timer Server feeds count up or countdown time to a linked text Field The left hand section of the Timer Server window is for setting the Client port number and Starting and Stopping the connection Th...

Страница 48: ...the desired location and the NOAA page with the weather conditions will be displayed Cut and paste the URL form the web browser into the Temperature Feeder XML address field The application will now feed the temperature from this page to the LogoMaster Field linked to the Temperature feeder port The left hand section of the Temperature Feeder window is for setting the Client port number and starti...

Страница 49: ...tion provides a list of connections with information on each including the port being used for communication the Address Field name being addressed the current status and the Message currently being sent The middle section of the screen can be used for manually entering text or modifying lines of text in the Message field within the connection list The bottom window provides Status messages for Ev...

Страница 50: ...d The Auto Connect checkbox will cause Field Feeder to automatically attempt to connect to the port defined under Port Nr upon launch The Address field below Port Nr can be used to specify which machine to connect to and the Refresh Period defines how often data is being sent Figure 1 22 Add Socket Port ...

Страница 51: ...te field can be used in conjunction with the Once Daily and Weekly options whereas the Time Interval field can be used with updating Every X seconds The filename is the source file containing the data we want to send with Field Feeder and that will be re polled by Field Feeder based on the previous settings Once the event is defined clicking Add will then add that event to the list of events on th...

Страница 52: ...eder when launched to automatically connect to the field crawl that will be receiving the data The Start and Stop buttons can be used to suspend transmission of data or resume sending and to the right of those buttons there s a connection status displaying the state of the connection between News Data Feeder and the field crawl it s talking to The two check boxes Use Enter As Separator and Use emp...

Страница 53: ...dd by Lines will add data to the above list on a line by line basis Selecting a line of data in the upper list will cause that text to be displayed in the bottom section for editing After making changes to the text the Update button can be used to update that line of information in the list above The Load button allows for a text file to be loaded in to the bottom display area where it can be edit...

Страница 54: ...the LogoMaster software This provides the ability to recall graphics directly from the master control panel When an assigned button is pressed on the Master Control Panel a trigger is sent to Command Dispatcher software which can then be defined to perform a number of actions such as recalling a scene or adding and subtracting scenes from the output with LogoMaster ...

Страница 55: ...ers or to terminate connection The Edit button opens the Server Editor window which allows for defining communications parameters for the serial connection to the MC 4000 Figure 1 26 Server Editor The Image above shows the Server Editor default settings in order that Command Dispatcher can communicate with the MC 4000 The proper settings are as follows Server Model Squeeze Max Serial Port COM 1 Ba...

Страница 56: ...ent If this client is ever removed it can be re added by clicking on the Add Client button the button with a plus sign which will bring up the Add Client window Figure 1 27 Add Client Once you drop down the Client Model and select Logomaster type client you will see the other fields listed and populated with their default values You optionally can supply a Name and Description for this client Clic...

Страница 57: ...0 will activate this event Setting the SqueezeMax flag pull down to Display Preset IN will cause this event to be executed when the MC 4000 panel button is pressed There are fields for providing a Trigger Name as well as a Trigger description to help identify the event The Command drop down allows you to choose which command will be executed and the Target Scene value is where you will define the ...

Страница 58: ...igger value It is possible to also set a delay between events by using the Generic Client in the Select Client drop down menu Figure 1 29 Add Event To store all configuration settings including server settings and triggers the Save Settings button within the main window can be used to save out a proc file This file can then be loaded in the future with the Load Settings button to restore that conf...

Страница 59: ...telligent Interface control of the GS 4000 The Logomaster software will listen over the telnet port port 23 for incoming Intelligent Interface commands The Serial to Telnet Bridge ties the incoming serial commands over the connection to the telnet port for the Logomaster software to receive Figure 1 30 Serial to Telnet Bridge ...

Страница 60: ...o windows The top window shows the Telnet log for the connection and the bottom window provides a listing of Intelligent Interface commands as they are received Clicking on the button labeled Serial Settings will bring up the following menu Figure 1 31 Serial to Telnet Bridge Serial Settings ...

Страница 61: ...ial connection Clicking on the button labeled Telnet Settings brings up this window Figure 1 32 Serial to Telnet Bridge Telnet Settings The Telnet Connection Settings window allows for configuration of the telnet settings for talking to the LogoMaster software Here you can supply an IP address as well as port for the telnet connection along with the username and password ...

Страница 62: ...1 52 GS 4000 LogoMaster ...

Страница 63: ...ated Bugs Messages Overview Promo Messages are manually entered into the CrawlMaster application and will crawl continuously until removed by the operator A Channel can contain and crawl multiple Promo messages Incoming Messages get their text information from a data link or from a database Incoming Messages are fed from an application that provides data to the crawl channel through a data port In...

Страница 64: ...ge has to be aired from a manual command it will be put online after the guard area The CrawlMaster window is dependent on the LogMaster application to get to air LogoMaster will be started automatically when Launch GS 4000 Graphics Suite is clicked on the GS 4000 Splash Screen Note LogoMaster must be running before opening CrawlMaster CrawlMaster Figure 2 1 CrawlMaster will look similar to the wi...

Страница 65: ...ab allows the characteristics of the currently highlighted Crawl Channel in the list to be defined The Visible check box determines whether or not the Crawl Channel will be visible on the output when called up as part of a LogoMaster page The Schedule checkbox tells the application to automatically and continuously load Promo and or Incoming crawls into the Crawl Channel If the Schedule box is unc...

Страница 66: ...he pane allows the user to set crawl Speed pixels field Text Style and the text Baseline Selecting the Text Style button opens the Edit Channel Text Style window The font body edge and outline characteristics are all selectable from this window Msg Sep allows the operator to define the Separator between messages in a crawl The separator can be a Gap Picture or a Logo animated graphic The Gap width...

Страница 67: ...Port number for the selected crawl channel is set to match the port number of where data is coming from such as the News Data Feeder The Culture button allows the user to select the language used in the incoming messages Accept Duplicate Messages is not used and should not be checked Accept Local Host is checked when the data server is running the GS 4000 Accept Remote Host is checked when the dat...

Страница 68: ...ase The database can include the following crawl text crawl speed and the crawl order if the database contains multiple text field The database can be built using an application such as Excel See below The first row of the Excel database contains the name of the data in each column The data for each crawl is placed in rows below the column names Figure 2 4 ...

Страница 69: ... sports headlines etc Click the version button and select the Excel version from the drop down window Click on Select Workbook The Select Workbook window will open Browse to the location of the file Select the desired file located in the left hand window and click OK to close the window At the ODBC Microsoft Excel Setup window click on Options Enter the number of Excel rows the application should ...

Страница 70: ...ist In this example Excel uses the Microsoft OLE DB Provider for ODBC Drivers Figure 2 5 After selecting this provider click the Next button which will open the Connection Tab In the Connection pane specify the data source name by first clicking the Use data source name radio button Select the desired database file from the drop down window ...

Страница 71: ...rties for our data The Advanced pane of the Data Link Properties dialog box is provider specific and displays only the initialization properties required by the selected OLE DB provider The Advanced options are impersonation level the level of impersonation that the server is allowed to use when impersonating the client protection level the level of data protection sent between client and server c...

Страница 72: ...ailable for our OLE DB provider Properties can vary depending on the OLE DB provider that is being used initialization of properties list lists all properties and their current values Edit Value opens the Edit Property Value dialog box for the selected property The Edit Property Value dialog box is used to edit the OLE DB initialization properties currently selected in the All tab Properties can v...

Страница 73: ...igure 2 7 Click on Edit Query to view or build a query The Query should look similar to one shown in the Query window below Click save the Save as Favorite button to save you Query Click the Load my favorite to load the Favorite Query Click the Restore to a fixed Factory default query ...

Страница 74: ... ID Field and User ID Field boxes if they are to be used by the Query Click Validate Output to confirm the database setup is correct Click Show Output to Test the database link The output will be displayed in the window Use the horizontal scroll to see all of the information Click OK to close the Query Setup window The Culture button allows the user to select the language used in the incoming mess...

Страница 75: ...cheduler determines how many of each type of message are crawled A 2 in the Incoming field and a 1 in the Smallest Promo field means that 2 Incoming messages will be crawled and then one Promo message Auto Parking Message Cluster size field changes the number of messages that have been sent to the LogoMaster que and are ready to crawl The setting default and minimum is 3 Scheduler Step sets the nu...

Страница 76: ...the attributes Click Enable Schedule if you want this message to enable and available for scheduling Leaving the Custom Priority unchecked will give equal time to all promo messages If you want this message to be crawled more or less often than other Promo messages click the check box and assign a to this message If you have three Promo messages and assign a priority of 20 to this message and assi...

Страница 77: ...message list Manual messages can be crawled when the message is highlighted and the Schedule icon at the top of the pane is clicked The highlighted message will be displayed once each time the Schedule icon is clicked Incoming Messages Click on the Incoming Messages tab This pane displays the Incoming messages as they are received from the Query or Incoming message applications Also displayed are ...

Страница 78: ...he crawl buffer but the crawl channel is not currently being used by LogoMaster Messages that have been loaded into the buffer cannot be deleted A spade symbol indicates a Promo message The network symbol indicates a Query or Incoming message a network symbol with a red X indicates that no link for an Incoming message is setup only Query messages are being received The keyboard symbol indicates a ...

Страница 79: ...raphic name and pixel size as well as the original graphic source and original graphic size The right side of the Pictures pane is for setting the picture properties The Embed Content box must be checked The Load Other button will allow you to replace the current graphic The Token field name was generated using the graphic file name when it was imported originally and can be edited The Token name ...

Страница 80: ...s when a graphic is used as a separator When the value is set to 0 pixels the spacing is determined by the width of the graphic A value of 1 pixel or more will override the graphic spacing The Picture Size button opens the Resize Picture window allowing resizing of graphics The Picture Bounds section of the size window allows independent resizing of height or width or it can preserve the original ...

Страница 81: ...urce file location the number of cells and memory used The right pane of the Bugs window is use to set bug properties The Embed Content check box will include the graphic when a backup of the crawlmaster database is made for archive or for use on another unit The Token field name was generated using the graphic file name when it was imported originally and can be edited The Token name can be inser...

Страница 82: ...try includes an ID number Token name Font thumbnail TN and a Description field The ID column contains the ID number automatically assigned to font style when the Font was added The ID number is used in Separator and Background drop down lists located in other Crawl Channel windows The Token name can be inserted at the beginning of any Promo or Manual message text to change the text style from the ...

Страница 83: ... Token name that were automatically assigned to the font style when it was added The ID number is used in the Separator and Background drop down lists located in the Crawl Channels General window The Token name can be inserted at the beginning of any Promo or Manual message to change the Message style from the current Crawl Channel style Only the message with the token will be affected All other c...

Страница 84: ...ed by the user The Name field is user defined to allow for quick selection i e Arial 55 Bold The ID number field is use for changing the ID number that was automatically assigned to the Message Style The Custom Bk Bk ID allows any graphic from the Pictures library to be used as a background with this style Custom Font Font ID allows the default font type to be changed to any font from the Text Sty...

Страница 85: ...es 1 13 Crawl Action on Read 1 6 Crawl Channels Query Tab 2 6 Crawl Channels Scheduler Tab 2 13 Crawl Tab 1 35 2 3 CrawlMaster 2 1 2 2 creating a scene 1 9 CRL 1 5 Cursor 1 6 Cursors Tab 1 19 D Data Link Properties dialog box 2 9 Database Setup Example 2 7 Date Format 1 37 Date Time Feeder 1 37 Del Num Pad 1 15 Display decimals 1 38 Display F 1 38 Duration 1 25 window 1 12 E Edge 1 27 Edit Color 1...

Страница 86: ...2 1 N Name and Desc 1 18 1 19 1 21 1 24 News Data Feeder 1 42 Numeric 1 26 O Online Mode 1 32 Outline 1 27 Output Format 1 37 Overview Crawlmaster 2 1 P Paste Keyframes 1 13 Persistent 1 21 checkbox 1 31 Picture Size button 2 18 Play 1 21 Port number 1 25 Position 1 28 Preview 1 28 Preview Aspect Ratio 1 33 Priorities 1 36 Promo Tab 2 14 Provider tab 2 8 Q Query Setup window 2 11 R Recalling a Sce...

Страница 87: ...gs 1 51 Test Connection button 2 9 Text 1 24 Text Anchor X Y 1 24 Text is a Graphics File Name 1 24 Text Style 1 24 Text Style Edit Color Function 1 28 Text Styles Tab 2 20 Text Styles Aux Colors Function 1 28 Thick 1 27 Time Format 1 37 TimeLine 1 7 Timeline generation 1 11 TimeLine Editor 1 12 Timeline Editor window 1 12 Timer Server 1 37 tns thumbnails 1 8 Trigger ID 1 47 Type Face 1 26 U Up Do...

Отзывы: