


ZenCut Black User Manual
Installation
2-8
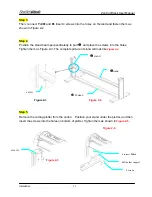
Step 4
Insert the blade holder into tool carriage. Please note the outward ring of the holder must be
put into the grooves of carriage firmly (see Figure 2-16), then fasten the case (Figure 2-17).
Figure 2-16
Figure 2-17
Step 5
Reverse the steps mentioned above to remove the blade holder.
Step 6
Press the push-pin to remove the blade from the blade holder when replacing blade.
Caution
The blade will lose its sharpness after a period of usage, and the cutting quality might be
affected. By increasing the cutting force, the blade may still cut. However, once the blade
is no longer provides a reliable cutting, you should replace it with a new one. The blade is
a consumable item and must be replaced as often as necessary to maintain the cutting
quality. Be sure to use a high quality blade to ensure good cutting results.
2.5 Cable Connection
The cutting plotter communicates with a computer through a
USB (Universal Serial Bus), Parallel
port
(Centronics), or
Serial port
(RS-232C)
. This chapter shows you how to connect the cutting
plotter to a host computer and how to set up the computer/cutting plotter interconnection.
!!
Notice:
When USB connection is enabled, both parallel port and serial port will be disabled
automatically.


