


ZenCut Black User Manual
Installation
2-3
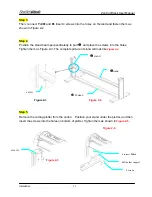
Step 3
Then, connect Part
Y
and
X
. Insert 4 screws into the holes on H-stand and fasten them as
shown in Figure 2-2.
Step 4
Position the stand beam perpendicularly to part
Y
and place the screws into the holes.
Tighten them as Figure 2-3. The complete picture of stand will look like
Figure 2-4
.
Step 5
Remove the cutting plotter from the carton. Position your stand under the plotter, and then
insert the screws into the holes on bottom of plotter. Tighten them as shown in
Figure 2-5
.
Y
stand
Z
s
tand
screw
X
H-stand
Figure 2-3
Figure 2-4
Figure 2-6
screws
Figure 2-5
6 screws
holes
Roll holder support
4 screws


