background image

WELCOME TO MEDIASTUDIO PRO 15

Installation

The MediaStudio Pro installation program runs from within Windows and contains 
complete instructions to take you through the installation process.

To install MediaStudio Pro:

1. Read the license agreement that comes with the MediaStudio Pro package. The 

license agreement contains important legal requirements that you need to be 
aware of. If you agree to abide by it, continue with the installation.

Please take a moment to fill out the registration card during installation. 
Becoming a registered user entitles you to product updates and upgrade 
information, as well as technical support. You can also instantly register 
online (electronically) after installing the program.

2. Insert the MediaStudio Pro CD into your CD-ROM drive. Windows should detect 

the CD and then automatically run the installation program. If the automatic 
detection feature is turned off, use Windows Explorer to run the SETUP.EXE 
program directly from your CD-ROM drive.

Follow the installation program instructions. While the program is installing files, a 
window will appear, displaying information about MediaStudio Pro and the 
installation status.

If you want to browse the contents of the MediaStudio Pro CD, run AUTOEXEC.EXE 
found in the Setup folder from your CD-ROM drive.

Installing Acrobat Reader

An electronic copy of this user guide is also available in the Adobe Acrobat format 
(Portable Document Format - PDF). To view this, first run the AR500ENU.EXE file 
(in the \Driver folder of the first MediaStudio Pro CD) and follow the installation 
instructions. After successfully installing the Reader program, run the program and 
click 

File: Open

 to open the file MediaStudio Pro 8 User Guide.PDF that is in the 

\Document folder of the CD. You can then view the user guide.

Содержание MEDIASTUDIO PRO 8

Страница 1: ...User Guide Ulead Systems Inc September 2005 P N C22 180 110 0A0001 ...

Страница 2: ...rks of Adobe Systems Incorporated QuickTime and the QuickTime logo are trademarks used under license QuickTime is registered in the U S and other countries All other product names and any registered and unregistered trademarks mentioned in this manual are used for identification purposes only and remain the exclusive property of their respective owners Sample files Files provided as samples on the...

Страница 3: ...r 21 Personalizing the workspace 21 Saving the layout 22 Setting up a video project 22 Creating a new video project 22 Opening an existing project 24 Customizing a video project 25 Project Options dialog box 25 Saving project settings as a template 27 Enabling Smart Proxy 27 Saving a video project 27 Capturing video 28 Video Capture 28 Batch Capture 30 Scan DV Tape 30 Creating project segments in ...

Страница 4: ...files 50 Inserting soundtracks from third party music 50 Inserting Video Editor projects 51 Push Away insertion 51 Working with tracks 52 Single track editing 52 Adding or deleting tracks 52 The Track buttons 52 Determining the visibility of clips 53 Displaying clips on the Timeline 53 Zooming in out of the Timeline 54 General Timeline and Summary Timeline 54 Creating nested timelines 56 Inserting...

Страница 5: ...g a frame 68 Setting field options for video clips 69 Working with cues 71 Placing project cues 71 Placing clip cues 72 Placing chapter cues 73 Locating clips 73 Locating an empty time slot 74 Trimming clips 74 Trimming in the Source Window 75 Trimming in the Preview Window 76 Using the Trim Window 76 Using the Scissors Tool to trim clips 77 Defining trim options 78 Smart Trim 79 Multi trim Video ...

Страница 6: ...boxes 103 Effects Manager 105 Previewing the applied effects 106 Editing in the Preview Window 107 Organizing effects 108 Overlay 109 Overlay Options dialog box 110 Overlay key types 111 Understanding Alpha Channels 112 Using Gamma correction 113 Working with mattes 114 Creating image and video mattes 114 Using Grayscale mattes 115 Applying video filters 115 Applying a regional matte to a video fi...

Страница 7: ... Digital 5 1 Surround Sound 145 Working with Dolby Digital 5 1 in Video Editor 146 Surround sound hardware requirements 146 Setting up surround sound projects 146 Mixing Dolby Surround 147 Creating a surround sound audio file 150 Chapter 7 Creating and Exporting Final Video 151 Creating a video file 152 Creating MPEG 1 or MPEG 2 files 153 Creating HDV or HD video files 153 Creating WMV HD files 15...

Страница 8: ...5 Converting files 175 Smart Check Convert 176 Batch Convert 176 Using the Quick Command Panel 177 Chapter 9 Integration with Ulead Products 179 VideoStudio project files 180 PhotoImpact UFO files 180 Importing masks from PhotoImpact 180 COOL 3D Production Studio files 181 Chapter 10 Shortcuts 183 PA R T I I V I D E O C A P T U R E Chapter 1 Getting started 194 Understanding the basics 195 Standar...

Страница 9: ...Tips for capturing video 210 Before capturing 211 Enabling device control 211 Choosing a capture plug in 212 Capturing video 213 Capture options 215 Capturing video from a DV camcorder 216 Capturing video from an HDV HD camcorder 217 Direct MPEG capturing from a DV camcorder 218 Seamless DV and MPEG capture 219 Direct WMV capturing 220 Selecting a profile 220 Editing and customizing a video profil...

Страница 10: ... audio quality 244 Preferences 245 Chapter 2 Editing Audio Files 247 Working with selections 248 Making selections 248 Creating precise selections 249 Clearing audio data 249 Inserting audio data 250 Working with cues 251 Managing cues 252 Using cues with Video Editor 252 Enhancing sound 253 Changing the audio level 253 Changing pitch 254 Quantizing a waveform 254 Working with silence 255 Removing...

Страница 11: ...ct 269 Add Media 270 Adding Editing chapters 271 Export selected clips 272 Setup Preferences Project Settings and other options 273 Settings and options 273 Preferences 273 Project settings 275 16 9 DVD 276 Play and edit media 276 The right click menu 277 Trimming a video 278 Setup menus 278 Manipulating objects 281 Displayed thumbnail and text style 281 Layout settings 282 Preview 282 Burn 283 Bu...

Страница 12: ...te Disc 289 Introduction to the workspace 289 Adding video files 290 Editing programs 290 Protecting programs 290 Playlist 291 Setting the name for a program playlist or entry point 291 Exporting video or image files 292 Burning your disc 293 Edit Disc 294 Formatting a disc 294 Protecting a disc 294 Certifying a disc 295 I N D E X Index 298 ...

Страница 13: ...igital video enthusiasts Built around a powerful suite of versatile and high performance programs MediaStudio Pro is the first choice for anyone wanting to work with video MediaStudio Pro offers Real time MPEG capture Real time preview and Real time output With intuitive controls and seamless integration creating video has never been easier or more accessible ...

Страница 14: ...the information required to master MediaStudio Pro is in the manual and online help These are the primary sources of information The MediaStudio Pro Web site www ulead com msp runme htm also has a number of resources you will find useful The Web based learning center has excellent tutorials that will guide you through the program in a brief and intense way Spending a few hours on the tutorial page...

Страница 15: ...ct the CD and then automatically run the installation program If the automatic detection feature is turned off use Windows Explorer to run the SETUP EXE program directly from your CD ROM drive Follow the installation program instructions While the program is installing files a window will appear displaying information about MediaStudio Pro and the installation status If you want to browse the cont...

Страница 16: ...easiest method to run another MediaStudio Pro program is by using the Switch menu located on the right of the Menu Bar Readme In the fast paced world of software changes occur almost daily While we have tried to keep this manual as up to date as possible there will inevitably be some things that did not make it into the book by press time Please browse through the Readme file installed in the Ulea...

Страница 17: ...PART I VIDEO EDITOR ...

Страница 18: ...d saving the workspace You will also learn how to capture video directly in Video Editor manage your media using the Production Library and use some of the basic program functions This chapter includes the following sections Understanding the workspace Setting up a video project Capturing video Creating project segments in Smart Compositor Using the Production Library Preferences ...

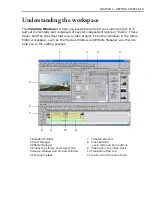
Страница 19: ...ct The other windows in the Video Editor workspace such as the Preview Window and Effects Manager are there to help you in the editing process 7 Timeline Window 8 Track buttons Lock Hide and Solo buttons 9 Video clip in the video track 10 Transition effect clip 11 Audio clip in the audio track 1 Standard Toolbar 2 Panel Manager 3 Effects Manager 4 Production Library and Project Tray 5 Source Windo...

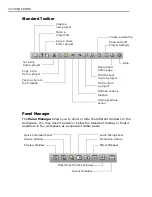
Страница 20: ...project Open a project file Save a Video Editor project Show and edit Project Settings Cut a clip from a project Copy a clip from a project Paste a clip into the Timeline Find the next clip in a project Find a clip in a project Redo an undone function Undo a previous action Help Open Ulead Home page Create a video file Preview Window Source Window Quick Command Panel Audio Mixing Panel Production ...

Страница 21: ...ake it floating or docked Insert Image File Insert Voice File Insert Audio File Insert Video File Zoom Clip Selection Stitch Trim Overwrite Trim Normal Trim Insert Title Clip Insert Color Clip Insert Silence Clip Time Selection Track Selection Timeline Display Mode Save Project Template Single track Ripple Editing Multi track Ripple Editing Enable Disable Video Proxy General Timeline Summary Timel...

Страница 22: ...d its associated clips are referred to as a video project which is saved as a DVP Digital Video Project file When you save a video project Video Editor only saves the positions and attributes of the clips in the Timeline not the actual source files themselves The advantage to this is that the DVP file has a relatively small file size and that any editing done is nondestructive that is the editing ...

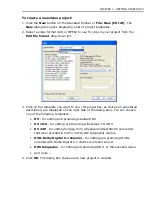
Страница 23: ...otated description are displayed on the right side of the dialog box You can choose one of the following templates DV for editing and producing standard DV DV 16 9 for editing or producing widescreen 16 9 DV DV 24P for editing footage from a Panasonic AG DVX100 camcorder that was recorded in 24P or 24PA 24P Advanced modes DVD Dolby Digital 5 1 channel for editing and producing DVDs encoded with Do...

Страница 24: ...hard drive or from a network select File Open or click on the Standard Toolbar Locate your project folder choose the project file to load and click Open For a more detailed explanation of setting up a template see Project Options dialog box on page 25 Also it is a good idea to consult the manual of your particular video capture board to see the recommended specifications When you run Video Editor ...

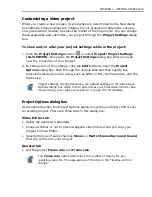
Страница 25: ...abs and then specify the television standard you are using such as NTSC or PAL the frame rate and the frame size Project Options dialog box As mentioned earlier the Project Options dialog box gives you direct control over an existing project There are three tabs in this dialog box Video Editor tab Select the desired TV standard Choose whether or not to preview applied video filters when you view y...

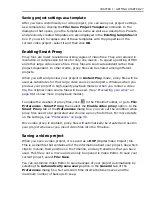
Страница 26: ...n tab This tab has all the video and audio compression controls One thing to remember in dealing with compression and data rate is output file size To minimize the size of your rendered projects compress your files with the best and the most recent compression algorithm possible Bit size is another way of saving your hard drive space The bigger it is the more space you will need You will need to b...

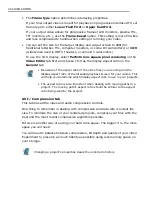
Страница 27: ...ou render a video file the original video source files will be used See Previewing your work on page 88 to know more on playback modes To enable the creation of proxy files click in the Timeline Toolbar or go to File Preferences Smart Proxy then select the Enable video proxy option In the Smart Proxy tab of the Preferences dialog box you can set the condition when proxy files need to be generated ...

Страница 28: ...find three tools for capturing footage in the Capture menu Video Capture Batch Capture and Scan DV Tape Before you start capturing with these tools make sure you have your capture card installed in your computer and your video camera is connected and switched on Video Capture Video Capture allows you to capture a video clip at a time The Video Capture dialog box in Video Editor looks slightly diff...

Страница 29: ...m the Capture format list 5 In the Capture Settings tab set your preferences for performing the capture Capture method Choose to auto capture with specified duration auto capture with no time limit or manual capture Select Auto naming to save each captured segment as a separate file Capture options Specify the prefix file name and folder to use for saving captured videos Click the Advanced tab to ...

Страница 30: ...uring on page 226 under Part II Video Capture Scan DV Tape Scan DV Tape quickly scans an entire DV tape and automatically detects scenes based on the recording date and time that is based on stops and starts of video recordings To use this function select Capture Scan DV Tape In the Scan DV Tape dialog box first choose how to perform the scan from the Scan Capture method list then click Start to b...

Страница 31: ...e templates that you can easily customize with your own video clips titles audio clips and effects Basically you will only need to complete two stages in Smart Compositor before inserting a movie segment into your project First select a template in the Theme Template tab 1 Select a theme category from this drop down menu 2 Click a thumbnail to choose a template 3 Use the Navigation buttons to prev...

Страница 32: ...e elements in a template in greater detail 1 Expand the Tree View then select clips to be replaced or effects to be customized 3 Click Save if you want to save your changes as a new template 4 Click Insert to insert the customized template as a project segment into the Timeline 2 Use the Settings panel to customize the elements in a template You can replace clips adjust overlay settings and tweak ...

Страница 33: ...ile from the Media Library and drop it onto the first thumbnail in the Storyboard 5 To append another clip drag your video or image file from the Media Library and drop it onto the placeholder that is the black thumbnail in the Storyboard Repeat this step to append more video or image clips 6 Repeat steps 3 to 5 to replace the other preset media clips with your own video or image clips The process...

Страница 34: ... replace the other default title clips with your own text To enable or disable filters 1 Click on the small triangle icon next to the Filter item to expand its tree view and to see the media clips that are applied with filters 2 Select a clip for instance Filter Clip 1 3 Select Remove Filter to disable the filter Clear this checkbox to enable the filter 4 Repeat steps 2 and 3 to enable or disable ...

Страница 35: ... Path Clip 1 3 To resize the clip dimensions change the width and height settings 4 Specify the initial clip position before the moving path effect starts by setting the X and Y coordinates 5 Specify the degree of Rotation for the clip 6 You can also apply a soft edge and add a surrounding border to the clip 7 Repeat steps 2 to 6 to customize moving path effects for the other clips in the template...

Страница 36: ...l pictures If the Production Library is not yet open in the program select Window Production Library or click on the Panel Manager to open it Placing clips into the Production Library To share clips among different projects import them to the Media Library folder of the Production Library tab To use clips only in a particular project import them to the Media Pool folder of the Project Tray tab To ...

Страница 37: ...duction Library you want to use into the Storyboard folder 3 Arrange the sequence of the images or video clips by dragging them to the desired positions 4 Select all the images or video files then right click and select Add to Timeline 5 In the Add to Timeline dialog box determine the layout option for your clips To be able to apply transitions between clips select Overlap 6 If you have images set...

Страница 38: ...ne folder in the Project Tray tab You can drag the timelines in this folder to other parts of your project For details on nested timelines see Creating nested timelines on page 56 Working with folders When you view the Production Library the contents of the currently selected gallery appear on the right side of the Production Library window To the left are folders which organize the various thumbn...

Страница 39: ...onal commands for viewing the properties of a selected thumbnail as well as editing deleting and customizing the Production Library preferences this menu can also be accessed by right clicking on a thumbnail When customizing the preferences you can choose to control the size of the thumbnails as well as to display or hide the name below each of the thumbnails If you want to maximize the space avai...

Страница 40: ...ll be final Number of recently opened files specifies how many file names are stored in the Recent History list found on the File menu Return to the first frame after playing returns any sequence in the Source and Preview windows to the first frame after it has been played like a CD player When left cleared the sequence stops on the last frame in the sequence after playing like coming to the end o...

Страница 41: ... 9999 frames Check Ulead s Web site at start of every _ day s automatically checks Ulead Web site at a specified number of days interval for product news and updates Temporary folder defines the folder that Video Editor uses as a temporary workspace for compiling compressing or decompressing files By assigning a temporary folder for these types of operations you prevent Video Editor from using the...

Страница 42: ... your video to fill out the entire frame without keeping the aspect ratio Keep aspect ratio with letterbox fits the entire video into the Preview Window while Keep aspect ratio no letterbox keeps the video proportioned and crops the areas that exceeds the Preview Window Default transition effect sets a default transition effect for video clips When two clips in the same track overlap a default tra...

Страница 43: ...it this to about half If left clear Video Editor uses your system s memory management to control the use and distribution of memory Preferences dialog box Smart Proxy tab Enable video proxy automatically creates proxy files whenever a video source file is inserted into the Timeline Create proxy when video size is or above allows you to set the condition as to when proxy files will be generated If ...

Страница 44: ...44 VIDEO EDITOR ...

Страница 45: ... step the real work occurs on the Timeline As the name implies the Timeline is a chronological workspace that allows you to visually lay out your clips transitions and overlays This chapter includes the following sections Inserting clips Working with tracks Creating nested timelines Working with virtual clips ...

Страница 46: ... Flash files If you choose a video file that contains both video and audio data the clips are placed in both the video and audio tracks these clips remain connected to maintain synchronicity You can separate them by clicking the Clip Split command Clips already in the Production Library can simply be dragged onto the Timeline You can also drag and drop clips directly from Windows Explorer When you...

Страница 47: ... Audio Tracks dialog box will appear 4 A list of all available tracks will appear in the Audio Tracks window Select the file you want to extract by clicking on it 5 Determine the file name audio file type and other options 6 Click OK Inserting voiceover In the case of documentaries and presentation videos narration often helps viewers understand and appreciate the movie s content Video Editor s vo...

Страница 48: ...der Select audio file folder click the ellipsis button to choose a folder where to save the voiceover file 6 Click Start to begin recording your voice Press ESC to stop recording Make sure the Project cursor is not over an existing audio clip on the selected Audio track You can adjust the recording level of the microphone by going into the Windows Volume Control Click Run Mixer to adjust the recor...

Страница 49: ...certain types of effects You can set key frames to create impressive gradient effects with each frame of the clip gradually shifting from one color to the next To insert a color clip 1 Click the Insert Color Clip button in the Timeline Toolbar You can also click Insert Color Clip or right click on a video track and select Color Clip from the pop up menu 2 In the Insert Color Clip dialog box specif...

Страница 50: ...re lets you easily create composer quality soundtracks from royalty free music and use them as background music in your project You can have different tempos or musical instrument variations per music To create soundtracks using Auto Music 1 Select Insert Auto Music 2 To choose from the royalty free music library that s supplied with Video Editor select Owned from the Scope menu then choose the mu...

Страница 51: ...d in the timeline you can treat it as any other ordinary video clip For details on what operations can be applied to virtual clips see Working with virtual clips on page 57 If you prefer to have the DVP project expanded on the timeline select Part of current project from the Append project as drop down menu In this case all of the media clips transitions and effects contained in it will be complet...

Страница 52: ...acks Depending on the scale of your project you can add or remove tracks in the Timeline To do so right click on the leftmost area of a track to open a menu You can then choose whether to add or remove the current track or to add or remove multiple tracks The Track buttons Track name button When this button is pressed down all the clips on the track are selected Lock or Unlock track button When a ...

Страница 53: ...form Thumbnail or Filename modes Filmstrip and Waveform modes display clips graphically video clips as frames audio clips as waveforms allowing you to see the entire contents of a clip While the graphic modes may be easier to work with it takes time for your computer to redraw clips every time they have been modified To help improve performance but still retain some visual cues as to the contents ...

Страница 54: ...d choose the preferred time unit to do your editing You can also select Zoom In Out single Frame Fit In Window or Previous Zoom to toggle between the previous zoom ratio and the current one Drag the Timeline Zoom slider to the left to zoom out or to the right to zoom in Alternatively click the Zoom Out or Zoom In button that is above the slider Click the Zoom tool and then click on the Timeline Ea...

Страница 55: ...t while editing in the General Timeline mode to select short clips and to see all the clips in your project In the Summary Timeline mode you get an overall picture of the whole project similar to a storyboard Clips are displayed in similar thumbnail sizes regardless of the clip s actual time length making it easier to select it The number of thumbnails you will see will depend on the number of seg...

Страница 56: ...ap the whole timeline as a single virtual clip and insert it into the Main Timeline To insert a nested timeline into the Main Timeline you can While in the main project timeline right click on the Main Timeline tab In the pop up menu that opens click Insert from Timeline then select the nested timeline that you want to insert into the Main Timeline While in a nested timeline for instance Timeline1...

Страница 57: ...e tab for you to edit its contents Working with virtual clips Virtual clips have the same editing attributes as ordinary video clips All tools applicable to video clips can be used with virtual clips such as trimming and Ripple modes You can also apply video and audio filters moving paths freeze frame speed reverse color calibration overlay options and other features The only limitation is the una...

Страница 58: ...ike normal video clips however there are some limitations when working with virtual clips in the Source Window Shuttle playback is not supported The Export Video submenu is disabled The VU Meter is not available Adding virtual clips to the Production Library Apart from viewing virtual clips in the Source Window you can load them into the Production Library To import a virtual clip into Production ...

Страница 59: ... is all about This is the heart of Video Editor This chapter includes the following sections Making selections in the Timeline Working with clips Working with cues Locating clips Trimming clips Multi trim Video Split by Scene Ripple Editing Using the Source Window Previewing your work ...

Страница 60: ...tracks in the Timeline You can select individual clips by clicking them Once you have selected a clip you can move it or drag on its borders to trim the clip To select all the clips in a particular track click the Track button on the left side of the track To select all the clips in the Timeline select Edit Select All CTRL L To select multiple clips 1 Select the Clip Selection tool 2 Press and hol...

Страница 61: ...on area Click OK to automatically create a selection marquee over the specified area of the Timeline Using the Track Selection Tool The Track Selection Tool is useful when you want to select entire tracks or parts of tracks To select a track or part of a track with the Track Selection tool 1 Click the Track Selection Tool on the Timeline Toolbar 2 Click on a clip The clip along with the rest of th...

Страница 62: ...nly one activated or simply solo Grouping clips As your project becomes more and more complex it may be useful to group some clips together so that they may be moved around as a unit To group clips 1 Select the clips by pressing SHIFT while dragging over clips to be included 2 Click Edit Group to ungroup click Edit Ungroup Additional clips can be added to the group by selecting the group and then ...

Страница 63: ... above actions you will have to click on the location where you want to paste the clip Pasting attributes Sometimes you may want to paste only the attributes Video Filters Audio Filters Overlay Options and Moving Paths of one clip to another This is a very powerful technique that allows you to maintain perfect consistency between clips To paste the attributes of a clip only 1 Select the clip 2 Rig...

Страница 64: ...o the corresponding audio track Video1 with Audio1 Video2 with Audio2 and the two clips are locked together as a unit To delete or move either of the clips separately the two must first be split This is useful when you are creating a music video and the audio track is not needed You will also need to split the audio from a video clip in order to perform a freeze frame effect see Freezing a frame o...

Страница 65: ...peed up or slow down the clips On the technical side it s important to know that every media clip has a certain playback speed expressed in frame rate Let s assume you have a video clip with a normal speed of thirty frames per second The motion is life like Suppose you want to speed up the pace of the action two folds make it move faster twice In this case you will need to tell the program to cram...

Страница 66: ... Timeline Toolbar 2 Click drag on any edge of a clip to either left or right Another way to retime your clip is by entering numerical values for speed duration or variable speed in the Speed dialog box Clip Speed This feature is extremely useful if you need to achieve fast and slow motion effects having in mind exact percentage by which to speed up or slow down the playback Here are the three meth...

Страница 67: ...mpletely transparent meaning that you won t even notice it called Smart Relink If you have moved your files to another drive or folder but have basically maintained their positions relative to one another Smart Relink will automatically find all of the clips in the project that have missing file links and locate the rest of the source files This can be a huge time saver If you click the Ignore but...

Страница 68: ...eo Editor this is done by selecting Clip Freeze Frame To freeze a frame during playback 1 Select a clip and then split the audio from the video see Splitting the audio from video clips on page 64 2 Right click the clip and select Freeze Frame The Freeze Frame dialog box opens 3 Use the slider under the Preview Window to find the frame you want to freeze 4 Check Freeze before frame or Freeze after ...

Страница 69: ... the beginning of the clip up to and including the frame itself and then resume normal playback Freeze after frame When the clip is played back it will playback normally until it comes to the designated frame and then freeze to the end of the clip If both boxes are checked the clip will freeze both before a particular frame and after a particular frame See the illustration below for an example In ...

Страница 70: ...e Deinterlace option This helps combine the two fields into one frame For frame based video that you are editing as field based select the Flicker reduction option to help Video Editor create the two fields necessary for each frame This may require some initial experimentation and may only be apparent when you output your movie to a video tape Click OK when you are done setting the options Display...

Страница 71: ...cues used only in projects that will be exported for DVD authoring in programs like Ulead DVD MovieFactory Placing project cues You can place cues either directly on the cue bar or in the Preview Window To place a project cue on the cue bar 1 Move the pointer to the cue bar the bottom part of the ruler The cursor changes to the cue cursor 2 Click on the appropriate location on the Timeline A trian...

Страница 72: ...mediately below the clip These cues cannot be named but can be used as navigation points in the Source Window by clicking the Next Previous Edit Point buttons To place clip cues using the Source Window 1 Open a clip in the Source Window double click the clip or drag it to the Source Window 2 Play the clip or use the Navigation Bar to move to the place where you want to place a cue 3 Press F5 or cl...

Страница 73: ...apter point cue bar Click on this bar to set more chapter points A green triangle indicator appears as you add a chapter point To remove a Chapter point drag the triangle icon all the way to the left Locating clips You can use cues to jump to a specific location in your project instantly To locate a specific clip 1 Click the Find Clip button or Search Find Clip CTRL F This displays the start time ...

Страница 74: ...ck Search Find Empty Time Slots to find these Trimming clips Trimming and editing clips is the basis of making movies There are a number of convenient methods for doing this in Video Editor Each of these offers different advantages depending on the type of clip and the operations you wish to perform To trim using the Clip Selection Tool 1 Click the Clip Selection Tool 2 Drag the left or right bord...

Страница 75: ...ess F4 4 Click Apply in the Source Window You can also use the Source Window to cut your video clips Video Editor gives you two options on how you can cut your video clips Cut by Position and Cut by Cue Cut by Position slices the video clip based on the position of the Jog slider Cut by Cue slices the video clip based on the cue positions Select Clip Duration if you need extreme precision for the ...

Страница 76: ...ited to the trimmed duration that was set in the Preview Window To set a preview range in the Preview Window 1 Open the Preview Window 2 Drag the little triangle trim handle on the left end to the desired play in point Alternatively drag the Jog slider to the position you want as the mark in point and then press F3 3 Drag the trim handle on the right to desired play out point Alternatively drag th...

Страница 77: ...t the clip Cutting a clip breaks the clip at the pointer position creating two separate clips that you can then move around the Timeline If you place two previously cut clips back in their original positions you can reattach them together by clicking with the Scissors Tool selected over the cut line If you have the Stitch trim option selected only the previous frame is displayed whenever you use t...

Страница 78: ...ble free clip slot Overwrite allows you to trim a clip so that it extends over a neighboring clip thereby replacing the overlapped portion with the new clip if you then trim the clip back it will still leave an empty slot Stitch allows you to trim a clip over another trimming the neighboring clip instead of overwriting it if you then trim the clip back it will reveal the underlying portion of the ...

Страница 79: ...art Trim In the dialog box that opens you can select the clip or clips that you want to permanently alter Multi trim Video Sometimes marking only the start and the end points to trim a clip just isn t enough There could be situations when you will need to mark multiple start end points Let s say you recorded a TV program and you want to trim out all the nine commercials in the clip For that you wi...

Страница 80: ...the segments you want kept or removed 6 Click OK when finished The video segments that you kept are then inserted onto the Timeline To mark segments you can also press F3 and F4 while playing the video Click Invert Selection to toggle between marking segments that you want to retain or marking segments that you want taken out from the clip Navigation controls in the Multi trim Video dialog box Rev...

Страница 81: ... join or split videos if needed 4 When done select the Open scenes recording cuts as multiple clips option 5 Click OK The file will then be split into multiple clips according to different scenes Each separated clip is merely a trimmed version of the captured video file Each of the clips is not an independent file Hence notice that the clips all bear the same file name indicating that they actuall...

Страница 82: ...de select a file to insert and hold down the SHIFT key while placing the clip on the Timeline When this file is dropped on the Timeline it will push all downstream clips in a single track out of the way Empty spaces will NOT be preserved if the clip length fits perfectly or is longer than the available slot With any of the Ripple Editing modes selected you cannot trim clips toward the start of the...

Страница 83: ...eline while the third is being inserted After insertion the third clip gets overlaid over the two neighbors without shifting them Inserting a clip into a full Timeline Ripple In this example the third clip is again inserted between the two clips This time Single Track Ripple is selected As the clip is being inserted the clip to the right is moved to the right two seconds The entire track is shifte...

Страница 84: ... Click the Insert Video File button 3 In the Insert Video dialog box select the clip you want to insert 4 Click the Open button 5 Press and hold the SHIFT key while clicking in the middle of the clip on the Timeline that you want to insert the new clip into Here green avi is inserted into red avi Multi Track Ripple is on In the first image you can see where the inserted clip overlaps the existing ...

Страница 85: ... Standard Toolbar or by using the Window Source Window command Once a clip is opened you can use the menu list to select any other clip which you have previously opened in the Source Window listed by track and start time The next few pages cover the Source Window in more detail Source Window 1 Playback slider slides back and forth to scrub the clip 2 Trim handles determine the Mark in and Mark out...

Страница 86: ...plays only the trim area from Mark in to Mark out portion 3 Play from the current position to Mark out Pause plays the clip from the cur rent position of the Playback slider to the Mark out point 4 Previous Edit Point moves the Playback slider to the previous cue or the beginning of the clip 5 Previous Frame moves the Playback slider to the previous frame 6 Next Frame allows you to maneuver the Pl...

Страница 87: ...d or Trim handle To trim an audio clip 1 Place the red vertical line where you want to begin the trim selection area 2 Click the Mark in button The unselected area changes to a blue waveform on a gray background 3 Repeat steps 1 and 2 with the Mark out button Alternatively to mark an audio clip segment press the Shift key and drag the mouse over a selection 4 Click the Apply button The clip on the...

Страница 88: ...an also preview the output there The Preview Window itself is very similar to the Source Window Where the Source Window is used to view trim and add cues to individual clips the Preview Window is used to view your project either in full or in part or to add project cues Preview Window 1 Play Pause plays a preview of all the clips in the video project 2 Play the Preview Range plays only the clips i...

Страница 89: ...der it when over the Preview bar A blue bar in the Preview Window indicates the period for preview Drag the edges of the white Preview bar in the Timeline or the little triangle icons in the Preview Window to set the in and out points of the preview Alternatively place the jog slider on a mark in point in the Preview Window and press F3 press F4 for the mark out point A right click on the cue bar ...

Страница 90: ...only when a segment s complexity level is above the performance level you set The Performance Level you set should be relative to your CPU speed You may also force a particular segment to be rendered to have a smoother preview To force a segment to render 1 Right click on the Complexity bar just below the Timescale 2 Select Force To Render Segment Preview Video Editor creates a preview file of the...

Страница 91: ...d the external monitor type you have you can preview your work in the target display devices you choose This feature is useful when you want to preview your work in the device where you will actually play your project Toggle button to High Quality Playback to render the whole project before previewing This produces better image quality and smoother transition of clips Toggle button Instant Playbac...

Страница 92: ...review range and then click OK Performing scrub previews You can instantly preview your video on the fly at any time This is known as scrubbing and is the quickest way to get an idea of how your project is going When you scrub you can preview your transitions and the timing of your video but filters and effects will not be visible unless your hardware supports them Unlike performing a regular prev...

Страница 93: ...w files The files that are created for the preview if high quality playback is selected are saved in a temporary folder that can be set from File Preferences on the Preview tab Preview files can take up a huge amount of disk space so it is important to set these folders up properly Sometimes MediaStudio Pro will generate a Not enough disk space error when previewing This error often occurs because...

Страница 94: ...94 VIDEO EDITOR ...

Страница 95: ...dio Pro has it all Let your creativity run wild as you learn about the most fun and exciting features of Video Editor This chapter includes the following sections Using transition effects Using key frame controls in dialog boxes Effects Manager Overlay Applying video filters Creating a moving path Applying audio filters Creating titles ...

Страница 96: ...When they overlap a default transition clip will be automatically added to the overlapped region The amount of overlap determines the effect duration which will automatically adjust when you readjust the overlapping region To specify a default transition for overlapping clips you will need to set it in the Preferences dialog box To set a default transition 1 Select File Preferences 2 Click the Edi...

Страница 97: ...e nuances to your transition with the Key Frame Controller Each effect has slightly different controls Refer to the next section for details Customizing a transition There are a number of options available in the Transition Options dialog box that let you customize your transition The variety of these available options depends on the type of transition you are applying The following is just one ex...

Страница 98: ... results in Video Edi tor s Preview and or an external monitor 14 Transition degree specifies the degree of completion at the current frame 15 X and Y indicate the coordinates for the starting point of the transition 16 Reverse changes the direction of the transition To customize a transition effect 1 Insert a Box Wipe transition effect between two clips 2 In the Transition Options dialog box adju...

Страница 99: ... and a description Click OK Commonly used transitions While Video Editor has dozens and dozens of different transition effects to choose from the jump cut with no transition and the crossfade are probably the only two that are commonly used in Hollywood movies Another popular technique is to fade to black at the end of a program or scene To fade to black 1 Place a video clip onto the Video1 track ...

Страница 100: ...ttle time for the effect to be created by your computer This is called rendering time To see your transition effect without rendering your project use the Instant Play function see Instant Play on page 90 A jump cut where the clips are simply placed beside each other on the same track requires no rendering time and is sometimes just as useful Video Editor offers so many fun and interesting transit...

Страница 101: ...f the light Contrast Set the color contrast between the two clips Middle flash Adds an element of light to the dissolving mask Inverse Reverses the effect of the mask The Mask transitions Different patterns or objects such as shapes leaves balls and more can be used in transition effects by rendering them as masks You can select from preset masks or import a BMP file and use it as a mask for your ...

Страница 102: ...lving mask Apply on Select whether to apply the mask on the before or after clip Audio transitions Transition effects are primarily for video In Video Editor s File Preferences Edit you can specify how you want your audio clips to interact in the event of overlapping There are two options an auto cross fade and a simple mix transition In the first case when two audio clips in the same track overla...

Страница 103: ...p All of the effects in Video Editor can be controlled with frame by frame precision using key frames As an example the procedure below uses the Circle Wipe transition effect dialog box to create a customized transition animated with key frames To use key frames to animate a transition effect 1 Place two clips on a single video track make sure the clips overlap 2 From the Wipe folder in the Produc...

Страница 104: ...button To move a key frame To move any key frame just drag it to a new location Since key frames are chronological in nature it is impossible to drag a key frame beyond a neighboring key frame on either side To reverse key frames 1 Click on any key frame diamond on the Key frame Controller 2 Click the Reverse Frame button For a list of shortcut keys when using key frame controls please refer to th...

Страница 105: ...e effective medium for working with keyframes and effects The Effects Manager is subdivided into three primary areas Effects List shows various effects you applied to your clip video and audio filters moving paths transition effects and overlay Clicking on the effect displayed here will load up its keyframes in Key Frame Controller and populate the Settings Area with effect controls Before using t...

Страница 106: ...lue back to 5 again 10 Mark in the playback range at frame 1 then mark it out at 8 seconds 11 Preview the 8 second range and notice how the blur value animates through the clip This is just a simple example to get you started changing effects values setting multiple key frames and animating them in a linear fashion Previewing the applied effects Tweaking the settings on key frames require real tim...

Страница 107: ...lip right in the Preview Window To animate a Moving Path of a clip in Preview Window 1 Open Preview Window and Effects Manager so they are both in your workspace 2 Apply Moving Path effect to your clip in timeline 3 Select Moving Path in Effects Manager 4 Click on the clip once in the Preview Window Green squares now appear in the window indicating the borders of the clip Each corner of the clip w...

Страница 108: ...lips as well as on screen controls in other video effects can all be animated in the same fashion Organizing effects Once you set up your key frames on one effect you can add more effects to the clip and animate their properties in the same fashion Click or to add or remove effects in the Settings Area Press to enter the Options dialog box of a particular effect To disable an effect press Drag on ...

Страница 109: ...1 track and line it up underneath the clip in the Video2 track 3 Click Clip Overlay Options This command can also be selected from the right click pop up menu The Overlay Options dialog box opens 4 From the Type list choose Color Key 5 On the Overlay clip click on an area that represents the color you want to be transparent with the Eyedropper 6 Set the Similarity range of colors to be transparent...

Страница 110: ...e Overlay preview window 5 Type specifies the method used for choosing which part of the image is transparent 6 Mask selects whether to use a video or image file as the source for the overlay 7 Color RGB sets the color to be transparent 8 Advanced control window displays a representation of the threshold cutoff max value min value and gamma value parameters Click any of the parameter handles and d...

Страница 111: ... the Opacity of the effect Mixed based types can also be easily identified as they work on the entire clip and you cannot specify a key color in the Overlay clip of the preview window This is a rather complicated topic please see the Help for more specific information about each of these types of keys If you select Color Key from the Type list you have two options in choosing a key color You can c...

Страница 112: ...review box If the blue screen is not totally replaced by the underlying clip increase the Similarity value 7 Click OK and preview the clip Understanding Alpha Channels One of the most powerful methods of creating transparent overlays involves using Alpha Channels This technical term simply means an area or areas of an image that have been selected to be transparent in an image or video In many way...

Страница 113: ...e affected The Y axis thumbtacks represent the possible changes you can make to the grays of the original clip The X axis thumbtacks work similarly except they restrict you to changing only the midtone grays of the original clip leaving the areas with strong highlights and shadows untouched 1 Background clip 2 Alpha channel 3 Overlay clip 4 Result 1 Place a video clip into the Video1 track 2 Place...

Страница 114: ...mes in your video project 2 Draw an area where you want the video to appear such as a circle or a square 3 Fill this area with a solid color like blue and then fill the background with a contrasting color like green 4 Load this image into a video track Video1 5 Right click on the image and select Overlay Options 6 Select the Color Key from the Type list and click in the blue area The blue area is ...

Страница 115: ...ue Using Grayscale mattes in this way gives you much greater control over how clips merge and blend with each other To use a Grayscale matte just load a black and white matte like you would an image matte but then choose the Gray Key Type Applying video filters Video Editor has a wide range of special effects and filters that allow you to enhance and improve existing video clips as well as create ...

Страница 116: ...be applied to in your video Click OK to return to the Video Filter dialog box 5 Click OK The Video Filters dialog box closes and the filter is applied to the clip If you regularly use the same filter you can define its default attributes by double clicking its thumbnail in the Video Filter gallery of the Production Library This opens the Video Filter Options dialog box for that filter which you ca...

Страница 117: ... particular filter dialog box All of the filter dialog boxes contain the Original clip window the Preview window and the Add button Video Filter Options dialog box Monochrome Like many other effects video filters can also be animated using key frames This is a great way to have the original video clip gradually transform to the altered look of an applied filter or vice versa The following procedur...

Страница 118: ...al matte to a video filter When you apply a video filter it affects the entire frame of a video clip There may be times however when you would prefer it to only affect a certain portion of the clip such as a highlighted area or a specific scene in the background You can do this by first creating an image or video matte see Creating image and video mattes on page 114 and then loading the matte into...

Страница 119: ...control the degree of the effect You can also choose to invert the area being affected by selecting the Invert option 5 Click OK to return to the Video Filters dialog box Region dialog box 1 Mask window shows a frame from the mask 2 Preview window shows a frame from the selected clip and the parts affected by the filter 3 Type drop down box lets you select the key type to use in the Mask window 4 ...

Страница 120: ...ocessing your shots you still need to adjust a number of settings on your video equipment Sometimes there is no time for that so the footage gets either under or overexposed has bad color representation or both Thus Enhance Lighting and Color Correction tools become valuable instruments you can use to perform a number of color related adjustments Enhance Lighting Tool Enhance Lighting is a video f...

Страница 121: ... the Timeline select a clip on which the filter will be applied 2 Click Clip Video Filters 3 In Video Filters dialog box select Color Correction from Available filters to the left 4 Click Add then click Options 5 In the Color Correction Tool dialog box make sure Levels tab is active and then click the Master button This will select all pixels across the tonal range for adjustment as opposed to sel...

Страница 122: ...ection is ready You can color correct it as described earlier in the manual correction procedure Color correcting with the HSL wheel As an alternative to the Levels you might find it a lot more suitable to color correct by adjusting Hue Saturation and Luminance values Hue is the color Saturation is the amount of color and Luminance determines how bright your video is HSL moves or shifts hues and l...

Страница 123: ...ecting with Curves Editing curves is the most straight forward color correction approach It allows you to directly remap the tonal values in the video or any channel of the video The most important thing to remember while working with curves is the X and Y axis relation The horizontal axis represents current values of the pixels in the video from 1 to 256 The vertical axis represents tonal values ...

Страница 124: ...tween the clips For example you can have one clip zigzag its way across another and spin away into the distance Moving paths can be applied to any clip in the video overlay tracks and are most commonly used with title clips still image elements and animated image sequences and objects created with CG Infinity To create a 2D basic moving path 1 Open the Production Library and select the 2D Basic fo...

Страница 125: ... window magnifying the Motion Control window 4 Restore changes the clip s dimensions back to its original size 5 Actual Image replaces the preview clip in the Motion Control window with thumb nails of the clip 6 Width and Height boxes define the frame dimensions of the actual clip 7 Keep aspect ratio ensures that any changes to a clip s dimensions are reflected equally in the Width and Height boxe...

Страница 126: ... the frame window 11 Speed determines the speed of the preview 12 Play performs a preview of the moving path 13 Preview Playback Options opens a dialog box where you can specify where to preview the filter effect 14 External Monitor previews on an external monitor 15 Title Safe Area displays guidelines around the frame box representing the viewable area on a television 16 Reference point box allow...

Страница 127: ...ppear within this frame then it will not be seen in the resulting video sequence The Reference box allows you to change the position of the control point within the sample clip thereby controlling which part of the clip moves first as well as the axis of any rotations except for Sphere and Cylinder by default this is set to the center For example clicking the top left corner changes the focus of t...

Страница 128: ...l window within the Effects Manager In the Preview Window drag on the clip surrounded by the green squares position the clip where you want it to begin the movement 6 Click the Play button to preview the moving path One common use for the 2D Basic Moving Path is to fix clips in a motionless position within another clip boundaries You can often see this technique in live broadcasts advertisement re...

Страница 129: ...to the desired value 3 Use the handles in the Distortion box to slant the clip to create perspective effects 4 Click the Play button to preview Click OK to apply Creating 3D moving paths Creating a 3D moving path whether it is a simple 3D path a sphere or a cylinder is much the same procedure as creating a 2D moving path The third dimension simply consists of additional rotation angles Sphere and ...

Страница 130: ...so control the speed of a moving path by adjusting the distance between key frames To change the direction of a moving path 1 Drag and drop the 2D Basic thumbnail from the Moving Path gallery onto a clip in an overlay track 2 Select Moving Path from a pop up window right clicking on the clip 3 Drag the Start control point S in the Motion Control window to the top left corner of the of the fixed pr...

Страница 131: ...y a moving path attribute to the image file that you have just inserted the image file will be stretched to fit the dimensions of your project To maintain the original size of your image you have to change the Width and Height in the dialog box of the moving path you have selected Applying audio filters Video Editor also allows you to apply audio filters to audio clips They allow you to do everyth...

Страница 132: ... OK The Audio Filters dialog box closes and the filter is applied to the clip Filling the left or right audio channel With the Fill Left and Fill Right audio filters you can copy audio from one channel and paste it to the other channel in clips that contain stereo audio This is very useful when a clip incorporates two languages with one from the left and the other from the right channel and you wa...

Страница 133: ...can be altered with any of the transformations and effects from MediaStudio arsenal To create a title clip 1 Place any clip video image or color into the Video1 track This is the background for your titles 2 Click Insert Insert Title Clip alternatively right click anywhere in Timeline and select Title Clip from the drop down dialog box 3 Double click the text editing area in the upper right of the...

Страница 134: ...lick on your text in the text editing area then click on any of the preset thumbnails from the window below 6 Specify the format for the text in the Font tab Settings here affect the whole text in the Title text box 7 Select Anti aliasing for smooth text 8 Click the Animation tab to apply moving effects to your clip Click select a thumbnail from the Animation Gallery 9 You can also apply particle ...

Страница 135: ...ile and save titles as a file Background color allows you to choose a solid color or transparency for background Transparency sets background transparent Solid choose a fully opaque color from the box to the left Load file loads a previously created text file TXT file extension for the Title text Save file saves the title as a text file for future use Title text window provides a display of the te...

Страница 136: ...ws color lines on the text preview window Alignment positions text to either the center of the text preview window or one of its corners Preview window 1 Preview window displays a preview of the title text and provides button controls for playing the title clip The thin grey line box is the Title safe area indicator It is recommended that your title stays within the area inside this box 2 Preview ...

Страница 137: ...e width of your text in the Preview window exceeds the frame size you need to reduce the size of the font or add a new line To start a new line press ENTER If you want to load a title from a text file make sure that the size of the file does not exceed 5KB Right clicking any of the color boxes in Video Editor allows you to use the Windows color picker You can perform a far greater range of movemen...

Страница 138: ...138 VIDEO EDITOR ...

Страница 139: ...XING Video Editor features a professional way of audio processing through the Audio Mixing Panel This chapter includes the following sections Audio Mixing Panel Grouping audio tracks Modifying volume in real time ...

Страница 140: ...de For more information see Grouping audio tracks on page 142 Audio Mixing Panel controls Play Pause plays all the audio clips in the Timeline instantly Once pressed the button changes to Pause If you click Pause the video clip stops at the current frame and the button returns to Play Play the preview range plays only the clips covered in the preview area Play the last playback plays the range of ...

Страница 141: ...played on the left side of the Decibel indicator It displays how loud or silent an audio clip is If the meter reaches the peak level and changes to Red color it is recommended to lower the volume fader to avoid clipping Audio mixing process gives you two modes in modifying volume controls in real time Auto Read and Auto Write Auto Read reads the settings you made to Volume Fader and Pan Balance co...

Страница 142: ...le tracks share one audio setting by grouping them together We call this the Mixing down process Instead of adjusting the audio settings of a track and then playing again to modify other tracks here you can simply group the preferred tracks to share one audio setting The Audio Mixing Panel has two working layouts Track and Group Layout When you switch to Group Layout the ID switches according to t...

Страница 143: ...o apply the automation process 5 Click Options Auto Write on the upper right side of the Audio Mixing Panel Select one of the following modes Select Default to edit the saved volume level and Pan Balance data without having to drag the controls during recording to begin the write process In this Auto Write mode all previous adjustments in the audio track will be erased This is ideal if you want to...

Страница 144: ...modified positions 6 Click Play in the Audio Mixing Panel to begin recording Click Repeat to play the program continuously or click Play the Preview Range to hear your selected part of the track 7 Drag the Volume Fader up to increase volume level or down to decrease volume level 8 Click Auto Read to prevent overwriting a previously applied automation 9 Drag the edit line towards the beginning and ...

Страница 145: ...livers a whole lot more realism to your living room It has five separate audio channels encoded into one WAV or WMA stream delivered to five speakers and one sub woofer This chapter includes the following sections Working with Dolby Digital 5 1 in Video Editor Surround sound hardware requirements Setting up surround sound projects Mixing Dolby Surround Creating a surround sound audio file ...

Страница 146: ...sound system Speaker setup option Six speakers L R front speakers L R rear speakers center dialogue speaker and one subwoofer Refer to your sound card manufacturer s documentation for the proper setup instructions and speaker connectivity details Once your hardware is configured properly you are ready to mix surround sound Setting up surround sound projects In Video Editor you can start a new proj...

Страница 147: ...and finalize the change Having your project ready for surround sound you can start working with audio tracks and mixing your audio If you now open the Audio Mixing Panel you will see 5 1 controls replacing the standard stereo sound mixing panel See the next section Mixing Dolby Surround to find out how to use the Audio Mixing Panel to mix 5 1 sound Mixing Dolby Surround One important thing about m...

Страница 148: ...ect LFE Rear Left RL Rear Right RR Center volume control controls the amount of output sound from the center speaker Low Frequency Effect LFE volume control controls the amount of low frequency sound output from the subwoofer To begin mixing audio first populate the audio tracks on the timeline with sound files There could be as few as two files for a quick mix or as many as you have in mind and y...

Страница 149: ... Repeat the step in the Audio 2 pan window dragging the dot to upper center 7 Do the same in Audio 3 putting the dot in the upper right corner 8 Click the Play button to stream the mix Notice how the sound pans from left to right Try placing audio clips on more than three tracks experiment with sound volume and position controls The more advanced mixes would include far more than just three clips ...

Страница 150: ...f the Dolby Surround channels may seem an overkill for a simple video job but if you go further than that consider separate recording an option Creating a surround sound audio file After you are done mixing encode your project into 5 1 compatible audio format The steps for encoding are the same as when creating any audio file see Creating an audio file on page 162 except for the quality settings Y...

Страница 151: ... export the rendered video file for DVD authoring before burning it as a DVD SVCD or VCD This chapter includes the following sections Creating a video file Creating HDV or HD video files Creating a VCD Creating an SVCD Creating a DVD Creating an audio file Creating an image sequence Analyzing a video file s data rate Recording to a digital video camcorder Creating an Edit Decision List EDL file Ou...

Страница 152: ...e in step 4 that suits your needs click the Options button to open the Video Save Options dialog box to specify your own attributes for encoding the video file This can be a complicated process See Determining your video save options on page 156 to learn more about these options After you are done changing the attributes click OK to close the Video Save Options dialog box and return to the Create ...

Страница 153: ...uter using a software player that supports playback of HDV or HD formatted videos To create an HDV or HD encoded MPEG 2 file 1 Select File Create Video File 2 In Save as type select MPEG in the list 3 Click Template and select an HDV or HD template from the pop up menu depending on how your video was encoded HDV HD or SD Render as few times as possible preferably only once For example don t render...

Страница 154: ...elect File Create Video File 2 In the Create Video File dialog box select Windows Media Video from the Save as type list 3 Click Template then select a WMV HD profile such as Ulead WMV HD 720 24p to use the default provided template settings for creating the WMV HD file If you want to specify custom settings click Options Profile Customize Use the New Edit or Copy button to create modify or duplic...

Страница 155: ...akes the file available for Internet viewing 6 Select the streaming method to be used from the drop down list This determines how the video file will be delivered over the Internet Fast Start Uses HTTP Hypertext Transfer Protocol and FTP File Transfer Protocol as transmission protocols for streaming the video file over the Internet While waiting for the downloading to be finished the browser utili...

Страница 156: ... Options dialog box 7 Click OK 8 Enter a File name for your Windows Media Video movie and click Save Determining your video save options The properties that you specify when saving a video file determine your output quality MediaStudio Pro offers different settings that you can apply to achieve a high quality video The set of available options depends on the output file format that you want since ...

Страница 157: ...the frame size of a video without having to resize the actual frames This is important as resizing frames resamples the original video resulting in distortion and loss of quality The downside though is that you need to remove data which may or may not be important Cropping is also good for removing unwanted noise that may occur around the edges of a video due to bad capturing or copying Cropping d...

Страница 158: ...nd data rate In this tab you are given the option of choosing the variable bit rate VBR encoding method This method produces better picture quality with a smaller file size There are eight MPEG subsets under Media type in the Compression tab Users can save their videos as DVD VCD SVCD ready MPEG files NTSC or PAL by simply selecting the desired media type from the drop down menu The frame rate and...

Страница 159: ...ight To perform a batch video file creation 1 Click File Create Multiple Files to open the Create Multiple Files dialog box 2 Click the Add button In the Open dialog box select the project file DVP or VSP you want to create a video file from Once selected click Open The standard Create Video File or Create Audio File dialog box opens 3 In the Create Video File dialog box enter a Name and set up an...

Страница 160: ...Media type list select NTSC VCD or PAL VCD depending on your TV standard 6 Click OK Enter a name and click Save to render your movie After rendering a VCD ready MPEG 1 file import this file into Ulead DVD MovieFactory and burn a VCD You can also use Ulead DVD DiskRecorder DVD VR from the File Export menu to burn a disc For details on how to use these bundled software see More Programs on page 268 ...

Страница 161: ...VD DiskRecorder DVD VR from the File Export menu to burn a disc For details on how to use these bundled software see More Programs on page 268 Creating a DVD DVD stands for digital video disc or digital versatile disc and is considered as the next generation of optical disc storage technology What makes it exciting is that it is a bigger and faster CD which can hold cinema like video high quality ...

Страница 162: ...Click File Create Audio File to open the Create Audio File dialog box 2 Select the drive and folder where you want to save the file and select the file type you want to create from the Save as type list 3 Enter a File name 4 Click the Options button to view or edit the specific details of the file in the Audio Save Options dialog box The Compression tab contains the options you need to specify to ...

Страница 163: ...1 Click File Create Video File 2 Select Ulead Image Sequence Files UIS and the drive and folder where you want to save the frames of the video 3 Enter a File name 4 Click the Options button to view or edit the properties for each of the image sequence files 5 Click the Format tab and select the file format and data type of the images in the sequence If the file type you select allows customization...

Страница 164: ...ct the video file that you want to analyze and then click Analysis The Data Rate Analysis window details the various attributes of the file and shows a graph indicating the size of each frame in the video This graph contains a number of blue frames which indicate key frames in the video sequence key frame diamonds are also visible beneath the Preview window For some video compression schemes such ...

Страница 165: ...roject to a DV or HDV HD camcorder you must first render it as a DV AVI or HDV HD encoded MPEG 2 file Select File Export DVD Recording to record your file to a camcorder To record a movie to your DV or HDV HD camcorder 1 Turn on your camcorder and set it to Play mode or VTR mode See your camcorder s manual for specific instructions 2 Click File Select Device Control From the Current device list se...

Страница 166: ... or directly to the DV camcorder If your display card supports two output devices aside from DV camcorder use it to preview the filter effect by selecting Dual Head Device on the External playback device option of the dialog box To preview using an external playback device 1 In the Production Library select Transition Effect Moving Path or Video Filter from the drop down list Video Editor should h...

Страница 167: ...s of your clips in the Timeline as well as the different effects and transitions used When preparing an EDL it is important that you contact your post production house to determine the format they use as well as which effects are supported ñ particularly because not all post production companies support the wide array of effects available in Video Editor To create an EDL file 1 Click File Create E...

Страница 168: ...ost timecode 1 Click Clip Post Timecode to open the Post Timecode dialog box 2 Type the name of your source video in the Reel name entry box for example Wedding 1 3 Specify the appropriate time to start recording from the source in the Timecode spin box The timecode should have been recorded when you captured the video from Video Capture using a controllable device You can view this timecode by cl...

Страница 169: ...put an avi file to video tape 1 Click File Print To Tape Video File to open the Select Video File dialog box 2 Locate and select the file you want to output and then click the Options button The Print To Tape Options dialog box opens 3 Set the time Delay Start determines the length of the delay before the video is played while End sets the length for after the video has played Selecting Manual all...

Страница 170: ...It is not necessary to use MediaStudio Pro to send your video back to tape There are many dozens of different kinds of capture boards and each comes with its own software for capturing and recording to tape Some people prefer to edit their video in MediaStudio Pro and then output to tape using the capture board s proprietary software Under a FAT 16 file system Win95 there is a 2GB file size limita...

Страница 171: ...RAM using DVD VR format or DVD R To export your videos to DVD MovieFactory 1 Select File Export DVD Authoring to export a rendered video file 2 The Select Video File dialog box will appear Select the file you want to open then click OK 3 The Ulead DVD MovieFactory program opens To export your videos to DVD DiskRecorder 1 Select File Export Ulead DVD DiskRecorder DVD VR 2 In the Select Video File d...

Страница 172: ...172 VIDEO EDITOR ...

Страница 173: ...y also get very complicated especially if a project needs to be shared for collaboration among video editors To easily manage projects and optimize the workflow Video Editor offers a host of smart tools and advanced features This chapter includes the following sections Smart Package Smart Relink Converting files Using the Quick Command Panel ...

Страница 174: ...as Archival package but will exclude smart trimmed clip files Smart trimmed package will back up all the media source files used in the main project timeline and smart trimmed clip files 2 Options In this group box you can choose additional items or specify additional conditions for packaging If you have no proxy files in your project you can generate them automatically during the package process ...

Страница 175: ... a new folder or hard drive Smart Relink will find all of the files after you relink just one provided the relative directory structure has remained the same Converting files There are many cases where you might want to convert video files to a different format You can use Video Editor as a quick conversion tool without even opening a video file into a specific project To convert a video file to a...

Страница 176: ...e Non optimized file list 2 Select a file to see which of its properties are inconsistent with the project s settings 3 Select the files you want to convert Use the SHIFT and CTRL keys to select multiple files Click Convert The process of converting these files could take some time but it is a one time render and will save you time in the long run Batch Convert Batch Convert allows you to simultan...

Страница 177: ...mmands to appear in custom and cache areas The custom area displays commands you specifically insert into the panel while the cache area automatically tracks the last commands you have used Selecting the Save when program closes option saves your changes whenever you quit Video Editor Leave this clear if you want to save the current configuration To add commands to the Quick Command Panel 1 Right ...

Страница 178: ...k OK to finish You can give a menu command an alias by selecting it and then typing in a new name in the Alias entry box For example Video Editor File Preferences can be written as VE Pref This is useful if you resize the Quick Command Panel and find that menu command names are hidden ...

Страница 179: ...media from other Ulead software packages can be easily imported into MediaStudio Pro Video Editor The output media from Video Editor can also be easily exported to other Ulead software such as VideoStudio PhotoImpact and COOL 3D Production Studio This chapter includes the following sections VideoStudio project files PhotoImpact UFO files Importing masks from PhotoImpact COOL 3D Production Studio f...

Страница 180: ...raphics creation There are endless possibilities of using it in conjunction with Media Studio Pro You can use PhotoImpact to create slideshows backgrounds for movie opening titles retouch still photographs to be animated in Media Studio Pro or create custom graphic elements like occlusion and matte masks PhotoImpact UFO files are treated as any other image files in MSP To import a PhotoImpact file...

Страница 181: ...lking about 3D is beyond the scope of this book but you can create great looking 3D text and logo elements for use in your video productions There are three ways to export a MediaStudio Pro compatible file format from Cool 3D C3D file MSP can directly import COOL 3D Production Studio project files c3d COOL 3D Production Studio can export a 32 bit avi video file with alpha channel this method is pe...

Страница 182: ... Adjust Soft Edge and Transparency sliders to desired values 3 Click OK or press Enter Edge fringing or so called aliasing of the images may spoil your composite To avoid jagged looking edges watch out for the alpha channel that comes with the imported 3D files Be sure to output images with Straight Alpha from these programs If you didn t work with alpha channels before here s a brief introduction...

Страница 183: ...ng to go through the menus In this chapter shortcuts are grouped as follows File menu Edit menu View menu Search menu Clip menu Help menu Using the Shift key Using the Ctrl key Double clicking Preview Window and Source Window Timeline Toolbar Timeline Source Window Production Library Effects Manager Miscellaneous ...

Страница 184: ...he Preferences dialog box Ctrl Q Exits Video Editor Ctrl Z Undoes the last command Ctrl Y Reapplies the last undone command Ctrl X Cuts the selection area onto the clipboard Ctrl C Copies the selection area onto the clipboard Ctrl V Pastes the clipboard contents Del Deletes the selected area Ctrl L Selects all clips in the Timeline Ctrl B Deselects any selection area F7 Invokes the selected clip s...

Страница 185: ...rl M Displays the Moving Path Options dialog box Ctrl I Splits a clip into separate video from audio clips F1 Starts the online help Shift while inserting a clip in the middle of another clip Splits existing clip to make room only when Single Track Ripple or Multi Track Ripple is selected Shift while selecting clips Allows you to select multiple clips Shift Ctrl Allows you to select audio clips wh...

Страница 186: ...tle bar of the Timeline Window Docks the Timeline into the Video Editor workspace Other Title bars Dock or float the window Info section in the Status bar Displays the Preferences dialog box Enter K Plays Pauses the preview of the project in the Preview Window or the playback of a selected clip in the Source Window Shift Space Plays a preview range or pauses the playback Space Plays from the curre...

Страница 187: ...indow only Ctrl 2 Activates the Preview Window Ctrl 3 Activates the Source Window J Displays the previous frame L Displays the next frame C while selecting a clip Allows you to select a clip using the Clip Selection Tool E while selecting the first clip in a track Allows you to select a track using the Track Selection Tool Shift E Allows you to select multiple tracks T while dragging Allows you to...

Страница 188: ...e Zooms out Ctrl I Separates the audio track from a video clip Ctrl 1 Activates the Timeline Window Shift Up Down arrows Displays all the video tracks in the Timeline Alt Up Down arrows Displays all the audio tracks in the Timeline Up Down arrows Moves the selected clip in the Timeline Window one track up or down U Cut by preview cursor if there is clip selection just cut the clip otherwise cut th...

Страница 189: ...to 8 0 Shift 1 Change speed range to 4 0 Shift 2 Change speed range to 2 0 Shift 3 Change speed range to 1 0 Shift 4 Change speed range to 0 5 Shift 5 Change speed range to 1 0 Shift 6 Change speed range to 2 0 Shift 7 Change speed range to 4 0 Shift 8 Change speed range to 8 0 Space Play project ESC Stop Page up or down Previous or Next edit point F3 F4 Set preview range F5 Add project cue Arrow ...

Страница 190: ...nge J Increases by one half the current play speed range Tab Toggle between Thumbnail View and List View Shift or Ctrl arrow key Select multiple clips F11 Add selected clips to Source Window F10 Open menu J Increases by one half the current play speed range Effects List Insert Add effect Delete Delete effect Arrow Up or down Traverse effects in Attributes Panel Arrow Left Collapse tree Arrow Right...

Страница 191: ... right Move frame to the right Shift Ctrl Arrow Left Move keyframe to the left Shift Ctrl Arrow right Move keyframe to the right Up Down arrows Adjusts the volume Left Right arrows Moves the selected clip s one frame forward or backward Left Right arrows Moves the Vertical Preview Line one frame forward or backward when there are no clips selected Also displays the current frame when the Preview W...

Страница 192: ...to the Source Window Shift F11 Moves the inserted clip from the Source Window to the Timeline Window specified by the indicator position If the Timeline is occupied the clips cannot be inserted Ctrl F11 Applies the changes made on the inserted clip directly to the Production Library or the selected clip in the Timeline Shift Ctrl Left Right arrows Allows you to select multiple clips in the Product...

Страница 193: ...PART II VIDEO CAPTURE ...

Страница 194: ...f different sources such as HDV or DV camcorders as well as DVDs TVs or VCRs Once captured you can then play back those files or take them into Video Editor to start constructing your own video project This chapter includes the following sections Understanding the basics Preparation Improving video signal when capturing analog video Preferences ...

Страница 195: ...USB port If you do not have a video source installed you can still use Video Capture to play back existing video files Once you have your video source connected and playing the video automatically appears in the Video Capture video window Otherwise the video window displays a color bar test pattern instead Video Capture s program window Depending on the video source connection used some commands a...

Страница 196: ... Capture Video Source MPEG Settings Capture To File Capture To Clipboard Save As Open Video Display Audio Format Video Format Capture Properties Scan DV Tape Select Capture Template Rewind Forward Previous Mark In Mark Out Record Stop Repeat End Home Next Play ...

Страница 197: ...d an IEEE 1394 card on your computer check also if the card is detected To check if the IEEE 1394 card and digital camcorder are detected 1 Insert your video tape into the camcorder and switch it on Make sure it is in playback mode usually named VTR or VCR Check your camcorder s manual for specific instructions 2 Open the Control Panel then open System Hardware Device Manager 3 Make sure the follo...

Страница 198: ...GR PD1 JVC GR PD1EK After connecting your HDV camcorder to the IEEE 1394 port check whether or not your camcorder or deck has been properly detected by your computer by following the guidelines below In addition to commonly used Texas Instruments and Microsoft DV drivers there are other drivers available Consult your camcorder s manual for suitable drivers Windows XP Device Manager Windows 2000 De...

Страница 199: ...the camcorder is detected as a DV device you can capture DV footage If the camcorder is detected as an AV C tape device you can capture HDV footage JVC HD camcorder If you have connected your JVC HD camcorder before to your computer check the Device Manager to see if your camcorder is detected as a DV device left image below or JVC tape device right image below DV mode HDV mode The Sony HDV camcor...

Страница 200: ...200 VIDEO CAPTURE DV mode MPEG 2 mode ...

Страница 201: ...order is detected 4 Switch off your camcorder and unplug the camcorder from the computer 5 Turn on your camcorder Flip open the camcorder s LCD monitor to reveal the camera panel In the camera panel switch i LINK OUT to MPEG2 and switch off your camcorder 6 Connect your JVC HD camcorder again to your computer s IEEE 1394 port using the IEEE 1394 cable 7 Turn on your camcorder and switch it to VTR ...

Страница 202: ...deo window of Video Capture If this does not happen then you need to tune Video Capture to your video source To do this click Setup Video Source The Video Source dialog box opens with various options that allow you to connect to a video channel and specify the type of video source you have as well as the television standard it operates on these options may differ depending on your video capture bo...

Страница 203: ...vice Control and Capture Plug in for you to be able to control your device using the Navigation Bar and capture video To view existing or captured video simply switch to Playback mode by clicking the Playback icon on the Standard Toolbar or selecting View Playback Setting preview options When previewing video in Capture mode Video Capture allows you to control the frame rate and frame size with th...

Страница 204: ...ulting video file To define audio input 1 Click the Audio Format button on the Standard Toolbar or Setup Audio Format to open the Audio Format dialog box This command is disabled when your PC has no sound card and your video capture board does not support audio 2 In the Name combo box select an option for the audio data The attributes of the option are displayed in the Attributes combo box You can...

Страница 205: ... be faithfully reproduced on that device such as a computer monitor or a television set If your video source does not have test pattern generation capability then you will be unable to accurately calibrate your display You can however adjust the colors using your video capture board s own controls see page 80 To calibrate your display 1 Make sure that the test pattern recorded on the video source ...

Страница 206: ...log box This dialog box allows you to adjust various color values such as hue saturation brightness and contrast It is important to keep both dialog boxes open so that any changes in the Setup dialog box can be reflected in the Color Calibration dialog box To view these changes you need to make sure that the preview test pattern in the Color Calibration dialog box redraws itself regularly To do th...

Страница 207: ... you to adjust the contrast color and position of any video displayed from an external video source The Video Display button on the Standard toolbar and the Setup Video Display or Setup Video Source command depending on your video capture board give you access to these controls If you are not sure how to use them refer to the documentation that accompanied your video capture board If you cannot sa...

Страница 208: ...h frame number in the Status bar as it is being displayed When clear only the starting frame number is shown Display capture options before capturing opens the Capture Video Dialog box every time you click the Record button When clear Video Capture begins recording immediately Image capture deinterlace downsamples captured images to minimize the file size Use Split dialog box for capture settings ...

Страница 209: ...his can be made up of several minutes of video or simply individual frames that you want to incorporate into the project you are working on This chapter includes the following sections Tips for capturing video Before capturing Capturing video Scanning a DV tape Batch capturing Changing a file s properties ...

Страница 210: ... you have two hard drives in your system it is recommended that you install MediaStudio Pro to your system drive usually C and store captured videos in your other drive usually D The choice of what hard disk to use is also crucial Using a dedicated video hard drive preferably with Ultra DMA 66 7200 rpm and 30GB free space is recommended Make sure DMA is enabled for your hard disk Open the Control ...

Страница 211: ... to define more parameters for the selected device control driver Visit Ulead s web side to know more about recommended settings for different device control drivers Once device control has been enabled Video Capture allows you to play stop or pause the video footage by using the Navigation Bar or the keyboard hotkeys To control your digital camcorder using the Navigation Bar 1 Make sure your digi...

Страница 212: ...hich include the following Ulead DirectShow Capture Plug in for capturing DV You can also use this plug in to capture analog video or TV footage in AVI format Ulead DSW MPEG Capture Plug in for capturing video in MPEG format Windows Media Format Capture Plug in for capturing video in WMV format Import DVD Plug in for capturing video from DVD Using this plug in will allow you to capture entire or s...

Страница 213: ...deo Capture s Navigation Bar for playback Whereas if you have an analog source use the playback controls on the device The video should appear in the video window of Video Capture If it does not check the connection to your video source and your video capture board setup 3 When you reach the part of the video that you want to capture pause the playback 4 Click the Record button on the Navigation B...

Страница 214: ...be saved as capt0001 capt0002 and so on 8 Select the Save to Production Library option to save your captures to the Production Library s Media Library 9 Click the Advanced tab to see more settings and customize them according to your needs 10 If you want to retain your settings for the next capture click Apply to save them 11 Click OK Video Capture begins capturing according to your settings The P...

Страница 215: ... are dropped displays a report after capturing whenever the specified dropped frame threshold has been met For general capturing specify 10 If you frequently get dropped frames try capturing at a lower quality Set this to 100 if you do not mind dropped frames or are only capturing low resolution files Pre allocate the capture file creates a temporary file to place your captured video sequences in ...

Страница 216: ...s the captured video as a DV AVI file AVI Also select Setup DV Type or click Properties in the Advanced tab of the Capture Video dialog box then choose whether to capture DV as DV type 1 or DV type 2 With DV Type 1 the video and audio channels are stored unmodified as a single interleaved stream in the AVI file With DV Type 2 which is the default the video and audio channels are stored as two sepa...

Страница 217: ...n Video Editor SmartRender is a technology that permits changes only rendering This means that whenever you preview your edits or create a video file only the clips which have been altered will be rendered Follow the instructions in To capture a video sequence on page 213 to capture video In addition when Auto no time limit is chosen as the Capture method in the Options tab of the Capture Video di...

Страница 218: ...rty Settings or click Properties in the Advanced tab of the Capture Video dialog box Select Customize then click Advanced 5 In the MPEG Settings dialog box select User Defined 1 or User Defined 2 from the Templates drop down list 6 Select whether to capture in MPEG 2 or MPEG 1 format from the MPEG type drop down list 7 Select either to use Constant bit rate CBR or Variable bit rate VBR to encode y...

Страница 219: ...deo file is 4 GB in Windows operating systems such as Windows 98 SE and Me that use the FAT 32 partition file system Captured video data in excess of 4 GB are automatically saved to a new file In Windows 2000 and Windows XP which can use the NTFS file system there is no limit in the captured file size To enable seamless capture 1 Select Seamless capture in the Options tab of the Capture Video dial...

Страница 220: ...ile on page 220 for details 5 To capture video follow the steps in To capture a video sequence on page 213 Selecting a profile The quality of a WMV file depends on the profile it is using A Profile covers various attributes for a Windows Media Format file such as bit rate number and type of streams compression quality frame size and so on When capturing video directly to WMV format Video Capture u...

Страница 221: ...or the WMV file 7 Choose the remaining options according to your preference then click OK 8 Click Close in the Manage Profiles dialog box 9 Click OK in the Select Profile dialog box About dropped frames If your PC and video capture board have difficulty supporting a specified frame rate a message box may appear after capturing detailing how many frames were captured and of those how many were drop...

Страница 222: ...rce In the program a camera shutter beep is available as a reminder Also there are three output destinations Production Library Image File and Clipboard Also a Jog bar is also available to make capturing a single frame easier for you To capture a single frame 1 Connect your DV camcorder to your IEEE 1394 interface card 2 Turn your camcorder on and set it to Play mode or VTR VCR mode 3 Run Video Ca...

Страница 223: ...in Sequence settings The capture engine will capture a frame based on the set interval time Select Capture duration and set how long you want the capturing process to last Click OK to accept the settings and close the dialog box so you can start the capture process Capture history Video Capture provides a capture history dialog box to track the latest captured files Select File Capture History to ...

Страница 224: ... in the dialog box You may choose one of the following Scan from beginning Rewinds the tape to the beginning of the tape and starts to scan This method can be used to scan a new tape Scan from current position Scans the tape from the current position This method can be used to scan a tape that has been scanned before and now will just need to scan the newly recorded scenes Scan from beginning and ...

Страница 225: ...s use the default Capture file directory for saving capture files or change it to your desired folder Specify a Capture file name 10 Click the Scene Information tab 11 Click Start to begin scanning the tape Scanned clips are then displayed at the left panel of the dialog box Quick scan collects frames faster than the speed of the playback and saves a lot of space in your storage disk If the DV cam...

Страница 226: ...rk video sequences and capture them 1 Connect your camcorder to the computer See Preparation on page 197 for details Turn the device on and set it to VCR or VTR mode 2 Select Capture Batch Capture 3 Click Capture Options and do the following Select Device Control to open the Device Control dialog box Select MS 1394 Device Control if you have a DV or D8 camcorder select HDV 1394 Device Control if y...

Страница 227: ...ll start from 01 02 10 15 and will end at 01 04 10 15 You can trim out unnecessary frames later when you are editing 6 Specify a Capture file name During batch capture the captured files will be named sequentially For example if the file name you specify is batch captured files will be named batc0001 batc0002 and so on 7 When you are ready to start marking video sequences click the Batch Settings ...

Страница 228: ...each time and is very helpful for creating high resolution files to replace low resolution files you may have been using for editing To import and edit a batch list 1 To load an existing batch file or Video Editor DVP file click the Open button on the toolbar in the Batch Capture dialog box Choose the appropriate file from the Open Batch Capture File dialog box 2 Click on the segment in the batch ...

Страница 229: ... want to capture by marking those frames and creating a batch list You also need to indicate a file to save the marked sequences to as well as provide a name for your reel or video source This is especially useful if your batch list contains marked sequences from a number of different tapes or sources When you perform the capture Video Capture will prompt you when it is time to insert the next ree...

Страница 230: ... video attributes in the General Advanced and Compression tabs 6 Click OK The Video Save Options dialog box closes and you return to the Save Video File dialog box 7 Click OK The dialog box closes and Video Capture saves the file accordingly ...

Страница 231: ...s many shortcuts that allow you to access commands and open dialog boxes without having to go through the menus In this chapter shortcuts are grouped as follows File menu Control menu View menu Capture menu Help menu Miscellaneous ...

Страница 232: ... forward through the video clip Moves back a single frame Moves forward a single frame Home Goes to the first frame of the video clip End Goes to the last frame of the video clip Shift F Goes to a specified location using a controllable device Only works if you are in Capture Mode Ctrl R Plays the video clip in a continuous loop Only works if you are in Playback Mode F3 Selects an individual frame...

Страница 233: ...re board F5 Displays the Video Capture dialog box Ctrl C Captures a single frame to the clipboard F8 Captures a single frame to a file F1 Displays the contents for Video Capture Help Double click Status bar Opens the Preferences dialog box Double click any toolbar Floats or docks the toolbar Shift F10 Invokes the About Windows Help dialog box Double click title bar Maximizes or restores the active...

Страница 234: ...234 VIDEO CAPTURE ...

Страница 235: ...PART III AUDIO EDITOR ...

Страница 236: ...D Audio Editor is the MediaStudio Pro program that gives you command over your soundtrack With it you can play record and edit the audio components of your video project with drag and drop ease and a click of the mouse ...

Страница 237: ...indow as a waveform This waveform represents the various positive and negative peaks that a natural sound wave makes If it is a mono file single channel only one waveform is present while stereo files two channels have two waveforms representing the left and right channels accordingly Audio Editor displays sound in this manner to help you visualize the contents of an audio file and make enhancing ...

Страница 238: ...trip Navigation Bar Fit Selection in Window Run Mixer Program Previous Cue Switch View Add a Cue Next Cue Mark In Mark Out Zoom Slider Selection area Active waveform View box Record Previous Mark In Mark Out Next End Play Pause Stop Home ...

Страница 239: ...better the audio reproduction the downside is increased file size 3 Select the number of channels to use from the Channels group box 4 Select the Sample size you want to use from the Sample size group box The sample size specifies how much memory is allocated to store the audio data In most cases 8 bit files produce adequate results without sacrificing too much in quality If you want the best poss...

Страница 240: ...perties click Edit Convert To In the dialog box that opens you can choose to change the sampling rate channels and sample size according to your needs Once you click OK the dialog box closes and the waveform is changed accordingly Zooming When you edit a waveform you may want to see part of it in greater detail or display it in a more compressed manner You can do this in three ways click View Zoom...

Страница 241: ...o return to viewing the entire waveform in the edit window click View Fit In Window CTRL 1 To view the waveform at 1x click View Actual View CTRL A In Audio Editor it is possible to zoom down to the sample level Editing at this level however is often impractical as any changes you make may be inaudible because of the sheer number of samples possible For example the smallest audio file still has 11...

Страница 242: ...ut takes longer to redraw On the other hand Quick scan produces a slightly less accurate waveform but is much quicker at redrawing In most cases the Quick scan option is more than adequate for editing at the seconds level In the Preferences dialog box you can also change the units used to indicate time along the bottom of the edit window You can choose from M S ms SMPTE or as samples An example of...

Страница 243: ...ear sound from your computer s speakers then it is a good connection 2 Run your audio mixing program by clicking the Run Mixer Program button on the Toolbar or click Control Run Mixer CTRL M To use the Windows default mixer click Start Programs Accessories Entertainment Volume Control 3 Make active the edit window you want to record the sound into and click the Record button on the Navigation Bar ...

Страница 244: ...ibrary folder of the Video Editor Production Library so you can access it right away when using Video Editor Tips for determining audio quality Generally it is quite straight forward to determine the properties you should use for recording a waveform The determining factors are the file size and the type of speakers the audio will be played back over For example if disk space is limited and the so...

Страница 245: ...ays time in samples per second For example if your sampling rate is 11 025 KHz then the waveform shows 11 025 sample points per second Waveform display controls the detail with which Audio Editor draws waveforms Selecting the Precise scan option produces a very detailed waveform but may take more time to redraw because of the extra information The Quick scan option produces a slightly less accurat...

Страница 246: ...246 AUDIO EDITOR ...

Страница 247: ...nhancing audio tracks for your audio and video projects become greatly simplified and significantly easier With a number of advanced audio effects and enhancements Audio Editor will soon have you creating audio files that add impact to your work and multimedia presentations ...

Страница 248: ...ld like to select This method is very useful for creating selections as your ear can hear the sound more clearly than your eyes can see it Drag on the waveform in the Overview Strip This can only be done if the file has been zoomed in and there is space outside the Global View Panel to select To deselect a selection area click anywhere within the waveform or click Edit Select None CTRL K Clicking ...

Страница 249: ...ting and ending positions for the area your cursor currently spans which depending on your zoom level may be the same or different The lower box for stereo files there will be two one for each channel indicates the negative and positive amplitudes in that region Clearing audio data Often when you open or record a waveform there may be areas which you don t want or no longer need In such cases you ...

Страница 250: ...g box which allows you to combine waveforms by adjusting their relative amplitudes A 100 mix means that the data is mixed at equal amounts Lowering the mix for one reduces its amplification while increasing the mix for the other adds to its amplification For more on mixing tracks see Mixing tracks on page 257 Fill replaces a selection area with the clipboard data If the selection area is longer in...

Страница 251: ... of impact between two cars in a high speed chase To place a cue 1 Click on the area in the waveform where you want to place a cue You may want to zoom in for a more accurate placement 2 Click the Add Cue button on the Toolbar or click Control Add Cue F5 to open the Add Cue dialog box 3 Enter a description in the Cue name entry box maximum 128 characters The default cue name p uses the time value ...

Страница 252: ... between them easily by clicking the Previous Cue Next Cue buttons on the Toolbar or click Control Previous Cue and Next Cue Shift Tab Tab If you want to go to a specific cue click Control Go To Cue Ctrl G This opens the Go To Cue dialog box which lists all the existing cues in the waveform To go to a cue select it and click the Go To button The cursor then jumps to that cue Using cues with Video ...

Страница 253: ...that they share a similar audio level especially if they were recorded at different levels To change the audio level of a file 1 Click Effect Amplify to open the Amplify dialog box 2 Specify the percentage you want to change the audio level by in the Percentage spin box 100 is unchanged while anything above that increases the audio level and anything below decreases it 3 Click OK The waveform chan...

Страница 254: ...ing file This can be either 8 bit or 16 bit The more bits the better the quality of the recording but the greater the size of the audio file If you need to reduce file size but still want to maintain a good level of quality you can quantize the file by clicking Effect Quantize This command opens a dialog box which allows you to specify the number of bits allocated to the file 1 7 for 8 bit files a...

Страница 255: ...ded to the waveform at the cursor s position increasing the length of the audio file accordingly To remove silence click Edit Trim Silence In the Trim Silence dialog box that opens you can specify to remove all silent areas in the file or just those matching a specified duration measured in M S ms Removing background noise Unless you record in a rigidly controlled environment such as a soundproofe...

Страница 256: ...point 0 on the amplitude scale Most of the time this doesn t adversely affect the overall quality of your tracks as the differences are minute However you may encounter some files whose baselines vary dramatically and the result of mixing them together produces unacceptable distortion and noise Audio Editor allows you to calibrate such files so that they all have matching baselines Simply click Ef...

Страница 257: ...together you may want to remove one of the files from the mixture For example you may be preparing an audio project for a client and after having created a master file they decide they want to remove the voice of one of their managers Initially this seems like an impossible task as all the files have been truly integrated Fortunately the solution is not as difficult as it seems All you need to do ...

Страница 258: ... you want to give your audio a smooth or rolling start and finish To perform a fade click Effect Fade to open the Fade dialog box A Fade graph allows you to control how the fade is performed offering a set of predefined fades or customizable settings The first control point in the graph defines the start fade amplitude the second and third points for the middle of the fade and the fourth point for...

Страница 259: ...tion accordingly Performing a stereo pan If you have a stereo file you can pan the audio so that it sounds as if the audio moves from one speaker to the other creating a surround sound effect To do this click Effect Pan and in the Pan dialog box that opens alter the fade for each channel accordingly For example a start and end level of 0 results in complete silence while 100 leaves the output unch...

Страница 260: ...t sound as if you are in a canyon or at a baseball game To create an echo quickly click either one of the Echo commands available in the Effect menu Or to customize one of those commands click Effect Echo This opens the Echo dialog box which allows you to define the three characteristics of each echo command Delay Decay and Bound Delay is the length of time that passes before you hear an echo whil...

Страница 261: ... This opens the Cross Fade dialog box which allows you to select the file you want to blend with You can only cross fade between files with the same properties Select the file to cross fade with from the Cross Fade with list box and then enter a value in the Cross duration spin box in M S ms to determine how much of the two files overlap If you do not specify a duration the second file is added to...

Страница 262: ... your sound files These plug ins provide a platform for creating dynamic audio files DirectX Audio goes beyond the 16 channel limitation and allows any number of audio tracks to be played simultaneously up to the limits of your system To use DirectX Audio Effects you will need to install third party plugins that will become awailable system wide For more information on DirectX Audio plug ins pleas...

Страница 263: ...y shortcuts that allow you to access commands and open dialog boxes without having to go through the menus In this chapter shortcuts are grouped as follows File menu Edit menu Control menu View menu Window menu Help menu Miscellaneous ...

Страница 264: ...Audio Editor Ctrl Z Undoes the last command Ctrl X Cuts the selection area onto the clipboard Ctrl C Copies a waveform or selection area onto the clipboard Ctrl V Pastes the clipboard contents Del Deletes the selected area Ctrl L Selects the entire waveform Ctrl K Deselects any selection area Esc Stops playing the waveform Space Plays Pauses the waveform Ctrl R Records to an audio file Ctrl D Reco...

Страница 265: ...e next cue Ctrl G Displays the Go To Cue dialog box Ctrl A Displays the actual view of the waveform Zooms in on the waveform Zooms out on the waveform Ctrl 1 Fits the entire waveform in the window Ctrl F Fits a selection in the window Ctrl T Toggles between current view and actual view Shift F5 Cascades all waveforms Ctrl H Tiles all waveforms horizontally Shift F4 Tiles all waveforms vertically C...

Страница 266: ...formation box Double click Sample Information box Displays the Wave Information dialog box Double click Status Bar Displays the Preferences dialog box Esc Closes dialog boxes without making changes Alt Backspace Undoes the last applied command Shift Insert Pastes the clipboard contents Shift Delete Cuts a selection area and places it onto the clipboard Ctrl Insert Copies a waveform or selection ar...

Страница 267: ...PART IV MORE PROGRAMS ...

Страница 268: ...parate programs that you can access inside MediaStudio Pro DVD MovieFactory allows you to author DVD VCD and SVCD to discs while the DVD DiskRecorder enables you to add or record videos to a device that supports DVD RAM or DVD R Learn how to use these programs in this chapter ...

Страница 269: ...ovieFactory Select the files and click Open By default DVD MovieFactory creates a DVD disc project and immediately brings your video files to the Add Media step If you want to create a VCD or SVCD disc instead click Back in the Add Media dialog box to go to the Start Project step where you can choose the desired disc media that you want to create Start Project This dialog box is where you can crea...

Страница 270: ...and Ulead VideoStudio To add a video project file to your project 1 Click New Project DVD Next to switch from the Start project page to Add media dialog 2 Click Add media in the Add Edit Media page to launch the Open Video File dialog box 3 Locate the video file s You can select and add multiple files under the same folder Press Ctrl or Shift to select multiple files 4 Repeat the above process to ...

Страница 271: ...eo clip will immediately jump to the first scene of that chapter and start the playback This feature gives your viewers the freedom to choose a particular part of the movie to watch Note that these small video thumbnails only link to its mother video without generating any additional physical video files So you don t need to worry about the possibility of unexpected file size increase Notes You ca...

Страница 272: ...change information DVD MovieFactory automatically detects each scene change and generates it as a chapter when you click Auto Add Chapters Use Remove Chapter or Remove All Chapters to delete unwanted chapters Use Show or Hide to include or exclude the selected chapters from the menu then click OK Export selected clips This lets you select existing video files and save them to another video file fo...

Страница 273: ...t Settings and other options Setup options for your projects in DVD MovieFactory can be accessed using the buttons on the lower left corner of the program Settings and options Use the options in this menu to customize the settings for video playback save your project view information about Ulead DVD MovieFactory visit the Ulead DVD MovieFactory Web page and register your copy of Ulead DVD MovieFac...

Страница 274: ...ion dialog boxes Select to have the confirmation boxes appear even after the Do not show again option is selected Max 30MB menus for set top DVD VR recorder Select to set the maximum file size for DVD menus to 30MB to make the DVD compatible with set top DVD DVD VR recorders Check Ulead Web site every days Select to specify how frequently the program checks the Ulead Web site for news and updates ...

Страница 275: ...etting Change MPEG Settings Select the type of video setting for your project Select Customize to personalize video settings Display aspect ratio Select the output display of your project Do not convert compliant MPEG files Select to prevent the program from rendering DVD compliant MPEG files during the rendering output process Support X Disc Includes Extended disc XDVD XVCD XSVCD compatible files...

Страница 276: ...w play and edit the content using DVD MovieFactory s playback controls and editing tools You can change the output format of your current project anytime by selecting the desired output format in Output disc type You can also set the display output of your project Aside from the standard 4 3 display DVD MovieFactory supports 16 9 display aspect ratio for high definition wide screen digital systems...

Страница 277: ... click a thumbnail in the Media Clip list to display a context menu that gives you access to more options Change Thumbnail Changes the current thumbnail display Reset Thumbnail Restores the original thumbnail display Media Clip Properties Displays the file video and audio properties of the selected media clip Jog Slider Jog Wheel Shuttle Slider ...

Страница 278: ...Jog Slider to move to the point where the clip will end then click or press F4 4 Click Play or press Space to view the trimmed video Setup menus Create main menus and submenus in this step These menus allow the viewers to instantly access specific portions of your video DVD MovieFactory offers a set of menu templates to best fit the purpose of each menu Custom made menus are also easily created Se...

Страница 279: ...mark as shown at the lower right corner of its thumbnail You can see the result when you are previewing the project later When Motion menu is selected the movie will use the beginning part of the video at a fixed duration instead of the first video frame as button thumbnails The duration of the motion menus ranges from 1 to 30 seconds Using motion menus will increase the file size Check the disc s...

Страница 280: ...menu click Next to go to the Preview page To create your own menu template 1 Click Customize in the Setup Menu page to open the Customize Menu dialog box 2 Select a menu template to modify in Customize template 3 Double click the thumbnail of the Layout Scene Frame or Navigation Button to use 4 To choose a new image to use as background click Background 5 Double click the menu title or the text de...

Страница 281: ... the objects are within the TV safe area defined by a border with red dotted lines Other right click menu commands include Reset Restores the original layout of the menu page Keep Aspect Ratio Proportionally retains the aspect ratio of the thumbnail images when resizing Displayed thumbnail and text style After customizing your menu pages you can edit your menu objects by double clicking them in th...

Страница 282: ...ion menu or background video in menus select Preview motion menu to the see their behaviors 2 Click Play to watch your video project and test the menu selection on your computer Use the navigation controls as you would use a standard remote control of a home DVD player 3 Click Volume control to adjust the audio volume of your computer as you preview your video project 4 Click Next to proceed to th...

Страница 283: ...our project and specify their location 3 Select Create disc image file to make an ISO image file of the DVD for later use 4 Select Normalize audio to make sure that irregular audio levels during playback are prevented 5 Click Burning Options to define additional burner and output settings 6 Click Burn to start the burning process 7 After successfully burning your disc a dialog box appears from whi...

Страница 284: ... is only enabled when the video file being created is a DVD Video The files created are in preparation for burning the video file to a DVD This also allows the user to view the finished DVD file on the computer using a DVD Video player software Create disc image file Select this option if you plan to burn the video file several times By selecting this option you don t have to generate the file aga...

Страница 285: ...ptions dialog box determine how your discs are burned Disc burner Specify the settings for your burning device Drive Select the disc burner to use in recording the video file Speed Select the recording speed to use in burning the video file Files to include on disc Choose additional items that you want to include on the disc Copyright information Includes copyright text or information about the au...

Страница 286: ... are using Restart DVD RW background format Select to format the DVD RW before recording Enabling this option will prolong the recording process but will ensure a successful burn This is recommended when you are using the DVD RW disc for the first time By default this option is not selected to ensure maximum compatibility Do not close disc Select this function to create a multi session disc for CD...

Страница 287: ...Intel Pentium III 800 MHz CPU or higher Pentium IV 2 4 GHz recommended Microsoft Windows 98 SE 2000 Me or XP 128MB of RAM 256MB RAM or higher recommended 200MB of available HDD space for program installation 4GB or more of HDD space for video editing Windows compatible display with at least 1024x768 resolution DVD burner supporting DVD RAM and DVD RW discs DVD RAM or DVD RW disc Windows compatible...

Страница 288: ...yback duration is defined from the mark in point to the mark out point Preferences The Preferences dialog box lets you determine most of the program settings To open the Preferences dialog box click Settings and options and select Preferences or press F6 Resume all confirmation dialog boxes Overrides the Do not show again option and makes all confirmation dialog boxes appear Check Ulead Web site e...

Страница 289: ... easy way to add or edit programs by adding video files into your DVD VR disc project Introduction to the workspace 1 Add video files Use it to add videos 2 Preview Window Use this to view your videos 1 Add video files 6 Project settings 2 Preview Window 7 Disc space usage 3 Program list 8 Program video clip list 4 Edit and info 9 Navigation controls 5 Settings and options 2 3 5 6 7 8 9 4 1 ...

Страница 290: ... clips Adding video files You can add video files of different formats such as AVI MPEG WMV and others to your movie To add a video file to your project 1 Click Add video files to select video file s Use Ctrl or Shift to select multiple files 2 Click Open Editing programs DVD DiskRecorder lets you edit your programs in the Program video clip list To combine programs use Ctrl or Shift to select mul...

Страница 291: ...o drag and drop programs to a playlist 4 To add more playlists or programs repeat steps 2 to 4 5 You can use Ctrl or Shift to select multiple programs from Program list and drag them to the Playlist entry point list Use edit buttons to join or separate entry points as needed Setting the name for a program playlist or entry point You can assign names to programs playlists and entry points in order ...

Страница 292: ...n export the slideshow to separate bitmap image files Note You can decide which audio channels to export by adjusting the audio export mode on the General tab of the Preferences dialog box To export video files 1 Select the video clip you want to export from the Program video clip list 2 Right click the video clip Select Export Video 3 Select a file type and the following settings if needed To use...

Страница 293: ...c see Edit Disc on page 294 To burn your disc 1 Choose a video from Select a video to preview and use navigation controls to preview your movie 2 Click Burning Options and specify the following settings Label The disc label name as seen in Windows Explorer Disc name The disc name as seen in set top DVD recorder Disc burner The burning device that contains the disc 3 Click Burn to begin the burning...

Страница 294: ...ish page Formatting a disc A DVD VR disc must be formatted using the UDF Universal Disc Format 2 0 format for rewritable discs To format a disc click and then click OK to start Protecting a disc To ensure that all the existing DVD VR content on a disc cannot be changed or removed you can click to toggle between protected and unprotected modes When a disc is protected only playback is allowed ...

Страница 295: ...ocess marks bad sectors to improve future writing reliability On DVD RW burners that support DRT DM Distributed Real Time Defect Management the certification process also moves the data in the recoverable defected sectors DRT DM Level 1 and Level 2 defects if any to healthy sectors to further improve data reliability To certify a disc click and then click Start ...

Страница 296: ...296 MORE PROGRAMS ...

Страница 297: ...INDEX ...

Страница 298: ...03 animate a video filter 118 Animation Gallery 134 Anti aliasing 134 136 Anti flicker filter 274 Apple QuickTime 155 Apply 86 Applying special effects 258 Archival Package 174 As a New Document 250 audio clip 49 Audio fade in out duration 274 Audio Filter 131 AUDIO MIXING 139 Audio Mixing Panel 139 147 audio quality 244 Audio Save Options 162 Audio transitions 102 Auto 214 Auto no time limit 214 ...

Страница 299: ... a disc 295 Changing audio properties 240 Changing pitch 254 Changing speed 259 Changing the audio level 253 Changing the view of a waveform 241 Chapter Cues 71 Chunk granularity 215 Circle Wipe 103 Clear Automation 140 142 Clearing audio data 249 Clip Angle 129 clip cues 71 clip duration 75 Clip menu 86 Clip Selection tool 60 74 Clip Settings 134 Clipboard 63 Clips 46 codec 152 Color Calibration ...

Страница 300: ...osition 86 Curves 123 customize a transition 98 Cut 63 cut a clip 77 Cut by Cue 75 Cut by Position 75 Cylinder 129 D data rate analysis 164 data rate analysis graph 165 Data track 157 Decay 260 Decibel dB Indicator 141 Decibel Indicator 140 Default 216 default transition 96 Defining audio input when capturing analog video 204 Deinterlace 70 deinterlace 42 Delay 260 Delete Cue 72 Device control 169...

Страница 301: ...orting video or image files 292 External Monitor 98 External playback device 166 External preview 166 extract an audio 47 eye dropper 122 eyedropper 122 F fade to black 99 Feather 122 field options 69 field order 42 Field Order B 70 Field based video 69 File Transfer Protocol 155 File type 42 Filename 53 Fill 250 Fill Left 132 Fill light 121 Fill Right 132 Fill text color 136 Filmstrip 53 filter t...

Страница 302: ...fer Protocol 155 I Image capture deinterlace 208 image clips 49 image matte 114 image sequence 50 163 Import Audio File 36 Import Image File 36 Import Video File 36 Importing and editing a batch list 228 Importing DVD Video 271 Importing masks 180 Improving video signal when capturing analog video 205 Insert 46 250 Insert Title Clip 133 Inserting audio data 250 Inserting clips 46 Instant Play 90 1...

Страница 303: ...nced Streaming format 155 Midtones 121 Mix 250 Mixer program 245 Mixer Volume 140 Mixer Volume Device Control 142 Mixing Dolby Surround 147 Mixing tracks 257 Mobile package 174 mono 237 Motion Control window 125 Move cursor when playing 245 Moving Path 107 moving path 124 Moving Path gallery 124 MPEG files 160 MPEG movies 153 MPEG 2 files 153 multiple key frames 106 Multi Track Ripple 84 Multi Tra...

Страница 304: ...recise scan 242 precise trimming 75 Preferences 40 208 245 273 288 Preview 282 preview files 93 Preview Files Manager 93 Preview Playback Options 98 167 Preview Range 89 Preview Window 106 107 Preview window 88 Preview Window Menu 89 Previewing 89 Previewing on an external device 93 Previewing video from your video source 203 Previewing your work 88 Previous Edit Point 86 Previous Frame 86 Print T...

Страница 305: ...se command 67 Reversing a file 260 Reversing the frames 67 Rewind 140 Ripple Editing 46 82 Ripple Editing examples 83 Run Mixer 48 Running DVD DiskRecorder 287 S Sample Information Window 249 Sample size 239 Sampling rate 239 Saturation 121 123 Save options 159 Saving files 239 Saving files to a video 240 Scan DV Tape 210 Scanning a DV tape 224 Scenes Recording Cuts 81 Scissors tool 77 Scroll Lock...

Страница 306: ...ontrol point 125 Start Time 73 stereo 237 stereo pan 259 Storyboard 37 Straight to Disc 270 286 stretch mode 42 Summary Timeline 54 SURROUND SOUND 145 SVCD 160 SVCD ready MPEG 2 161 Synchronize video with audio 215 System requirements 287 T template 27 Terminologies 288 Text Settings 134 Text settings 136 Text soft edge 136 Text transparency 136 TGA 114 The right click menu 277 Thumbnail 53 thumbn...

Страница 307: ...pture settings 208 Using cues with Video Editor 252 V Variable bit rate 218 VCD 160 VCD player compliant 274 VCD ready MPEG 1 160 Vectorscope 205 video clip 49 Video Editor 18 video matte 114 video mattes 114 video project 23 25 173 Video Save Options 152 Video Track 79 visibility of clips 53 Vocal Reduction 133 Voice File 48 voice over 47 Volume Fader 140 144 volume levels 143 VU Meter 140 W WAV ...

Страница 308: ...308 ULEAD MEDIASTUDIO PRO X X Axis unit 245 Z Zooming 240 Zooming in out 54 ...

Отзывы: