background image


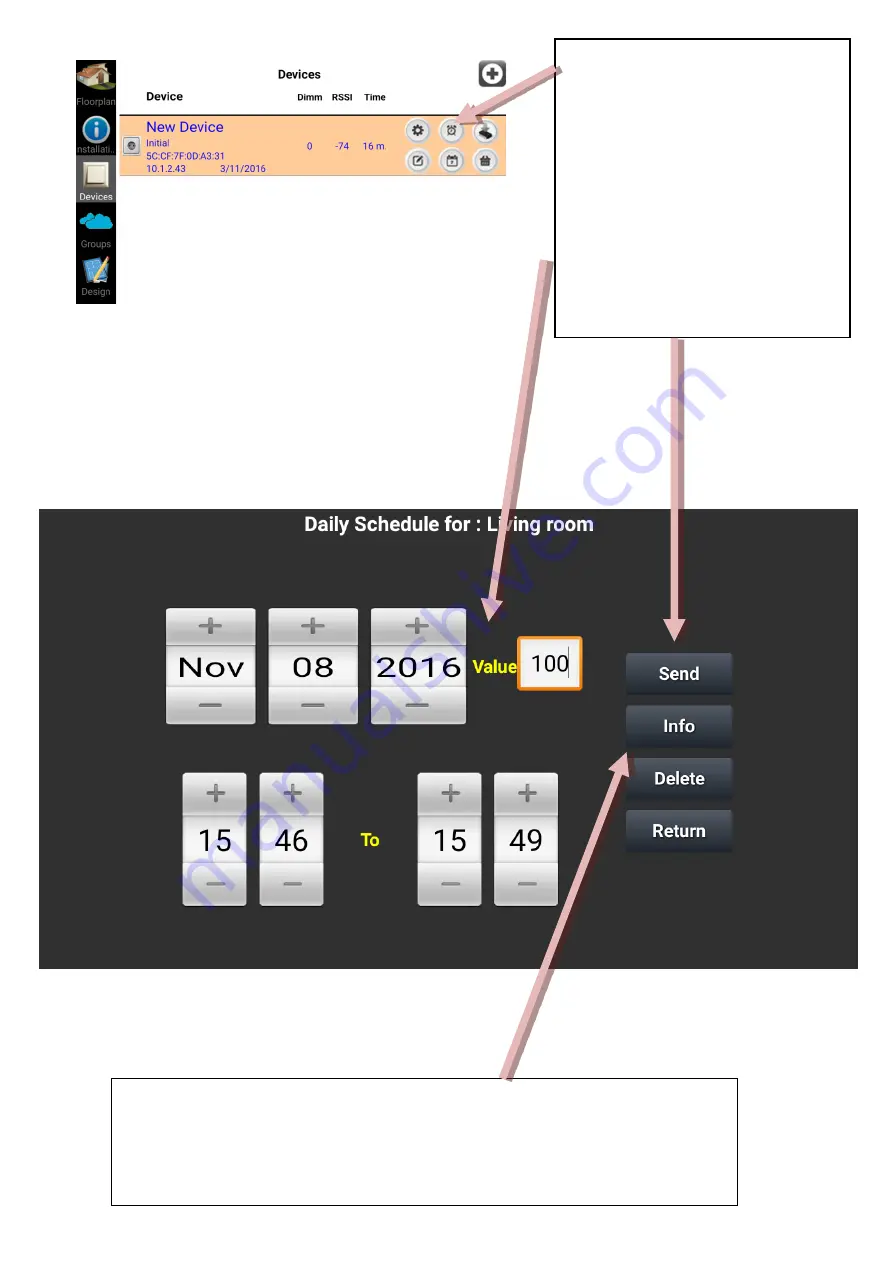
Pressing  this  button  on  each 
device, we get the next screen, 
where  we  can  set  a  daily 
schedule for a certain device.  

So  on  8/11/16  and  at  15:46 
Living  room  device  will  be 
turned  ON  (100%)  and  turned 
off  at  15:49.  We  have  to  press 
Send to activate the Schedule. 

Button “Info” informs us with the stored Daily schedules from device 

memory. 

But

ton “Delete” deletes all the stored Daily Schedules from device.


Содержание HOMIDUS

Страница 1: ...HOME AUTOMATION SYSTEM HOMIDUS TECHNICAL DESCRIPTION...

Страница 2: ...cation comprise the first step in adding Intelligence everywhere HOMIDUS range of products support the control of all kinds of lighting devices floor table or ceiling lamps as well as several types of...

Страница 3: ...the best solution compared to similar products in the market For the installation we have to put the device to the wall socket and the appliance s plug SCHUKO to the front face of the device The appli...

Страница 4: ...purchasing cost RGB Strip RGB Strip designed for driving RGB strip typed lighting combining the automation that HOMIDUS family offers with the option for the user to choose any type or dimension of R...

Страница 5: ...n be controlled and programmed wirelessly while apart from performing actions it also informs the system administrator in real time regarding the overall HOMIDUS system It also incorporates integrated...

Страница 6: ...boiler operation Alarm Alarm is a smart device that gets connected to wired sensors of an existing alarm system With this device we upgrade the functions of the existing alarm system by visualizing th...

Страница 7: ...ed to them The software HOMIDUS is found at Google Play https play google com store apps details id com amdp homidus and at our server http www homidus com We have to download HOMIDUS application and...

Страница 8: ...HOMIDUS application Introductory screen Swipe to left...

Страница 9: ...Swipe to left Swipe to left and press Select Installation...

Страница 10: ...has the appliances we want to control Demo installation has some virtual devices only for demonstration purpose By pressing sign we add a new Installation to the list giving its name From Settings but...

Страница 11: ...Camera or by using the drawing program we have included in this application This is the main screen of the application and the place where all our devices appliances will be displayed and controlled...

Страница 12: ...ation and pressed Settings from Installation Tab we have to provide SSID and Password of our Router Then we press button ADD DEVICES and wait until all un configured devices get configured see flashin...

Страница 13: ...Next we return to our Floorplan The device has been inserted to the selected Installation successfully having HOMIDUS plug icon...

Страница 14: ...We see the name of the newly configured device New Device as well the right toolbar changed If we want to control any device we must select it first by pressing on it Then this device will start blin...

Страница 15: ...ce In this screen we see that New Device belongs to Initial Installation we get its MAC address IP address and version number as date Next to them we get Dimmer value 0 RSSI signal from router 74 dbm...

Страница 16: ...Events Delete Device Pressing button Configure Device Settings we get this screen where we can change Device name the Installation that belongs and some other characteristics of the device Such as if...

Страница 17: ...ices list the device is getting the changes and shows them accordingly At this point we get IP Address of the device Having set all the attributes we prefer for each device by pressing Back all these...

Страница 18: ...Going back to Setup tab and scan for other devices that are powered up these are being added to the floorplan Next we drag them to their physical locations...

Страница 19: ...For every new device we set the information we want as we did before...

Страница 20: ...ating them Pressing on each icon the device icon starts blinking the name of the device is showed up and the right toolbar changes giving us the available operations of the selected device Living room...

Страница 21: ...The device with name Kitchen is a HOMIDUS Mini Light device with ON OFF operation Bedroom is a HOMIDUS RGB Strip device with adjustable color and luminosity...

Страница 22: ...ature and luminosity readings The I O Data Control device can be used in many applications giving us information about measurements we want to take such as inputs from an existing alarm system status...

Страница 23: ...o add a S W HOMIDUS CAM module A dialog is opening where we can set the name of the S W CAM module and the needed info for the camera to connect The Cam Module can read MJPEG stream of certain types o...

Страница 24: ...and if given credentials are correct we get the stream of the camera inside the main window in front of the floorplan Swipe left right up down for PAN function not available at this public camera Hit...

Страница 25: ...ondition will be activated when Motion detection will occur on Living room device The Action Set Dimmer that will be executed will happen in two phases Phase 1 after 5 seconds from the Motion Detectio...

Страница 26: ...red remote control set up heating by temperature changes control window blinds by luminosity read A D from other electronic devices and take actions combining all of them and many more In this example...

Страница 27: ...ory will be erased and will be replaced by the new ones written here If we want so we press OK If we press Cancel the old conditions will remain to device remain active and the new will remain on phon...

Страница 28: ...a certain device So on 8 11 16 and at 15 46 Living room device will be turned ON 100 and turned off at 15 49 We have to press Send to activate the Schedule Button Info informs us with the stored Dail...

Страница 29: ...device So on every Tuesday Thursday and Friday Living room device will be turned ON 100 at 19 00 and turned off at 19 03 We have to press Send to activate the Schedule Button Info informs us with the...

Страница 30: ...eated This action requires Internet connection at local network set a Plug device as MASTER and configured it correctly IP Gateway in order any other device can download new firmware The procedure wil...

Страница 31: ...n through the initial procedure of configuring Devices At any time we want to delete reset a device and loose configuration such as router SSID and password MASTER IP gateway and other settings like s...

Страница 32: ...pressing sign a Popup window appears asking for the creation and description of a new Group Groups are more than one devices together that we can handle as one entity So we can gather all the exterior...

Страница 33: ...uttons to control group appliances we have to indicate which devices belong to this Group We do that by pressing the button indicated by the arrow In the next screen we check the devices that we want...

Страница 34: ...Delete button asks permission to delete the selected group...

Страница 35: ...floorplan image of your house building or create it with the aid of any drawing application Then save it at homidus folder of your mobile as a JPG file 2 If you an existing floorplan design in a hard...

Страница 36: ...hin Line Medium Line Thick Line Fill Transparency Fill Solid Grey Colors First we select line or rectangle then thickness of Line Fill type if necessary and finally we move the circular pointers to th...

Страница 37: ...rt in about one minute After that pressing save button and giving the name of the drawing it gets stored to mobile s storage area Then from Installation settings and having select the Installation we...

Страница 38: ...as to be configured correctly and our mobile phone must have access to Internet Then selecting the Installation we prefer HOMIDUS finds WAN IP of our house and after a while it shows the connected dev...

Страница 39: ...Introductory Screen Introductory Screen is shown up at the first execution of the program If we want to see it again we have to press button i at next screen...

Страница 40: ...om Installation list or by swiping main window from right to left and opposite as shown by the arrows The old Installation leaves the window and the next one from Installation list is coming Finally t...

Страница 41: ...es the choice of controlling appliances by voice detection To use this feature it s necessary to have Internet connection on mobile Then you have to check Voice Detection checkbox Afterwards you can p...

Страница 42: ...ate from ON to OFF or the opposite We can use expressions too For example if the device is called Kitchen we can say Turn ON Kitchen turn the lights OFF at Kitchen etc Words you can use are TURN ON TU...

Страница 43: ...OMIDUS application Next get MASTER s MAC address and from tab CHANNELS in Pushetta add a new channel giving as Channel Name the MASTER s MAC address Fill all the required info as you like and make Kin...

Страница 44: ...lights to them as soon as the user turns the wall switch on From that point we can remote control the appliance after a few seconds while connecting to WiFi with HOMIDUS application It is obvious that...

Страница 45: ...ation When a device has been configured and connected to router then it starts flashing once every second If the device is turned ON then the time that stays ON is more than the time that is in OFF st...

Страница 46: ...ll together while you are moving towards to them After device Configuration After setting device configuration LED starts to blink every second to the configured devices This is indication of properly...

Страница 47: ...D 10 SD 20 SD 30 SD 40 SD 50 Encryption Led Reset PIR Infrared Relay Dimmable Soft Start Conditions on Events AC Fail Detect Bypass Repeater Daily Schedule Weekly Schedule Firmware OTA Power supply 23...

Страница 48: ...light fixture ATTENTION Remember to switch off the mains power before installation For the installation we have to put HOMIDUS Light device besides the base of the light fixture After disconnecting Li...

Страница 49: ...emember to switch off the mains power before installation For the installation we have to put HOMIDUS Mini Light device besides the base of the light fixture After disconnecting Live and Neutral junct...

Страница 50: ...HOMIDUS Data Control has 4 general purpose I O controls 2 A D channels 4 NO relay temperature and luminosity control HOMIDUS Data Control works with any 7 28V DC Power supply...

Страница 51: ...HOMIDUS RGB Strip has 3 controls for each color RGB and 12V output HOMIDUS RGB Strip works with any 7 28V DC Power supply depending the RGB strip we ll use...

Страница 52: ...s and hardware which satisfies a wide range of requirements in the above fields as well as custom made solutions i e solutions that are developed during the process of research and development R D to...

Страница 53: ...The WEB sites http www homidus com https play google com store apps details id com amdp homidus www ubilus com Contact Email info ubilus com...

Страница 54: ...s SSID is displayed and you have to provide its password Then press button ADD DEVICES and wait until all un configured devices get configured see flashing rate of found devices that start blinking a...

Отзывы: