23
7200790 Service Manual for the HELION
®
XENION
®
Surgical Lighting System GB
7 Replacing the Filter Glass Assembly
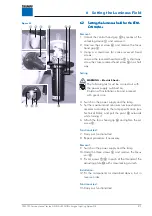
Figure 01
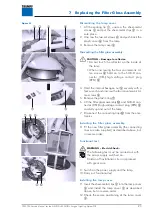
Dismantling the lamp cover:
1. Lift the sealing lip
1
, unscrew the sheet-metal
screws
2
and put the sheet-metal clips
5
in a
safe place.
2. Unscrew the two set screws
4
and push back the
plastic cover
6
from the lamp.
3. Remove the lamp cover
3
.
Dismantling the filter glass assembly:
CAUTION – Damage to reflector:
• Do not touch the reflector on the inside of
the lamp,
• When unscrewing the four countersunk Al-
len screws
8
hold on to the SUB-D con-
nector (HEL)/high-voltage contact plug
(XEN)
B
.
4. Hold the internal hexagon nut
9
securely with a
fork wrench and unscrew the four countersunk Al-
len screws
8
.
5. Remove the plastic ring
7
.
6. Lift the filter glass assembly
A
and SUB-D con-
nector (HEL)/high-voltage contact plug (XEN)
B
carefully up and out of the lamp.
7. Disconnect the connecting lines
C
from the elec-
tronics.
Installing the filter glass assembly:
8. Fit the new filter glass assembly (the connecting
lines are also supplied) as described above, but
in reverse order.
Functional test:
WARNING – Electric Shock:
The following test must be carried out with
the power supply switched on.
Cordon off installation site and proceed
with great care.
9. Switch on the power supply and the lamp.
10.Carry out functional test.
Installing the lamp cover:
11.Insert the sheet-metal clips
5
into the lamp cover
3
and install the lamp cover
3
as described
above, but in reverse order.
12.Check the secure positioning of the lamp cover
3
.


