20
7200790 Service Manual for the HELION
®
XENION
®
Surgical Lighting System GB
6 Setting the Luminous Field
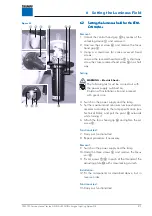
Figure 01
6.1
6.1
6.1
6.1
6.1
Setting the luminous field for the HELI-
Setting the luminous field for the HELI-
Setting the luminous field for the HELI-
Setting the luminous field for the HELI-
Setting the luminous field for the HELI-
ON M/M+ / L/L+
ON M/M+ / L/L+
ON M/M+ / L/L+
ON M/M+ / L/L+
ON M/M+ / L/L+
Setting is described using the HELION L as an ex-
ample.
Removal:
1. Unlock the central hand grip
2
by means of the
unlocking device
1
and remove it.
2. Undo the three screws
3
and remove the focus
unit
9
.
3. Using an Allen key size 25
6
:
- unscrew the long cheese head screw
5
a short
way,
- screw the short cheese head screw
7
in a short
way.
Installation:
4. Fit the components as described above, but in the
reverse order.
WARNING – Electric Shock:
The following adjustments must be made
with the power supply switched on.
Cordon off installation site and proceed
with great care.
5. Switch on the power supply and the lamp.
6. Mark the maximum and minimum luminous field
diameters on the hand grip according to the lamp
specification
8
.
Removal:
7. Switch on the power supply and the lamp.
8. Undo the three screws
3
and remove the focus
unit
9
.
9. With an Allen key size 2.5
6
adjust the long chee-
se head screw
5
and the short cheese head screw
7
according to the markings.
Installation:
10.Fit the components as described above, but in
reverse order.
Functional test:
11. Carry out functional test.
12. Repeat procedure if necessary.
13. Fix the long cheese head screw
5
and the short
cheese head screw
7
with screw-locking varnish.


