5-1
Chapt
er
5
M
a
in
tenanc
e
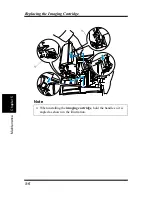
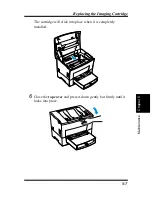
Replacing the Imaging Cartridge
Replacing the Imaging Cartridge
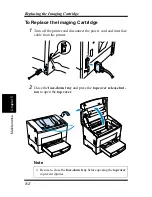
The imaging cartridge contains the print drum and enough toner to
produce about 9,000 A4/Letter-size prints. The imaging cartridge that
comes with the printer is capable of producing approximately 5,000
A4/Letter-size prints. This is calculated based on an average image
density equivalent to a black-to-white ratio of 5% or less. The actual
number of pages obtained from a imaging cartridge depends on the
image density of the pages you print.
When the Ready and Error indicators are lit and the Paper indicator
is off on the control panel, a low level of toner in the imaging car-
tridge is indicated. This situation will be confirmed by the
Toner Near
Empty
message that will appear in the Status Display. Print quality will
gradually decline so a replacement for the imaging cartridge should
be prepared for installation at this time.
To use as much of the remaining toner as possible, remove the imaging
cartridge, shake it 2 or 3 times and reinstall it in the printer. If print
quality is not satisfactory, you should replace the imaging cartridge
with a new one according to the following procedure.
When the Ready and Error indicators are lit and the Paper indicator
is blinking on the control panel, the imaging cartridge is now empty.
The imaging cartridge must be replaced.
Note
◆
The
Toner Near Empty
message appears in the Status Display as a
reminder that the imaging cartridge will run out of toner soon. Since
print quality will decline after the
Toner Empty
message appears,
replacement with a new imaging cartridge is recommended when the
Toner Near Empty
message is displayed.
Содержание LP 218
Страница 1: ...INSTRUCTION HANDBOOK LP 218 Laser Printer 300 Series ...
Страница 9: ...viii Foreword ...
Страница 15: ...xiii Contents ...
Страница 16: ...MEMO ...
Страница 17: ...xv Contents ...
Страница 18: ...Chapter 1 Introduction 1 1Chapter Introduction ...
Страница 19: ...Chapter 1 Introduction ...
Страница 26: ...Chapter 2 Setting Up 2 2Chapter Setting Up ...
Страница 27: ...Chapter 2 Setting Up ...
Страница 44: ...2 17 Chapter 2 Setting Up Setting Up Sample Configuration Page ...
Страница 62: ...Chapter 3 Using the Printer 3 3Chapter Using the Printer ...
Страница 63: ...Chapter 3 Using the Printer ...
Страница 82: ...Chapter 4 PCL Printer Driver 4 4Chapter PCL Printer Driver ...
Страница 83: ...Chapter 4 PCL Printer Driver ...
Страница 165: ...4 82 Uninstalling the USB Device Driver Chapter 4 PCL Printer Driver ...
Страница 166: ...Chapter 5 Maintenance 5 5Chapter Maintenance ...
Страница 167: ...Chapter 5 Maintenance ...
Страница 180: ...Chapter 6 Troubleshooting 6 6Chapter Troubleshooting ...
Страница 181: ...Chapter 6 Troubleshooting ...
Страница 219: ...6 38 Indicator Lights Printer Messages Chapter 6 Troubleshooting ...
Страница 220: ...Chapter 7 Specifications 7 7Chapter Specifications ...
Страница 221: ...Chapter 7 Specifications ...
Страница 230: ...Appendix Glossary A Glossary Appendix A ...
Страница 231: ...Glossary Appendix A ...

