88
TRAK Machine Tools
Southwestern Industries, Inc.
ProtoTRAK SMX, K2, K3 & K4 & Retrofit Safety, Installation, Maintenance, Service and Parts List Manual
5.1.9 Ball Screw Replacement, X-Axis (Table)
CAUTION!
Never screw a ball screw partially or totally out of its nut. They cannot be
reassembled.
1.
Y-axis motor mounting bracket and hardware must be removed to remove X yoke.
2.
Position the table in the center of travel.
3.
Remove the left side table tray by pulling it up, and remove the X motor (If machine has tray).
4.
Remove the motor mounting bracket and bearing housing.
5.
Remove the right side bearing housing.
6.
Loosen the table gibs. Slide the table to the right and on to a lift that will support the table's weight. Slide
the table until the yoke is exposed.
CAUTION!
The weight of the table must be supported by the lift to prevent damage or
breakage to the dovetails.
7.
Remove the 5/16 x 1" screws holding the ball nut to the yoke and loosen the 4 screws that mount the yoke
to the saddle. Remove the oil line.
8.
Tilt the yoke (it is pinned) to remove the ball screw.
9.
Remove the elbow and setscrew from the old ball screw flange and fit them similarly in the new ball screw.
10.
Pump oil to be certain it flows through the oil line and then attach the oil line to the elbow.
11.
Reassemble all assemblies.
Important
: The clamp nut must be reassembled as follows:
Install rear bearing and seal into bearing housing and slide housing onto the ball
screw.
(Note: Letters on bearings must face each other in the housing.).
Thread the split nut onto the ball screw and tighten the #10-32 clamp screw until
you feel the split nut contact the ball screw threads. It should drag as you tighten
the clamp nut.
Torque the split nut to 50 ft. lb.
Firmly tighten the #10-32 clamp screw to lock the clamp nut in place.
See the diagnostics section under Mechanical Drive Train for an explanation of how to align the ball screw.
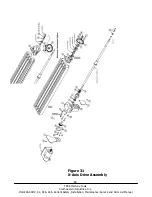
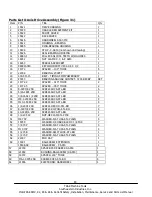
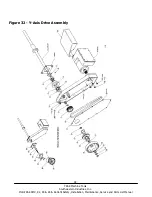
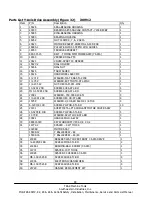
See Figure 31 for an illustration of the X-axis drive train.


