


Toyota Orderpicker Model
15 Service Manual
Section 7 . Component Procedures
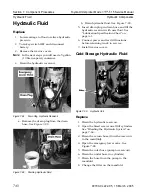
Hydraulic Components
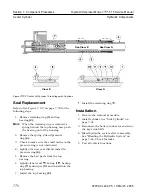
Center Cylinder
Center Cylinder
Removal
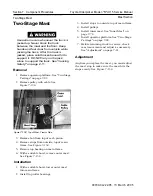
Use extreme care whenever the truck
is
jacked up. Never block the truck
between the mast and the floor. Keep
hands and feet clear from vehicle while
jacking the truck. After the truck
is
jacked, place solid blocks beneath it to
support it. DO NOT rely on the jack
alone to support the truck. See "Jacking
Safety" on page
2- 1 1.
1. Remove carriage. See "Three-Stage
Carriage" on page 7-74.
4. Install carriage. See "Three-Stage
Carriage" on page 7-74.
5. Install end cap on center cylinder.
6. Connect power and test lift function before
returning truck to service.
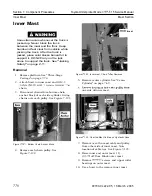
Service of Cylinder with
Cushions
Cushion Replacement
Refer to Figure 7-107 on page 7-70 for the
following steps.
1. Remove retaining ring (1 and top
bearing (2).
N
OTE
:
When the retaining ring is removed, a
spring behind the top bearing may push
the bearing out of the housing.
Remove the spring
(3) and pressure
ring (4).
Remove the three
screws (5) located
about 6 in. from the top of the housing.
Remove piston
(6) from cylinder housing.
Remove the cushion assembly (7).
Coat the threads of the new cushion
assembly with thread-locking compound
primer (Loctite
and apply
thread-locking compound (Loctite
#
277).
Assemble the new cushion assembly (7) to
piston rod.
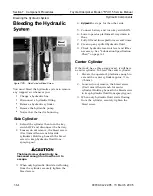
Figure
7- 106. Center Cylinder,
Bottom
View
8. Re-install piston assembly in cylinder
housing.
2. Remove snap ring and washer from
bottom of center cylinder. See
9.
Re-install the three torx screws (5).
Figure 7- 106.
10. Lightly oil a new seal
(8) and install in
3. Remove and cap hydraulic hoses.
4. Remove U-shaped bracket.
5. Remove center cylinder.
Install
pressure ring (4). Check to make sure the
small orifice in the pressure ring is not
obstructed.
1 1. Install spring
(3).
12. Remove the bad parts from the top
bearing.
1. Install center cylinder. Make sure the
13. Lightly oil new seal
O-ring (1
backup
bushing is on the mounting bolt.
ring (1 1) and wiper (1 2) and install into the
2.
Install washer and snap ring to bolt under
top bearing.
center cylinder. See Figure 7- 106.
14. Install the top bearing (2).
3. Install U-shaped bracket.
15. Install the retaining ring (1).
00700-CL222-05, 1 5 March 2005
Содержание 7BPUE15
Страница 1: ...Serial Numbers Service Manual 80 001 and up 7BPUE15...
Страница 2: ......
Страница 5: ......
Страница 22: ...Toyota Orderpicker Model 7BPUE15 Service Manual Section 2 Safety Section 2 Safety 00700 CL222 05 15 March 2005...
Страница 58: ......
Страница 128: ...Toyota Orderpicker Model 7BPUE15 Service Manual Section 6 Codes and Tests Code 4 1 00700 CL222 05 15 March 2005...
Страница 144: ......
Страница 168: ...Toyota Orderpicker Model 7BPUE15 Service Manual Section 7 Component Procedures 00700 CL222 05 15 March 2005 7 24a...
Страница 169: ...Section 7 Component Procedures Toyota Orderpicker Model 7BPUE15 Service Manual 7 24b 00700 CL222 05 15 March 2005...
Страница 170: ...Toyota Orderpicker Model 7BPUE15 Service Manual Section 7 Component Procedures 00700 CL222 05 15 March 2005 7 24c...
Страница 171: ...Section 7 Component Procedures Toyota Orderpicker Model 7BPUE15 Service Manual 7 24d 00700 CL222 05 15 March 2005...
Страница 172: ...Toyota Orderpicker Model 7BPUE15 Service Manual Section 7 Component Procedures 00700 CL222 05 15 March 2005 7 24e...
Страница 173: ...Section 7 Component Procedures Toyota Orderpicker Model 7BPUE15 Service Manual 7 24f 00700 CL222 05 15 March 2005...
Страница 174: ...Toyota Orderpicker Model 7BPUE15 Service Manual Section 7 Component Procedures 00700 CL222 05 15 March 2005 7 24g...
Страница 175: ...Section 7 Component Procedures Toyota Orderpicker Model 7BPUE15 Service Manual 7 24h 00700 CL222 05 15 March 2005...
Страница 176: ...Toyota Orderpicker Model 7BPUE15 Service Manual Section 7 Component Procedures 00700 CL222 05 15 March 2005 7 24i...
Страница 177: ...Section 7 Component Procedures Toyota Orderpicker Model 7BPUE15 Service Manual 7 24j 00700 CL222 05 15 March 2005...
Страница 178: ...Toyota Orderpicker Model 7BPUE15 Service Manual Section 7 Component Procedures 00700 CL222 05 15 March 2005 7 24k...
Страница 179: ...Section 7 Component Procedures Toyota Orderpicker Model 7BPUE15 Service Manual 7 24l 00700 CL222 05 15 March 2005...
Страница 180: ...Toyota Orderpicker Model 7BPUE15 Service Manual Section 7 Component Procedures 00700 CL222 05 15 March 2005 7 24m...
Страница 181: ...Section 7 Component Procedures Toyota Orderpicker Model 7BPUE15 Service Manual 7 24n 00700 CL222 05 15 March 2005...
Страница 182: ...Toyota Orderpicker Model 7BPUE15 Service Manual Section 7 Component Procedures 00700 CL222 05 15 March 2005 7 24o...
Страница 183: ...Section 7 Component Procedures Toyota Orderpicker Model 7BPUE15 Service Manual 7 24p 00700 CL222 05 15 March 2005...
Страница 184: ...Toyota Orderpicker Model 7BPUE15 Service Manual Section 7 Component Procedures 00700 CL222 05 15 March 2005 7 24q...
Страница 185: ...Section 7 Component Procedures Toyota Orderpicker Model 7BPUE15 Service Manual 7 24r 00700 CL222 05 15 March 2005...
Страница 186: ...Toyota Orderpicker Model 7BPUE15 Service Manual Section 7 Component Procedures 00700 CL222 05 15 March 2005 7 24s...
Страница 299: ......
Страница 301: ......
Страница 346: ......
Страница 358: ......
Страница 374: ...Toyota Orderpicker Model 7BPUE15 Service Manual Section A Appendix Section A Appendix 00700 CL222 05 15 March 2005...
Страница 386: ...Figure A 6 Cont Elec Schematic Sheet I Part 2 of 2 00700 CL222 05 15 March 2005...
Страница 389: ......
Страница 391: ...Hydraulic Schematic RES Figure A 9 Hydraulic Schematic 00700 CL222 05 15 March 2005...
Страница 399: ...Index Toyota Orderpicker Model 7BPUE15 Service Manual This page intentionallyleft blank 00700 CL222 05 15 March 2005...
Страница 400: ......
Страница 401: ...Printed in the USA...


