This product complies with all relevant European
directives; for details, please see the separate product
specific Declaration of Conformity (DOC) sheet.
Important:
If you are using this machine above
1500 m (5,000 ft) for a continuous period, ensure
that the High Altitude Kit has been installed
so that the engine meets CARB/EPA emission
regulations. The High Altitude Kit increases
engine performance while preventing spark-plug
fouling, hard starting, and increased emissions.
Once you have installed the kit, attach the
high-altitude label next to the serial decal on the
machine. Contact any Authorized Toro Service
Dealer to obtain the proper High Altitude Kit and
high-altitude label for your machine. To locate
a dealer convenient to you, access our website
at www.Toro.com or contact our Toro Customer
Care Department at the number(s) listed in your
Emission Control Warranty Statement. Remove
the kit from the engine and restore the engine to
its original factory configuration when running the
engine under 1500 m (5,000 ft). Do not operate an
engine that has been converted for high-altitude
use at lower altitudes; otherwise, you could
overheat and damage the engine.
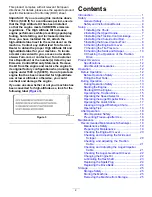
If you are unsure whether or not your machine has
been converted for high-altitude use, look for the
following label (
).
decal127-9363
Figure 3
Contents
Setup ........................................................................ 6
Drive ............................................................. 10
Product Overview ....................................................11
Operation ................................................................ 12
Before Operation ................................................. 12
During Operation ................................................. 13
............................... 17
After Operation .................................................... 18
Maintenance ........................................................... 19
Recommended Maintenance Schedule(s) ........... 19
Scraper ......................................................... 20
Checking and Adjusting the Traction
Cable ............................................................ 21
Checking and Adjusting the Auger/Impeller
Cable ............................................................ 21
Storage ................................................................... 25
2
Содержание 38812
Страница 2: ......
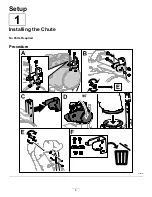
Страница 8: ...Setup 1 Installing the Chute No Parts Required Procedure g385316 6 ...
Страница 10: ...4 Installing the Chute Control Rod No Parts Required Procedure g257848 8 ...
Страница 36: ...Einrichtung 1 Einbauen des Auswurfkanals Keine Teile werden benötigt Verfahren g385316 6 ...
Страница 38: ...4 Einbauen der Schaltstange für den Auswurfkanal Keine Teile werden benötigt Verfahren g257848 8 ...
Страница 62: ......
Страница 68: ...Mise en service 1 Montage de la goulotte Aucune pièce requise Procédure g385316 6 ...
Страница 70: ...4 Montage de la tige d orientation de la goulotte Aucune pièce requise Procédure g257848 8 ...
Страница 98: ...Montage 1 Monteren van het uitwerpkanaal Geen onderdelen vereist Procedure g385316 6 ...
Страница 100: ...4 De bedieningsstang van het uitwerpkanaal monteren Geen onderdelen vereist Procedure g257848 8 ...
Страница 124: ......


