


g001011
Figure 10
The machine should move rearward. If the
machine does not move or moves forward,
complete the following:
A.
Release the traction lever and shut off the
engine.
B.
Disconnect the trunnion from the
speed-selector lever.
C.
Turn the trunnion downward (clockwise) on
the speed-control rod.
D.
Connect the trunnion to the speed-selector
lever.
4.
Release the traction lever.
5.
Move the speed selector to Position 1; refer to
Operating the Speed Selector (page 16)
.
6.
Squeeze the left (traction) lever to the handgrip
(
).
The machine should move forward. If the
machine does not move or moves rearward,
complete the following:
A.
Release the traction lever and shut off the
engine.
B.
Disconnect the trunnion from the
speed-selector lever.
C.
Turn the trunnion upward (counterclockwise)
on the speed-control rod.
D.
Connect the trunnion to the speed-selector
lever.
7.
If you made any adjustments, repeat this
procedure until no adjustments are required.
Important:
If the machine moves when the
traction lever is in the released position, check the
traction cable; refer to
the Traction Cable (page 21)
or take the machine
to an Authorized Service Dealer for service.
Product Overview
g264798
Figure 11
1.
Handgrip (2)
9.
Discharge chute
2.
Auger/impeller lever
10.
Scraper
3.
Speed-selector lever
11.
Auger
4.
Quick Stick®
discharge-chute control
12.
Skid (2)
5.
Traction lever
13.
Electric-start button
6.
Fuel-tank cap
14.
Electric-start plug-in
7.
Oil-fill tube/dipstick
15.
Snow-cleanout tool
8.
Chute deflector
11
Содержание 38812
Страница 2: ......
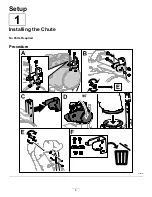
Страница 8: ...Setup 1 Installing the Chute No Parts Required Procedure g385316 6 ...
Страница 10: ...4 Installing the Chute Control Rod No Parts Required Procedure g257848 8 ...
Страница 36: ...Einrichtung 1 Einbauen des Auswurfkanals Keine Teile werden benötigt Verfahren g385316 6 ...
Страница 38: ...4 Einbauen der Schaltstange für den Auswurfkanal Keine Teile werden benötigt Verfahren g257848 8 ...
Страница 62: ......
Страница 68: ...Mise en service 1 Montage de la goulotte Aucune pièce requise Procédure g385316 6 ...
Страница 70: ...4 Montage de la tige d orientation de la goulotte Aucune pièce requise Procédure g257848 8 ...
Страница 98: ...Montage 1 Monteren van het uitwerpkanaal Geen onderdelen vereist Procedure g385316 6 ...
Страница 100: ...4 De bedieningsstang van het uitwerpkanaal monteren Geen onderdelen vereist Procedure g257848 8 ...
Страница 124: ......