3.
Loosen or tighten the turnbuckle to adjust the
spring length to 7 cm (2-3/4 inches) as shown
in
g031000
Figure 29
1.
Jam nut
3.
Spring
2.
Turnbuckle
4.
7 cm (2-3/4 inches)
4.
Tighten the jam nut (
), ensuring that
there is slight tension on the cable.
5.
If the auger/impeller cable is properly adjusted
but a problem remains, contact an Authorized
Service Dealer.
Checking the
Auger-Gearbox-Oil Level
Service Interval:
Yearly—Check the auger-gearbox
oil and add oil if necessary.
1.
Move the machine to a level surface.
2.
Clean the area around the pipe plug (
).
g016782
Figure 30
1.
Pipe plug
3.
Remove the pipe plug from the gearbox.
4.
Check the oil level in the gearbox. The oil should
be 9.5 mm (3/8 inch) below the filler opening.
5.
If the oil level is low, add GL-5 or GL-6, SAE
80-90 EP gear oil lubricant to the gearbox until
the oil level is 9.5 mm (3/8 inch) below the filler
opening.
Note:
Do not use synthetic oil.
6.
Install the pipe plug in the gearbox.
Changing the Engine Oil
Service Interval:
After the first 5 hours—Change the
engine oil.
Yearly—Change the engine oil.
If possible, run the engine for a few minutes before
changing the oil because warm oil flows better and
carries more contaminants.
Engine oil capacity
0.60 L (20 fl oz)*
Oil viscosity
Refer to
.
API service classification
SJ or higher
*There is residual oil in the crankcase after you drain
the oil. Do not pour the entire capacity of oil into the
crankcase. Fill the crankcase with oil as directed in
the following steps.
Use
below to select the best oil viscosity for
the outdoor temperature range expected:
1.
Move the machine to a level surface.
2.
Clean the area around the oil-drain cap (
g016496
Figure 31
1.
Oil-drain cap
3.
Slide an oil-drain pan under the drain extension
and remove the oil-drain cap.
4.
Drain the oil.
22
Содержание 38812
Страница 2: ......
Страница 8: ...Setup 1 Installing the Chute No Parts Required Procedure g385316 6 ...
Страница 10: ...4 Installing the Chute Control Rod No Parts Required Procedure g257848 8 ...
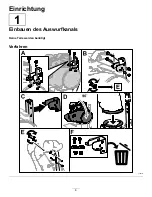
Страница 36: ...Einrichtung 1 Einbauen des Auswurfkanals Keine Teile werden benötigt Verfahren g385316 6 ...
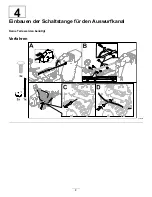
Страница 38: ...4 Einbauen der Schaltstange für den Auswurfkanal Keine Teile werden benötigt Verfahren g257848 8 ...
Страница 62: ......
Страница 68: ...Mise en service 1 Montage de la goulotte Aucune pièce requise Procédure g385316 6 ...
Страница 70: ...4 Montage de la tige d orientation de la goulotte Aucune pièce requise Procédure g257848 8 ...
Страница 98: ...Montage 1 Monteren van het uitwerpkanaal Geen onderdelen vereist Procedure g385316 6 ...
Страница 100: ...4 De bedieningsstang van het uitwerpkanaal monteren Geen onderdelen vereist Procedure g257848 8 ...
Страница 124: ......


