Note:
Dispose of the used oil properly at a local
recycling center.
5.
Install the oil-drain cap and tighten it securely.
6.
Clean around the oil fill/dipstick.
7.
Unscrew the dipstick and remove it.
8.
Carefully pour about 3/4 of the engine capacity
of oil into the oil-fill tube.
Use
to select the best oil viscosity for
the outdoor temperature range expected:
g011606
Figure 32
9.
Wait 3 minutes for the oil to settle in the engine.
10.
Wipe the dipstick clean with a clean cloth.
11.
Insert the dipstick into the oil-fill tube, screw it in,
then remove the dipstick.
12.
Read the oil level on the dipstick.
•
If the oil level on the dipstick is too low,
carefully pour a small amount of oil into
the oil-fill tube, wait 3 minutes, and repeat
steps
through
until the oil level on the
dipstick is correct.
•
If the oil level on the dipstick is too high,
drain the excess oil until the oil level on the
dipstick is correct.
Important:
If the oil level in the engine is too
low or too high and you run the engine, you
may damage the engine.
13.
Install the dipstick into the oil-fill tube securely.
Lubricating the Hex Shaft
Service Interval:
Yearly—Lubricate the hex shaft.
Lightly lubricate the hex shaft yearly with automotive
engine oil (
).
g019018
Figure 33
1.
Hex shaft
3.
Rubber wheel
2.
Steel friction pulley
Important:
Do not get oil on the rubber wheel or
the steel friction pulley because the traction drive
will slip (
1.
Drain the fuel from the fuel tank.
2.
Tip the machine forward onto its auger housing
and block it so that it cannot fall.
3.
Remove the back cover (
g019019
Figure 34
1.
Screws
4.
Move the speed-selector lever to Position R2.
5.
Dip your finger in automotive engine oil and
lightly
lubricate the hex shaft.
6.
Move the speed-selector lever to Position 6.
7.
Lubricate the other end of the hex shaft.
8.
Move the speed-selector lever forward and
rearward a few times.
9.
Install the back cover and return the machine to
the operating position.
23
Содержание 38812
Страница 2: ......
Страница 8: ...Setup 1 Installing the Chute No Parts Required Procedure g385316 6 ...
Страница 10: ...4 Installing the Chute Control Rod No Parts Required Procedure g257848 8 ...
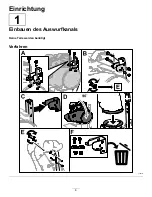
Страница 36: ...Einrichtung 1 Einbauen des Auswurfkanals Keine Teile werden benötigt Verfahren g385316 6 ...
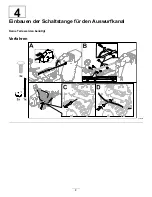
Страница 38: ...4 Einbauen der Schaltstange für den Auswurfkanal Keine Teile werden benötigt Verfahren g257848 8 ...
Страница 62: ......
Страница 68: ...Mise en service 1 Montage de la goulotte Aucune pièce requise Procédure g385316 6 ...
Страница 70: ...4 Montage de la tige d orientation de la goulotte Aucune pièce requise Procédure g257848 8 ...
Страница 98: ...Montage 1 Monteren van het uitwerpkanaal Geen onderdelen vereist Procedure g385316 6 ...
Страница 100: ...4 De bedieningsstang van het uitwerpkanaal monteren Geen onderdelen vereist Procedure g257848 8 ...
Страница 124: ......

