


72
BALANCE Function
This function allows the user to temporarily* set the
FRONT
/
REAR
and
LEFT
/
RIGHT
balances as well as the
CEN
ter and
SUB
woofer speaker levels, the shelf
EQ
, and a relative adjustment of the analog input level
(
ANLVL
), in order to compensate for distinct program material characteristics.
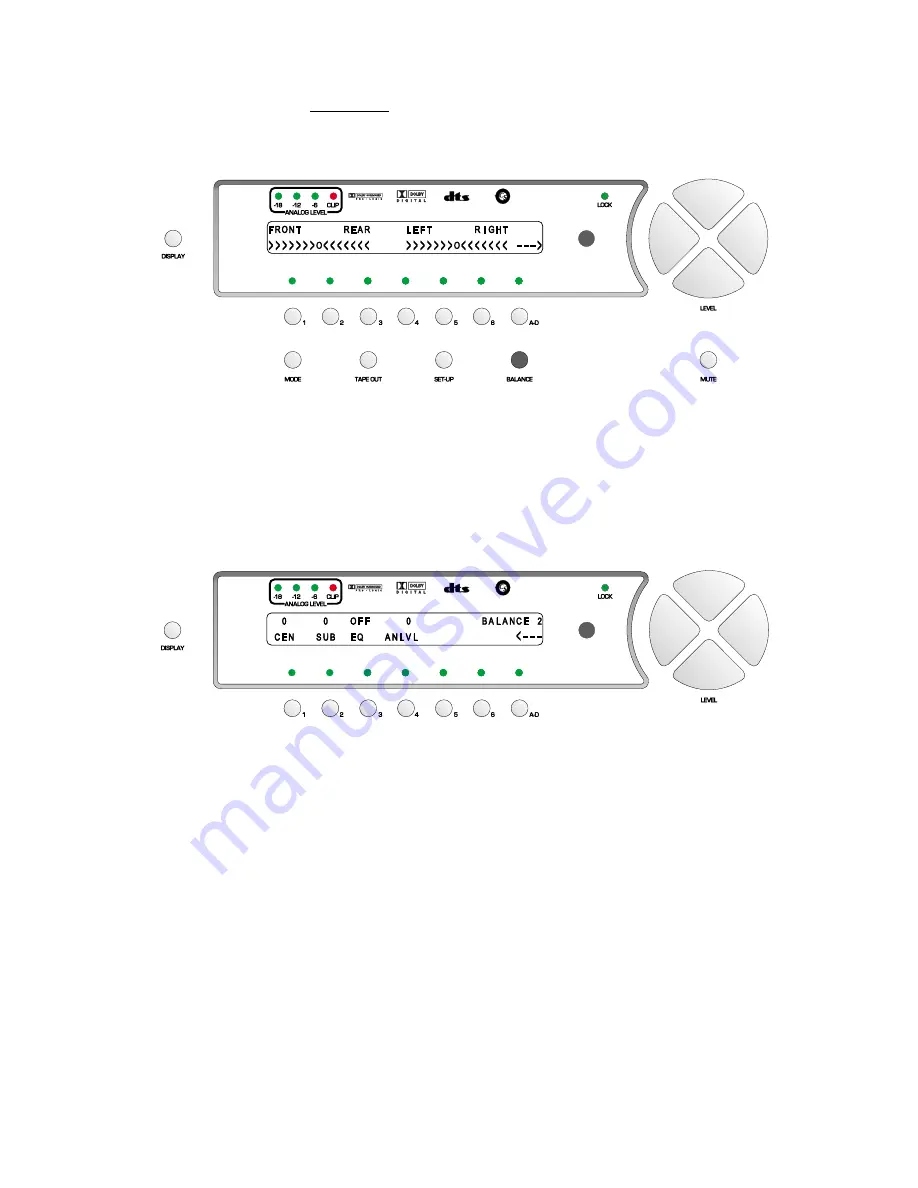
The first page of the balance menu is shown in figure 60 and the second in figure 61.
Figure 60 - Front Panel Display of the BALANCE Page 1 Menu
Front/Rear and Left/Right Balance
The
BALANCE
adjustments are made with reference to the relative speaker trim levels that are stored in the
SETUP
/
INP
/
LVLS
sub menu.
LEVEL
LEFT
/
RIGHT
adjusts the Left/Right balance and
LEVEL
UP
/
DOWN
adjusts
the Front/Rear balance.
*The parameter values in the two
BALANCE
pages are, by default, temporary. This is to say that under certain
conditions such as pressing a different
INPUT SELECT
button, the changes made will revert to
0
. This feature
has an override, (
CLRBAL
), which is accessed via the
SETUP/GLOBAL
sub menu, button #
4
.
Figure 61 - Front Panel Display of the BALANCE Page 2 Menu
Pressing the
A-D
button once will reveal the second
BALANCE
page, consisting of temporary level settings for the
center (
CEN
) speaker, sub woofer (
SUB
),
EQ
and analog input level (
ANLVL
) for the currently selected input.
Center and Sub Balance
Press button #
1
to adjust the
CEN
ter level and button #
2
to adjust the
SUB
woofer level.
Shelf EQ
Pressing button #
3
will allow the user to adjust the
EQ
setting between
OFF
,
1
,
2
,
3
and
4
. This is a low pass
shelf EQ that, at 2KHz, drops by 1.5dB when the parameter value is set at
1
, 3dB when set at
2
, 6dB when set at
3
, and 9dB when set at
4
. Being a shelf EQ, the rolloff amplitude never drops significantly below the specified dB
value. The
EQ
is active in all modes and is designed to roll off excess brightness in different program material.
Analog Input Level Override
Button #
4
lets the user adjust the analog input level of the currently selected input, relative to the stored value in
the
SETUP
/
GLOBAL
/
ANLG LVLS
(analog levels) menu.
Press the
BALANCE
button twice to return to the current
INPUT SELECT
menu.
Содержание Casablanca II
Страница 1: ...THETA DIGITAL C O R P O R A T I O N Casablanca II Owner s Manual V 2 01 Digital Done Right...
Страница 14: ...4 Casablanca II Block Diagram Input Processing Sections Figure 1 Block Diagram of Input Processing Sections...
Страница 16: ...6 Casablanca II Block Diagram DAC and Analog Out Sections Figure 3 Block Diagram of DAC and Analog Outputs...
Страница 23: ...13 Setup Menus and Pages Figure 13 Setup Menus and Pages...
Страница 25: ...15 STEP BY STEP SETUP GUIDE...
Страница 34: ...24 Setup Flowcharts A P Flowchart A Setup Subwoofer s...
Страница 35: ...25 Flowchart B Front Left Right Configuration...
Страница 36: ...26 Flowchart C Front Center Configuration...
Страница 37: ...27 Flowchart D Left Right Surround Configuration...
Страница 38: ...28 Flowchart E Surround Center Configuration...
Страница 39: ...29 Flowchart F Sides Configuration...
Страница 40: ...30 Flowchart G Setup Speaker Levels...
Страница 41: ...31 Flowchart H Setup Speaker Delays...
Страница 42: ...32 Flowchart I Setup Dolby Digital...
Страница 43: ...33 Flowchart J Setup DTS...
Страница 44: ...34 Flowchart K Setup Circle Surround...
Страница 45: ...35 Flowchart L Copy Input Speaker Parameters...
Страница 46: ...36 Flowchart M Setup Default Mode...
Страница 47: ...37 Flowchart N Setup Post Process...
Страница 48: ...38 Flowchart O Map Input Jacks...
Страница 49: ...39 Flowchart P Setup Analog Input Levels...
Страница 85: ...75 REMOTE REMOTE REMOTE REMOTE CONTROL CONTROL CONTROL CONTROL...
Страница 109: ...99 APPENDIXES APPENDIXES APPENDIXES APPENDIXES...
Страница 115: ...105 Figure 110 Wiring diagram for the Casablanca II Digital Output board and a 6 Channel External Volume Control unit...


