30
7. Installation
When in doubt about how to install the device correctly, please contact an
EXPERT or a specialist workshop and let them carry out the installation!
Improper installation involves damaging both your mains unit and your computer
as well as all connected devices. Moreover, this involves dangers such as e.g.
short-circuit, electric shock or fire.
Danger!
Switch off the computer in which the mains unit is to be installed and all
connected devices and separate all devices from the mains voltage. Unplug the
mains plug! Swicthing off via the mains switch is not sufficient!
• Open the housing of your computer and carefully take off the housing cover.
• If the mains unit shall be used as a substitute for an old and defective mains unit, you first have
to remove the existing mains unit. First, remove all possibly existing cable attachments and
fasteners. Carefully loosed all connectors for the mainboard and the built-in devices.
Hold the old mains unit and remove all holding screws of the mains unit so that it can be removed
from the computer housing.
• Install the new mains unit into the computer housing and fasten it with 4 screws (thread measured
in inches, max. thread length approx. 5mm).
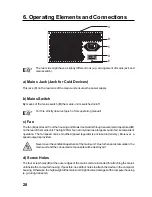
• Insert the 5.25" plug-in module with the speed regulator into a free 5.25" slot of your computer
housing and fasten it with screws.
• Connect the cable for the TWV display to the respective connection of the mains unit. Via this
cable, the mains unit sends the value of the present output power to the display.
• Connect the connector of the speed regulator of the 5.25" plug-in module to a suitable connection
of the mains unit.
Later, the speed of the mains unit fan can be set by means of the speed regulator.
â
In case of excessive warming of the mains unit, the speed of the mains unit fan is
increased automatically.
• Connect the speed output of the mains unit fan to the respective connection on the mainboard,
if existing. Thus, the speed can be monitored e.g. via BIOS/setup.
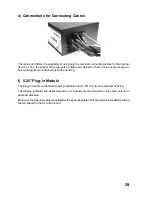
• Finally, connect the outputs of the mains unit to the connections of the devices (mainboard, hard
disk etc.) by means of the enclosed connecting cables.
Contrary to other mains units, the cables are not fixed, but can be connected separately.
Thus, you have to place and connect only the cables that you need.
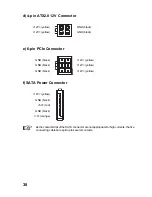
Depending on the mainboard, the ATX power supply connection is provided with 20 or 24 pins.
Due to the special design of the enclosed connectors, it can be used in both cases. For a 20-pin
ATX connection, a 4-pin part can be separated from the rest of the connector by simply sliding
it off.
Содержание TWV 500W
Страница 79: ...79 ...

