14-1
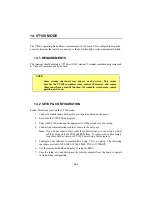
14. VT100 MODE
The VT100 operating mode allows remote setups of the board. This configuration requires
a remote terminal that must be connected to the board through a serial communication link.
14.1 REQUIREMENTS
The terminal should emulate a VT100 or ANSI terminal. Terminal emulation programs such
as Telix or Procomm can also be used.
NOTE
Some strange characters may appear on the screen. This occurs
because the VT100 recognizes some control characters, and causes
them to perform a specific function, for example, screen erase, cursor
position, and so on.
14.2 SETUP & CONFIGURATION
Follow these steps to set up the VT100 mode:
1.
Connect a monitor and a keyboard to your board and turn on the power.
2.
Enter into the CMOS Setup program.
3.
Select the VT100 mode and the appropriate COM port and save your setup.
4.
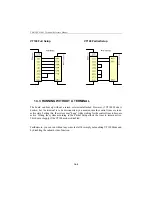
Connect the communications cable as shown in the next page.
Note
: If you do not require a full cable for your terminal, you can set up a partial
cable by using only the TXD and RXD lines. To ignore control lines simply
loop them back as shown in VT100 Partial Setup cable diagram.
5.
Configure your terminal to communicate using 8 bits, no parity. The following
speeds are available: 2400, 9600, 19200, 38400, 57600, 115200BPS.
6.
Use the remote keyboard and display to setup the BIOS.
7.
Save the setup, exit, and disconnect the remote computer from the board to operate
in stand-alone configuration.
Содержание TEK-CPCI 1003
Страница 15: ...TEK CPCI 1003 Technical Reference Manual 5 4 5 1 CONNECTOR LOCATION...
Страница 22: ...FEATURE DESCRIPTION 7 ONBOARD FEATURES...
Страница 51: ...TEK CPCI 1003 Technical Reference Manual 9 2 JUMPER LOCATION...
Страница 52: ...Setting Jumpers 9 3 JUMPER SETTINGS Table 1...
Страница 53: ...TEK CPCI 1003 Technical Reference Manual 9 4 JUMPER SETTINGS TABLE 2...
Страница 67: ...SOFTWARE SETUPS 12 AWARD SETUP PROGRAM 13 UPDATING THE BIOS WITH UPGBIOS 14 VT100 MODE...
Страница 95: ...C 1 C BOARD DIAGRAMS C 1 ASSEMBLY TOP DIAGRAM...


