background image

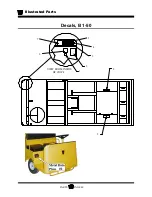
Illustrated Parts

PARTS


PAGE 25

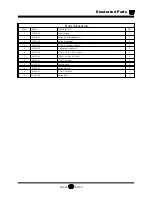
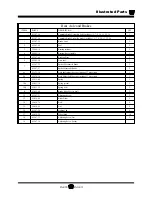
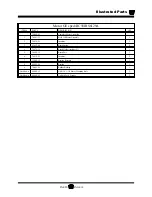
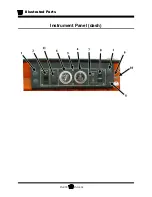
Instument Panel (dash)

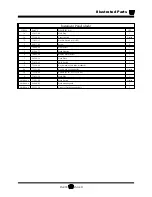
ITEM #

PART #

DESCRIPTION

QTY

1a

95-913-00

Hole Plug

1

1b

71-100-00

Toggle Switch

Option

2

71-039-11

Rocker Switch (ON-OFF)

1

3

88-817-08

Screw

8

4

74-000-00

Hour Meter

1

5

01-200-75

Dash Housing

1

6

74-009-00

Battery Status Meter

1

7

94-304-10

Dash Plate

1

8

71-039-02

F&R Switch

1

9

71-120-00

Key Switch, keyed alike (standard)

1

9a

71-121-00

Key Switch, keyed unalike

Option

10

71-120-80

Extra Keys for #9 (71-120-00)

11

71-039-20

Hole Plug

2

Not Shown

71-501-00

Horn Switch

Option

Not Shown

88-060-09

Dash mounting bold

2

Not Shown

97-211-20

U-nut for Dash Mounting Bolt

2

Содержание B 1-50

Страница 1: ... s i n e s s Serial number Starting 136914 MANUAL MB 150 02 Operation Troubleshooting and Replacement Parts Manual Published 11 26 2002 Revision C B0 015 00 MX 016 00 Models Inlcuded B0 015 00 B 1 50 Load Master MX 016 00 MX 1600 Maintenance Expediter ...

Страница 2: ......

Страница 3: ...t parts or service should be obtained through your local dealer A dealer locator can be found on the Taylor Dunn website at www taylor dunn com If you do not have access to the internet you can call the factory direct at 01 714 956 4040 Feedback regarding this or any Taylor Dunn vehicle manual can be sent to Taylor Dunn Manufacturing Attn Tech Writer 2114 West Ball Road Anaheim CA92804 ...

Страница 4: ...B2 48 With Dump Bed Option B2 10 Ambulance B2 48 with Steel Cab Foldaway 4 Passenger Seat and Stake Sides ET 3000 ET1 50 Full Size Truck P2 50 30 000 Pound Tow Tractor ...

Страница 5: ...Troubleshooting 12 Wire diagram 13 Chargers 14 Illustrated Parts 15 Appendix A Special Tools 16 Appendix B Suggested Torque Values 17 Appendix C Brake Lining Handling Precautions 18 Taylor Dunn Model B0 015 00 MX 016 00 Operator and Service Manual Section Index This quick reference section index guide will assist you in locating a desired topic or procedure Refer to each sectional Table of Content...

Страница 6: ...TAYLOR DUNN ...

Страница 7: ...Introduction About this manual 2 Who Should Read This Manual 2 Responsibilities 3 How To Use This Manual 4 Conventions 4 How to Identify Your Vehicle 6 Taking Delivery of Your Vehicle 7 Contents ...

Страница 8: ...ide Taylor Dunn has made every effort to include as much information as possible about the operation and maintenance of this vehicle Included in this manual are Vehicle Description Safety Rules and Guidelines Operational Information Operator Responsibilities Owner Responsibilities Control Operation and Location Information Maintenance and Troubleshooting Information Standard Parts List Before serv...

Страница 9: ...n of the vehicle preoperational and operational checks on the vehicle and the reporting of any problems to service and repair personnel Of the Service Personnel The service personnel are responsible for the service and maintenance of the vehicle At no time should a service person allow any untrained personnel to service or repair this or any Taylor Dunn vehicle For the purposes of training a quali...

Страница 10: ... to be performed on this vehicle It also includes various subjects that should be included in the operator and service training program Maintenance Service and Repair This section gives specific information on the servicing of the vehicle and a schedule for maintenance checks Electrical and Charger Troubleshooting This section identifies the troubleshooting procedures for testing the electrical sy...

Страница 11: ...treme care while performing the task or The symbol at the left and the bold text contained within a box denotes a Caution and is used to inform the reader that property damage may occur Be sure to exercise special care and follow any instructions contained with in a caution NOTE Alerts the reader to additional information about a subject Conventions Symbols and or words that are used to define war...

Страница 12: ... S H A Standard Section 1910 178 Powered Industrial Trucks and with all applicable portions of the American National Standard for Personnel and Burden Carriers ANSI B56 8 The locations of the model and serial numbers are illustrated below This vehicle is not designed to be driven on public roads or highways It is available in maximum designed speeds ranging from 7 to 15 mph Do not exceed the maxim...

Страница 13: ...a result of shipping note the damage or problem on the bill of lading and file a claim with the freight carrier The claim must be filed within 48 hours of receiving the vehicle and its accessories Also notify your Taylor Dunn dealer of the claim If there is a problem with the operation of the vehicle DO NOT OPERATE THE VEHICLE Immediately contact your local Taylor Dunn distributor and report the p...

Страница 14: ...Model B 1 00 ...

Страница 15: ...ectrolyte Alarm Optional 8 Directional Signals Optional 8 Hazard Light Switch Optional 9 Accessory Switch Optional 9 Auxiliary Switch Optional 9 Vehicle Operational Guidelines 10 Driving 10 Loading and Unloading 10 Parking 10 Towing 10 Charging your vehicle 11 Signet Charger Operation Model HB Series 11 Signet Charger Operation Model HBS series 11 Lestronic II Charger Operation 12 New Battery Brea...

Страница 16: ...olid State Speed Control 275 Amp Transmission Helical Gear Oil Bath Direct Drive Motor DC Series Wound 36 volt 6 hp 1200 RPM for 5 minutes 2 hp 2800 RPM for 60 min Maximum Recommended 19 3 kph 12 mph Speed Brakes Rear Wheel Mechanical Drum Foot Operated Park Brake Steering Automotive Steering 24 1 Tires 5 70 X 8 Load Range B Tire Pressure 60 psi max Frame B 1 50 Steel Unitized Body Heavy Duty 16 G...

Страница 17: ...5 mph Do not exceed the maximum designed speed Exceeding the maximum designed speed may result in steering difficulty motor damage and or loss of control Do not exceed locally imposed speed limits Do not tow at more than 5 mph Do not drive this vehicle unless you are a qualified and trained operator Keep all body parts head arms legs inside the vehicle while it is moving Drive slowly when making a...

Страница 18: ...ety rules contained within this manual Proper operation of all vehicle controls A vehicle operation and driving test Driver Qualifications Only those who have successfully completed the Operator Training program are authorized to drive this vehicle Operators must possess the visual auditory physical and mental ability to safely operate this vehicle as specified in the American National Standards I...

Страница 19: ...e Push the top of the switch to engage the forward direction Push the bottom of the switch to engage the reverse direction DO NOT SHIFT from forward to reverse or vice versa while the vehicle is in motion Make sure the vehicle is completely stopped before shifting The forward reverse switch should be in the center OFF position with key switch off and the park brake set whenever the operator leaves...

Страница 20: ...up on the park brake handle push the release button and lower the handle Horn Switch The horn switch is located to the left of the steering column Depress the switch with your left foot to sound the horn release it to turn it off Seat Interlock Switch A switch located under the driver s seat disables the power to the vehicle when the driver leaves the seat The driver must be seated for the vehicle...

Страница 21: ...OTE The interlock shown is mounted external of the charger Some vehicles may have the interlock built into the charger Battery Status Indicator Analog The battery status indicator is located to the left of the hour meter The normal operating range is in the green zone Park the vehicle for a few minutes for an accurate reading The vehicle needs charging if it is in the yellow zone During and immedi...

Страница 22: ...on the speed control panel or on the rear panel of the vehicle The reverse alarm is activated when the Key switch is in the ON position and the Forward Reverse switch is in the reverse position The alarm makes a repeated audible sound Electrolyte Alarm Optional The Electrolyte Alarm is located in the battery area in the 4th battery cell from the main battery positive cable The Electrolyte alarm is...

Страница 23: ...m of switch to turn off the accessory The accessory can be turned on with the key switch in the OFF position If a vehicle is equipped with windshield wipers and one or more accessories the windshield wipers are controlled from this switch Other accessories are controlled from the auxiliary switch Auxiliary Switch Optional The auxiliary switch is located on the left side of the instrument panel and...

Страница 24: ...ds Parking Before leaving the vehicle Set the parking brake Set the forward reverse switch to the center OFF position Turn the key switch to the OFF position and remove the key In addition If parking this vehicle on an incline turn the wheels to the curb or block the wheels Do not block fire aisles emergency equipment stairways or exits Towing To tow this vehicle attach a tow strap to the front bu...

Страница 25: ...urn itself ON when the AC power cord is connected to the AC power source and turn itself OFF when the batteries are fully charged Once the charge cycle is complete the charger will continue to monitor the batteries If the battery voltage drops during storage the charger will start a new cycle to keep the batteries fully charged NOTE If the charger restarts during a short time period of storage the...

Страница 26: ...cycle could lead to overcharging or discharging the batteries too deep Both circumstances will shorten the life of the batteries New Battery Break in New batteries require a break in period of up to 40 cycles The batteries will not have their full capacity during this break in period and may require longer charging times Lestronic II Charger Operation The Lestronic II charger is a semi automatic c...

Страница 27: ...posed electrical connections Inflate tires to proper pressure if applicable For extended storage the vehicle should be elevated so that the tires do not touch the ground If stored for a prolonged period the batteries should be charged as follows Storage Temperature F Charging Interval months Over 60 1 Between 40 and 60 2 Below 40 6 Returning To Service Check the battery s state of charge and charg...

Страница 28: ...Y RULES AND OPERATING INSTRUCTIONS Safety Rules Page 14 PERIODIC MAINTENANCE CHECKLIST NOTE A full page copy of the Periodic Maintenance Checklist is on the Vehicle Documentation CD under the Misc sub folder ...

Страница 29: ...tch Charger interlock switch etc Inspect for leaking fluids or grease MAINTENANCE GUIDELINES FOR SEVERE DUTY APPLICATIONS 1 This maintenance checklist is based on the average application If the vehicle is operated under severe conditions service procedures should be conducted more frequently than specified The frequency of service under severe conditions is determined by the use of the vehicle The...

Страница 30: ...TAYLOR DUNN ...

Страница 31: ...TABLE OF CONTENTS General Maintenance Maintenance Guidelines 2 Maintenance Guidelines for Vehicles Used in Severe Conditions 3 Troubleshooting Guide 4 Lubrication Chart 5 ...

Страница 32: ...ts Do not use an open flame to check level or leakage of battery electrolyte Do not use open pans of fuel or flammable fluids for cleaning parts Only properly trained and authorized technicians should perform maintenance or repairs to this vehicle Periodic maintenance and service must be performed on this vehicle Failure to complete these scheduled maintenance and service procedures can result in ...

Страница 33: ...dition the entire vehicle should be inspected monthly for signs of damage If any damage is found the vehicle should be immediately removed from service and repaired The following list is meant as a guide and is not all inclusive SEVERE CONDITIONS refer to operation In extreme temperatures On bumpy dusty or poorly maintained roads In excessively wet areas In corrosive or contaminated areas At or ne...

Страница 34: ...Operation Brakes or Parking Brakes Dragging Worn Drive Gears Front End Out of Alignment Defective Speed Control Abnormal Noise Worn Drive Gears or Bearings Worn Front Rear Axle Bearings Loose Lug Nuts Motor Bearings Worn Oil Leak in Rear Bearing Area Rear Wheel Bearing and or Gasket Failed Drive Over Filled Brake Pedal Soft or Spongy Air in Brake Lines Brake Pedal Low Brake Worn 1 16 Wear Limit Br...

Страница 35: ...ubricant Type 1 Front Leaf Springs General Purpose Grease 2 King Pin General Purpose Grease 3 Ball Joints General Purpose Grease 5 Front Wheel Bearings High Temperature Wheel Bearing Grease 6 Rear Leaf Springs General Purpose Grease 9 Drive Fill Plug 11 oz 30 wt Motor Oil 1 1 2 2 3 5 5 6 6 9 ...

Страница 36: ...TAYLOR DUNN ...

Страница 37: ...emoval and Installation 4 Removal 4 Installation 5 Front Axle Disassembly and Assembly 6 Replace Front Wheel Bearings 7 Replace the Ball Joints Tie Rods and Drag Link 8 Replacing the Drag Link 10 Replacing the Tie Rod 11 Replace the King Pins and Bushings 12 Replace the Steering Knuckle 14 Front Axle Service ...

Страница 38: ...d listen for any grinding noise Any grinding noise may be an indication of worn or damaged wheel bearings NOTE Refer to the Replace Front Wheel Bearings section for information regarding the replacement of the wheel bearings 9 Lower the vehicle 10 Reconnect the main positive and negative cables at the batteries 11 Remove the blocks from behind the wheels 12 Release the park brake and test drive th...

Страница 39: ...e wheel bearings 11 Install a new cotter pin 12 Install the dust cap 13 Lower the vehicle 14 Reconnect the main positive and negative cables at the batteries 15 Remove the blocks from behind the wheels 16 Release the park brake and test drive the vehicle 1 Make sure the key switch is in the OFF position then remove the key 2 Place the forward reverse switch in the center OFF position 3 Set the par...

Страница 40: ...t with jack stands 7 Remove both front wheels Refer to Tires and Wheels section for information regarding removing the front wheels 8 Tie up or support the front axle so it can not fall out of the vehicle 9 Disconnect the drag link ball joint or rod end from the steering knuckle or the steering gear pitman arm NOTE Refer to the Replacing the Ball Joints section for information regarding the remova...

Страница 41: ...he vehicle and support with jack stands 7 Install the front axle in reverse order of removal NOTE Use all new cotter pins NOTE Refer to the Replacing the Ball Joints section for information regarding the installation of the ball joints or rod ends NOTE Refer to Tires and Wheels section for information regarding removing the front wheels 8 Realign the front wheels Refer to Steering Component Servic...

Страница 42: ...garding these procedures Replace the Steering Knuckle Replace the King Pins and Bushings NOTE The front axle does not have to be removed unless the axle beam must be replaced Refer to Front Axle Removal and Installation for information regarding removing the front axle Yoke Lower Bushing King Pin Nut Cotter Pin Outer Bearing Bearing Cap Castle Nut Flat Washer Steel Washer Bronze washer Steel Washe...

Страница 43: ...hub Refer to Replace the Steering Knuckle for information regarding removing the steering knuckle 8 Remove the hub dust cap cotter pin and spindle nut 9 Remove the hub from the steering knuckle NOTE For a front disc brake option you must remove the brake body before removing the hub Refer to the Brakes section for information regarding the removal of the brake body NOTE Catch the outer bearing as ...

Страница 44: ...t where it is installed on the steering arm or pitman arm The second cannot be greased and has a straight shaft See the illustrations to the right Depending on the configuration of your vehicle it may be equipped one or both types of ball joints In this text The first type will be referred to as a Ball Joint The second type will be referred to as a Rod End NOTE If a rod end or ball joint is worn o...

Страница 45: ...move the rod end nut 9 Remove the rod end from the steering arm HINT Count the number of turns required to remove the rod end from the steering sleeve This will make it easier to realign the wheels 10 Install the new rod end into the steering sleeve Screw it into the sleeve the same number of turns counted in the previous step Do not tighten the rod end clamp or jam nut at this time 11 Install the...

Страница 46: ...int from the steering sleeve HINT Count the number of turns required to remove the ball joint from the sleeve This will make it easier to realign the wheels 11 Install the new ball joint into the steering sleeve Screw it into the sleeve the same number of turns counted in the previous step Do not tighten the ball joint clamp at this time 12 Install the ball joint into the steering arm Tighten the ...

Страница 47: ...y injury 7 Remove the ball joints or rod ends from the steering knuckle and pitman arm NOTE Refer to the Replacing the Ball Joints section for information regarding the removal of the ball joints or rod ends 8 Remove the drag link as an assembly 9 Install in reverse order 10 Realign the front wheels NOTE Refer to the Steering section for information regarding realignment of the front wheels 11 Low...

Страница 48: ...hings in the axle beam Bronze bushings in the steering knuckle Metal backed teflon bushings in the axle beam Refer to the illustration below for the type of bushing in your vehicle 7 Remove the ball joints or rod ends from the steering knuckles NOTE Refer to the Replacing the Ball Joints section for information regarding the removal of the ball joints or rod ends 8 Remove the tie rod as an assembl...

Страница 49: ... causing severe bodily injury and or property damage 6 Raise the front of the vehicle and support with jack stands 7 Remove the steering knuckle Refer to Replace the Steering Knuckle for information regarding removing the steering knuckle NOTE It is not necessary to remove the tie rod or drag link for this procedure 8 Press the king pin bushings out from the axle or steering knuckle 9 Press new bu...

Страница 50: ... hub bearing cap cotter pin and nut then remove the hub from the steering knuckle NOTE For a front disc brake option you must remove the brake body before removing the hub Refer to the Brakes section for information regarding the removal of the brake body Do not remove the hydraulic brake line from the brake body If the brake line is removed then it will be necessary to bleed the brakes NOTE Catch...

Страница 51: ... in the illustration below NOTE Refer to Replace Front Wheel Bearings for information regarding proper tightening of the spindle nut 16 Install new cotter pins 17 Realign the wheels NOTE Refer to the Steering section for information regarding realignment of the front wheels 18 Lower the vehicle 19 Reconnect the main positive and negative cables at the batteries 20 Remove the blocks from behind the...

Страница 52: ...TAYLOR DUNN ...

Страница 53: ...ering gear Saginaw 5 Replace the Steering Shaft Saginaw non tilt steering 7 Replace the Steering Wheel Saginaw non tilt steering 9 Replace the Steering Gear Saginaw 10 Repair the Steering Gear 11 Exploded View of Steering Gear 14 Steering Component Service ...

Страница 54: ...nd then tie off the wheels so that they cannot turn from the straight ahead position 8 Disconnect the drag link from the pitman arm NOTE Refer to Replace the Ball Joints section for information regarding removing the ball joint or rod end from the drag link 9 Center the steering gear and tie off the steering wheel so that it cannot rotate NOTE Refer to Adjust the Steering Gear section for informat...

Страница 55: ... clamps or the rod end jam nuts on the drag link 16 Untie the steering wheel and the front wheels 17 Reconnect the main positive and negative cables at the batteries 18 Rotate the steering wheel from a full left turn to a full right turn and make sure that the ball joint clamps do not contact any other component Do not drive the vehicle while the steering wheel or front wheels are tied in position...

Страница 56: ...joint clamps 10 Lower the front wheels to the ground and push the vehicle back and forth a few feet to settle the suspension 1 Make sure the key switch is in the OFF position then remove the key 2 Place the forward reverse switch in the center OFF position 3 Set the park brake 4 Place blocks under the rear wheels to prevent vehicle movement 5 Disconnect the main positive and negative cables at the...

Страница 57: ...ering Gear for information regarding removing the steering gear 6 Raise the front of the vehicle and support with jack stands Rotate the steering wheel from a full left turn to a full right turn and make sure that the ball joint clamps do not contact any other component Clamps positioned so that they contact other components may result in steering failure and loss of control of the vehicle causing...

Страница 58: ...er jam nut 12 Find the center position of the steering shaft A Turn the steering shaft all of the way in one direction B While counting the rotations turn the steering shaft all of the way in the opposite direction C Turn the steering shaft 1 2 the number of turns in the original direction 13 While rotating the input shaft back and forth through its centered position adjust the gear lash adjusting...

Страница 59: ...ke 4 Place blocks under the front wheels to prevent vehicle movement 5 Disconnect the main positive and negative cables at the batteries 10 Remove and discard the pinch bolt and nut from the steering shaft coupler NOTE Most vehicle configurations will now allow the steering shaft to slide off of the steering gear input shaft and then back down out of the steering column If there is not enough clea...

Страница 60: ...ure to replace the pinch bolt and nut may result in failure of the steering causing loss of control of the vehicle This could lead to property damage and or severe bodily injury 14 Tighten the pinch bolt to 24 26 ft lbs 15 Reconnect the main positive and negative cables at the batteries 16 Remove the blocks from behind the wheels 17 Release the parking brake and test drive the vehicle Make sure th...

Страница 61: ...teering wheel orientated as shown in the illustration to the right 11 Tighten the steering wheel nut to 50 60 ft lbs 12 Reinstall the horn switch if equipped 13 Reconnect the main positive and negative cables at the batteries 14 Remove the blocks from behind the wheels 15 Release the parking brake and test drive the vehicle 1 Make sure the key switch is in the OFF position then remove the key 2 Pl...

Страница 62: ...out of the vehicle 1 Make sure the key switch is in the OFF position then remove the key 2 Place the forward reverse switch in the center OFF position 3 Set the park brake 4 Place blocks under the rear wheels to prevent vehicle movement 5 Disconnect the main positive and negative cables at the batteries Steering Gear with Pitman Arm Failure to support the steering gear will result in the steering ...

Страница 63: ...efer to the illustration at the end of this section for a blown up view of the steering gear assembly 1 Center the steering gear A Turn the steering shaft all of the way in one direction B While counting the rotation turn the steering shaft all of the way in the opposite direction C Turn the steering shaft 1 2 the number of turns in the original direction 2 Remove the worm bearing adjuster locking...

Страница 64: ... 10 Remove the ball nut from the worm shaft 11 Thoroughly clean and inspect all parts for signs of corrosion damage or wear and replace as required Reassembly 1 Lightly lubricate all parts before reassembly 2 Install a new worm shaft seal and pitman shaft seal into the housing 3 Install the upper worm bearing cup 4 Divide the ball bearing into two equal groups 5 Position the ball nut onto the worm...

Страница 65: ...the worm bearing adjuster lock nut 12 Rotate the worm shaft to center the ball nut in the housing 13 Place a new gasket onto the housing and install the assembled pitman shaft side cover onto the housing using two of the three mounting bolts 14 Pack the steering gear with grease through the open side cover bolt hole and then install the bolt 15 Adjust the steering gear NOTE Refer to Adjust the Ste...

Страница 66: ...Maintenance Service and Repair Steering Page 14 Exploded View of Steering Gear ...

Страница 67: ...akes 4 Adjust the Mechanical Brake Linkages 5 Adjust the Parking Brake 6 Wheel Park Brake mechanical drum standard 6 Wheel Park Brake hydraulic drum 6 Check Master Cylinder Fluid 7 Bleed the Brake System 8 Flush the Brake System 9 Replace Front Disc Brake Pads 10 Replace Rear Brake Shoes 11 Replace the Front Cylinder 12 Repair the Brake Body 13 Replace the Master Cylinder 15 Repair the Master Cyli...

Страница 68: ...n for information on removing the wheel 1 Measure the run out of the rotor at its maximum diameter If the run out exceeds 0 005 then the rotor must be machined Do not machine the rotor beyond its service limits 2 Measure the thickness of the brake rotor in 3 places If the brake rotor thickness is less than 0 20 inches then the rotor must be replaced Front Disc Brake Pads NOTE The brake pad must be...

Страница 69: ...commended handling precautions Do not use a brake drum that is worn beyond its service limits A drum worn beyond its service limits could fail and cause loss of brakes resulting in severe bodily injury and or property damage INSPECT THE PARKING BRAKE 6 Release the park brake 7 Inspect the brake shoes The parking brake shoes are the same as the service brake shoes Refer to Inspect the Service Brake...

Страница 70: ...inside of the left and right brake Do not adjust the brake by means of the brake cables as this will cause mis operation of the brakes If you hear a single clunking noise while braking it may be due to mis adjustment of the brake cables or linkage Refer to Replace Brake Linkages Cables for information regarding proper adjustment of the cables and linkages ADJUST THE SERVICE BRAKES 1 Make sure the ...

Страница 71: ...is set 4 Place blocks under the front wheels to prevent vehicle movement 5 Disconnect the main positive and negative cables at the batteries 6 Release the park brake 7 Loosen the clevis jam nuts on the main brake cable and connecting rod refer to illustration on previous page 8 Loosen the brake cable and connecting rod 9 Adjust the park brake linkage so that the angle between the connecting rod an...

Страница 72: ...uts on the connecting rod and park brake linkage 12 Set the park brake 13 Reconnect the main positive and negative cables at the batteries 14 Remove blocks from behind the wheels 15 Release the park brake and test drive the vehicle 1 Make sure the key switch is in the OFF position then remove the key 2 Place the forward reverse switch in the center OFF position 3 Confirm the electric park brake is...

Страница 73: ...T 3 brake fluid is corrosive and will damage paint finishes Dispose of brake fluid in accordance with local state and federal regulations Read and follow all warnings on the brake fluid container Do not ingest brake fluid or allow contact with skin or eyes Always wear protective clothing and a face shield when working with or around brake fluid SKIN CONTACT Flush area immediately with water for se...

Страница 74: ... in the master cylinder to drop too low as this will allow air into the brake lines 9 Attach a clear hose to the bleeder valve on the brake cylinder that is to be bled Route the hose into a clear container for waste brake fluid 10 Pump the brake pedal a few times and then press and hold light pressure to the brake pedal 11 Open the bleeder valve on the hydraulic brake body 12 Depress the foot peda...

Страница 75: ...brakes are optional 6 Raise the rear wheels off of the ground and support with jack stands 7 If equipped with front brakes raise the front wheels off of the ground and support with jack stands 8 Release the park brake 9 Remove both rear wheels and if equipped with front brakes the front wheels Refer to Tires and Wheels section for information regarding removing the wheels 10 Remove the wheel cylin...

Страница 76: ...e wheel assembly Refer to Tires and Wheels section for information on removing the tire and wheel assembly NOTE Refer to the illustration above for the following steps 10 Remove the brake body bolts 10 and discard the lock nuts 1 and brake pads 8 11 Remove the spacer bushings 6 from the mounting bracket 5 and discard the bushings 12 Inspect the brake rotor SeeInspect the Service Brakes section for...

Страница 77: ...tands 8 Remove the tire wheel assembly Refer to Tires and Wheels section for information on removing the wheel 9 Remove and inspect the brake drum Refer to Inspect the Service Brake section for information regarding inspecting the brake drum 10 Remove the retracting springs and torsion springs from the brake shoes 11 Remove the hair pin clips from the actuating arms and discard 12 Remove the brake...

Страница 78: ...d reverse switch in the center OFF position 3 Confirm the electric park brake is set 4 Place blocks under the front wheels to prevent vehicle movement 5 Disconnect the main positive and negative cables at the batteries Always use a lifting strap hoist and jack stands of adequate capacity to lift and support the vehicle Failure to use lifting and support devices of rated load capacity may result in...

Страница 79: ... brake system components must be kept clean Make sure your work area is free from dirt and debris and will contain any brake fluid spills Any debris or contaminates left in the brake system could lead to brake failure and result in property damage and or severe bodily injury Do not ingest brake fluid or allow contact with skin or eyes Always wear protective clothing and a face shield when working ...

Страница 80: ...nging off of the end of the piston 14 Insert the rubber boot piston into the brake body making sure that the boot is properly seated in the groove 15 Press the pistons all the way down into the brake body making sure that the boot seats properly into the upper groove on the piston 16 Install any fittings or plugs that were removed from the brake body using teflon tape thread sealant 17 If the brak...

Страница 81: ...ash or skin irritation develops get medical attention immediately EYE CONTACT Immediately flush the eye with water for 15 minutes and call physician INGESTION Get medical attention immediately NOTE Most vehicle configurations do not require lifting the vehicle to remove the master cylinder Lifting the vehicle may not be required 6 If required raise the vehicle and support with jack stands 7 Place ...

Страница 82: ...iscard Remove the rubber boot Depress the plunger and remove the plunger spring clip retainer Pull the plunger and all seals out of the master cylinder bore Thoroughly clean inspect and replace parts as required If any damage is found in the bore of the master cylinder then it must be replaced Lubricate all parts with clean brake fluid from a sealed container Reassemble in reverse order If the mas...

Страница 83: ...otors with internal cooling fans 2 Enclosed Motors GE no cooling fan 2 Motor Removal and Installation 3 Motor Inspection 3 Replacing the Brushes 5 Replacing the Bearings 6 Repairing the Commutator 6 Service Limits 7 Motor Service Typical Exploded Motor ...

Страница 84: ... Disconnect the main positive and negative cables at the batteries Typical motor with cooling fan indicated by the arrow Typical brush and brush holder Motors with internal cooling fans NOTE There are four brushes in the motor The brushes will not wear at the same rate It is recommended that all four brushes are inspected at the same time NOTE In some vehicle configurations it may not be possible ...

Страница 85: ... the length of each motor brush If any one brush is less than or equal to the service limit specified in section Service Limits then all four brushes should be replaced Refer to Replacing the Brushes section for information regarding replacing the motor brushes 2 Measure the diameter of the commutator If the commutator is less than the minimum diameter specified in section Service Limits then the ...

Страница 86: ... of digital multi meter check the continuity from any one of the commutator segments and the armature frame If it is not an open circuit then the armature is shorted and the motor must be replaced 11 Rotate the motor bearing s by hand The bearing should not freewheel but should come to a smooth stop when rapidly spun by hand If the bearing freewheels then grease is no longer present in the bearing...

Страница 87: ... Remove the brush covers 2 Loosen the brush wire retaining screw and remove the brush from the brush holder Be careful with the brush spring and do not let it slip off of the spring mount If the spring comes off then the motor must be disassembled Refer to Motor Inspection Disassembly section for information on taking the motor apart 3 Install the new brushes in reverse order 4 Be certain that the...

Страница 88: ... Limits then the motor must be replaced 5 Thoroughly clean all copper debris from between the commutator segments Do not press against the outer race of the bearing Pressing against the outer race will damage the bearing and may result in premature failure of the bearing See the illustration below Example of freshly cut commutator Properly undercut and cleaned commutator segments 6 Measure the com...

Страница 89: ...e Depth max mm inches mm inches mm inches mm inches 5BC58JBS6129A 0 635 0 025 66 75 2 625 19 05 0 75 38 1 1 5 5BC58JBS6129B 0 635 0 025 66 75 2 625 19 05 0 75 38 1 1 5 5BC58JBS6129C 0 635 0 025 66 75 2 625 19 05 0 75 38 1 1 5 5BC49JB399C 0 635 0 025 78 97 3 109 19 05 0 75 5BC58JBS6110C 0 635 0 025 78 97 3 109 19 05 0 75 38 1 1 5 ...

Страница 90: ...TAYLOR DUNN ...

Страница 91: ...Oil Level 2 Change Oil 3 Motor 4 Removal 4 Installation 4 Rear Hub with Brake Drum 5 Rear Axle 6 Replace the Axle Bearing 8 Transmission 9 Remove 9 Install 9 Differential Case 10 Disassemble 10 Assemble 13 Transmission Service ...

Страница 92: ...t the main positive and negative cables at the batteries 10 Remove blocks from behind the wheels 11 Test drive the vehicle 1 Make sure the key switch is in the OFF position then remove the key 2 Place the forward reverse switch in the center OFF position 3 Set the park brake 4 Place blocks under the front wheels to prevent vehicle movement 5 Disconnect the main positive and negative cables at the ...

Страница 93: ...Maintenance Service and Repair Transmission Page 3 CHANGE OIL Changing the transmission oil requires removal of the transmission cover Refer to transmission disassembly later in this section ...

Страница 94: ...otor HINT Tag each wire with the number of the terminal it was removed from 7 Remove the bolts holding the motor to the transmission housing see illustration 8 Slide the motor off of the transmission input shaft Installation 1 Remove the rubber bushing from inside of the motor armature coupling 2 Thoroughly clean all grease from the transmission input shaft rubber bushing and the motor armature co...

Страница 95: ...ase on the axle splines could contaminate the braking surfaces resulting in loss of braking power This could lead to severe bodily injury and or property damage 6 Remove the rear wheel Refer to Replace the Rear Tire Wheel section for information regarding removing the rear wheel 7 Remove the cotter pin from the axle shaft 8 Remove the hub retaining nut and remove the hub from the axle shaft 9 Inst...

Страница 96: ...ar Tire Wheel section for information regarding removing the rear wheel 7 Remove the axle hub Refer to Rear Hub Brake Drum section for information on removing the hub 8 Remove the outer snap ring from the axle housing 9 Remove the axle from the transmission assembly HINT Use a slide hammer threaded onto the end of the axle shaft 10 Remove the inner snap ring 11 Remove the axle seal from the axle h...

Страница 97: ... assembly HINT Use a slide hammer threaded onto one of the wheel studs 12 If the axle bearing is to be replaced remove the bearing race from inside of the axle housing 13 Remove the axle seal from the axle housing and discard 14 Install in reverse order using a new axle seal 15 If equipped with hydraulic brakes bleed the brakes Refer toBrake Service Bleed the Brakes section for information on blee...

Страница 98: ... the bearing with grease and wrap it in plastic to prevent corrosion Non Removable Hub 1 Drill a 1 4 hole to a depth of approximately 3 4 the thickness of the retaining ring 2 Use a chisel to split the retainer and remove the retainer from the axle shaft Do not drill all of the way through the retainer into the axle shaft Drilling into the axle shaft will weaken the axle shaft and could cause the ...

Страница 99: ...ont wheels to prevent vehicle movement 5 Disconnect the main positive and negative cables at the batteries Always use a lifting strap hoist and jack stands of adequate capacity to lift and support the vehicle Failure to use lifting and support devices of rated load capacity may result in severe bodily injury Do not let the vehicle hang from a hoist or leave the vehicle supported only by the liftin...

Страница 100: ...ction for information on removing the axles 4 Suspend the differential case over a drain pan that can hold a minimum of 2 quarts of oil 5 Remove the differential case cover being careful not to bend or damage the case cover flange or the sealing surface of the differential case 6 Remove the differential bearing caps and remove the differential assembly from the housing NOTE The bearing caps are ma...

Страница 101: ...iate shaft bore plugs 10 Thread a sheet metal screw into each plug until the bore plug is forced out 11 Remove both snap rings from the intermediate shaft bore 12 Using a soft metal or hard wood dowel drive the intermediate shaft through the bearing just enough to allow clearance for an ID bearing puller Do not attempt to drive the shaft out of the opposite end of the transmission ...

Страница 102: ...and remove the intermediate shaft from the housing 15 Remove the o rings from each end of the intermediate shaft 16 Remove the circlip from the input shaft 17 Remove the input shaft from the housing 18 Press the bearings off of the input shaft The shaft and gear assembly must be supported by hand during the next step Failure to properly support the shaft and gear assembly could result in damage to...

Страница 103: ...it tightly into their grooves If a snap ring is loose then it must be replaced NOTE All internal components should fit easily together Do not hit any shaft or component with a hard metal hammer or punch NOTE Pre lube all bearings seals and o rings before assembly 1 Thoroughly clean all components as well as the inside of the housing 2 Press new bearings onto the input shaft and differential case 3...

Страница 104: ...fferential housing Torque the nuts to 35 45 ft lbs 11 Install the differential assembly into the drive housing and install the bearing caps Torque the bolts to 35 45 ft lbs NOTE The bearing caps are marked for identification and must be installed in their original locations 12 Place a small bead of non acidic silicone sealant to the bottom flange of the housing NOTE The sealant bead should be on t...

Страница 105: ...TABLE OF CONTENTS Suspension Replace the Rear Springs 2 Leaf 2 Replace the Front Springs 4 Leaf 4 Replace the Spring Bushings 6 Replace the Shocks 7 Front 7 ...

Страница 106: ...FF position 3 Set the park brake 4 Place blocks under the front wheels to prevent vehicle movement 5 Disconnect the main positive and negative cables at the batteries Always use a lifting strap hoist and jack stands of adequate capacity to lift and support the vehicle Failure to use lifting and support devices of rated load capacity may result in severe bodily injury 7 Tie up or support the rear a...

Страница 107: ...ausing severe bodily injury or property damage 13 Install the new spring in reverse order 14 If the spring hanger bolts do not have a grease fitting lube the spring bushings before installing the spring 15 Tighten the spring hanger bolts securely but not so tight as to bind the spring 16 Lower the vehicle 17 Reconnect the main positive and negative cables at the batteries 18 Remove the blocks from...

Страница 108: ...FF position 3 Set the park brake 4 Place blocks under the rear wheels to prevent vehicle movement 5 Disconnect the main positive and negative cables at the batteries Always use a lifting strap hoist and jack stands of adequate capacity to lift and support the vehicle Failure to use lifting and support devices of rated load capacity may result in severe bodily injury 7 Tie up or support the front a...

Страница 109: ... or damage is found then they must be replaced 13 Install the new spring in reverse order 14 If the spring hanger bolts do not have a grease fitting lube the spring bushings before installing the spring 15 Tighten the spring hanger bolts securely but not so tight as to bind the spring 16 Lower the vehicle 17 Reconnect the main positive and negative cables at the batteries 18 Remove the blocks from...

Страница 110: ...NOTE Refer to Replace the Front Springs section for information regarding removing the front springs 8 If the vehicle is equipped with spring hangers remove the spring hanger bolt from the vehicles frame 9 Remove the spring bushing s For internal bushing press the spring bushings out of the two spring eyes and from the mounting eye on the vehicles frame For external bushing Remove the bushings fro...

Страница 111: ...some vehicles it may be required to remove the front wheel to gain access to the shock mounting bolts Refer toTires and Wheels section for information regarding removing the front wheels 6 Some vehicles may require that the wheels be lifted off of the ground and supported with jack stands to replace the shocks 7 Remove the upper and lower shock bolts 1 Make sure the key switch is in the OFF positi...

Страница 112: ...eakage If any sign of leakage is seen then the shock must be replaced B Inspect the upper and lower shock bushings If any signs of damage or wear are seen then the shock must be replaced 9 Install the shock in reverse order 10 Lower the vehicle 11 Reconnect the main positive and negative cables at the batteries 12 Remove the blocks from behind the wheels 13 Release the parking brake and test drive...

Страница 113: ...TABLE OF CONTENTS Cleaning 2 Testing 3 Watering 5 Charging 6 Replacing 7 Moist Charge Batteries 9 Storage and Returning to Service 10 Returning to Service 11 Battery Service ...

Страница 114: ... rinse thoroughly with clear water DO NOT get any of the solution into the battery cells 8 Reconnect the batteries remove the blocks from the wheels and test drive Explosive mixtures of Hydrogen gas are present within battery cells at all times Do not work with or charge battery in an area where open flames including gas furnace or water heater pilots sparks cigarettes or any other sources of comb...

Страница 115: ...n the center OFF position 3 Set the park brake 4 Place blocks under the front wheels to prevent vehicle movement 5 Disconnect the main positive and negative cables at the batteries Explosive mixtures of Hydrogen gas are present within battery cells at all times Do not work with or charge battery in an area where open flames including gas furnace or water heater pilots sparks cigarettes or any othe...

Страница 116: ... check and record the specific gravity of each cell in the battery pack If after charging none of the cells exceed a hydrometer reading of 1250 then there may be a fault in the charging system If the charging system checks OK then the batteries are no longer accepting a charge and should be replaced NOTE Refer to Charger Troubleshooting for information on checking the charging system The highest r...

Страница 117: ... in an area where open flames including gas furnace or water heater pilots sparks cigarettes or any other sources of combustion are present Always provide ample ventilation in rooms where batteries are being charged Failure to do so may result in severe bodily injury and or property damage A battery is a live electrical source It cannot be disconnected or neutralized Do not drop any tool or conduc...

Страница 118: ...r add additional battery electrolyte to the batteries 8 Reconnect the batteries remove the blocks from the wheels and test drive CHARGING Refer to Charging Your Vehicle in section Safety Rules and Operating Instructions 1 Make sure the key switch is in the OFF position then remove the key 2 Place the forward reverse switch in the center OFF position 3 Set the park brake 4 Place blocks under the fr...

Страница 119: ... batteries Explosive mixtures of Hydrogen gas are present within battery cells at all times Do not work with or charge battery in an area where open flames including gas furnace or water heater pilots sparks cigarettes or any other sources of combustion are present Always provide ample ventilation in rooms where batteries are being charged Failure to do so may result in severe property damage and ...

Страница 120: ...ompartment 14 Inspect the main positive and negative cables and terminals charger cables and terminals and 12 volt tap wiring If any of the terminals or wires show signs of corrosion then they must be repaired or replaced 15 Install the batteries in reverse order Refer to the Illustrated Parts List for battery cable routing 16 It is recommended to replace the battery terminal hardware when replaci...

Страница 121: ...ter that is formulated to be used in wet lead acid batteries and is available at most automotive parts distributors that carry batteries Explosive mixtures of Hydrogen gas are present within battery cells at all times Do not work with or charge battery in an area where open flames including gas furnace or water heater pilots sparks cigarettes or any other sources of combustion are present Always p...

Страница 122: ...ncrete or solid metal surface will cause the batteries to discharge and may result in premature failure of the batteries Storage Temperature F Charging Interval months Over 60 1 Between 40 and 60 2 Below 40 6 Battery electrolyte will stain and corrode most surfaces Immediately and thoroughly clean any surface outside of the battery that the battery electrolyte comes in contact with Failure to clea...

Страница 123: ...rge battery in an area where open flames including gas furnace or water heater pilots sparks cigarettes or any other sources of combustion are present Always provide ample ventilation in rooms where batteries are being charged Failure to do so may result in severe property damage and or serious A battery is a live electrical source It cannot be disconnected or neutralized Do not drop any tool or c...

Страница 124: ...TAYLOR DUNN ...

Страница 125: ...TABLE OF CONTENTS Tire Inflation 2 Tire Inspection 2 Replace the Front Tire Wheel 3 Replace the Rear Tire Wheel 3 Repair the Tire 4 Replace the Tire 5 Tires and Wheels ...

Страница 126: ...ptions available with varying tire pressures Refer to the side wall of your tire for information regarding the tire pressure for your tires The illustration to the right is an example of the side wall information on a tire Tire pressures must be checked when the tire is cold TIRE INSPECTION 6 Check the tire pressure Refer to Tire Inflation section for information on checking the tire pressure 7 In...

Страница 127: ...e stem 11 Inspect the tread and side walls for debris in the rubber that could lead to a puncture If any debris is found it should be removed and the tire inspected for a leak REPLACE TIRE WHEEL 6 Raise the wheel to be replaced off of the ground and support with jack stands 7 Remove the 4 or 5 wheel nuts and remove the wheel 8 Install in reverse order 9 Following the pattern shown on the following...

Страница 128: ...e unique to the type of repair equipment or repair components used Refer to the instructions provided with your equipment or repair components 1 2 3 4 5 3 4 2 1 4 Bolt Pattern 5 Bolt Pattern Pattern for tightening the wheel nuts Do not attempt to repair a tire with a damaged side wall or a slice in the tread This type of repair could fail prematurely resulting in severe bodily injury and or proper...

Страница 129: ... wheel 2 Cut the old valve stem off of the wheel 3 Remove the valve stem cap from the new valve stem 4 Lubricate the valve stem with liquid soap 5 Install a new valve stem using a valve stem tool NOTE The valve stem tool is available at most auto repair shops 6 Install the tire onto the wheel following the instructions provided with your tire replacement equipment 7 Inflate the tire to the proper ...

Страница 130: ...TAYLOR DUNN ...

Страница 131: ...bleshooting SYMPTOMS 2 READ THIS FIRST 3 Test Equipment Required 3 IMPORTANT NOTES and INSTRUCTIONS 3 Definitions 3 SYMPTOM TROUBLESHOOTING GUIDE 19 PMC CONTROL 20 PLUGGING DIODE 22 FREEWHEEL DIODE 23 ISO 24 SOLENOIDS 26 MOTOR 29 REV F ...

Страница 132: ...rmal speed in the opposite direction with high armature current only NOTE Field current will be very low in the opposite direction Accelerates slowly and exceeds normal speed in both directions plus high armature current NOTE Field current will be very low Full speed only Does not run in either direction plus there is noise from motor hum or whine with high field current and low armature current J...

Страница 133: ...tiple component failures This troubleshooting guide assumes the batteries are good Charge and test the batteries before troubleshooting the control system DO NOT start in the middle of this troubleshooting guide Start at the beginning and complete each test in the order that they are written DO NOT skip any test unless instructed to do so Once a problem is found stop testing and repair the indicat...

Страница 134: ...elerator pedal is depressed then go to the Forward Reverse Switch sequence After any repairs are made completely retest the vehicle before lowering the drive wheels to the ground Failure to retest the vehicle could result in unexpected movement of the vehicle resulting in severe bodily injury and or property damage The rear drive wheels may rotate during some of the following tests Block the front...

Страница 135: ...e key 2 Place the forward reverse switch in the center OFF position 3 Set the park brake 4 Place blocks under the front wheels to prevent vehicle movement The rear drive wheels may rotate during some of the following tests Block the front wheels raise the rear drive wheels off the ground and support the vehicle with jack stands Failure to do so may cause the vehicle to move and cause severe bodily...

Страница 136: ...rk brake 4 Place blocks under the front wheels to prevent vehicle movement The rear drive wheels may rotate during some of the following tests Block the front wheels raise the rear drive wheels off the ground and support the vehicle with jack stands Failure to do so may cause the vehicle to move and cause severe bodily injury and or property damage Rotating rear drive wheels are a potential hazard...

Страница 137: ...e all interlock switches turn the Key Switch ON and place the F R Switch in Forward Depress the accelerator pedal to engage MS 1 only If the voltage is not between 6 0 and 6 5 volts then go to the Accelerator sequence Depress the pedal fully If the voltage is not between 11 0 and 11 5 volts then go to the Accelerator sequence Connect voltmeter across the PMC KSI terminal and battery negative With ...

Страница 138: ...positive If the voltage is not the same as battery volts then there is an open circuit in the wire from B to the battery Stop troubleshooting here and repair the problem When the repair is completed completely retest the vehicle before lowering the drive wheels to the ground B M A2 B 2 KSI _ Main Battery Positive The voltage shown is for illustration only The actual voltage may vary B M A2 B 2 KSI...

Страница 139: ... motor may not be in the same location S2 A1 A2 S1 Wiring to motor omitted for clarity Do not disconnect the motor wires for this test Motor Set the test light voltage to the same voltage as the battery volts Connect the test light across the motor A1 and A2 terminals Close all interlock switches turn the Key Switch ON and place the F R Switch in Forward Depress the accelerator fully If the light ...

Страница 140: ...ion the power switch to the 6 11 volt range All but the power lamp should be OFF If the FS 1 FS 3 or OV lamp Over Voltage are ON then the module is faulty Depress the lever on the module The FS 1 lamp should be ON with no more that a few degrees of rotation If the FS 1 lamp does not come on then the module is faulty see note2 below The voltage on the digital display should vary with the position o...

Страница 141: ...n Representative for more information If you do not know how to test for continuity refer test to a qualified technician COLD Violet Wire s HOT Red wire s BATTERY MAIN NEGATIVE KEY SWITCH View of the terminals of a typical Key Switch A OFF mV V V Hz FLUKE 79 SERIES II MULTIMETER Connect a voltmeter across the HOT terminal of the key switch and battery negative If the voltage is not at battery volt...

Страница 142: ... at battery volts then go to the Accelerator sequence Connect a voltmeter across one of the COLD terminals of the KSI side of the F R switch and battery negative Close all interlock switches turn the Key Switch ON and place the F R Switch in Forward If the voltage is not at battery volts then the F R switch has failed Stop trouble shooting here and repair the problem When the repair is completed c...

Страница 143: ...ive NOTE You may skip this test if it was completed in a previous section If the voltage is not at battery volts then check the wiring to battery negative and the negative circuit breaker Stop trouble shooting here and repair the problem When the repair is completed completely retest the vehicle before lowering the drive wheels to the ground Connect a voltmeter across the center terminal of the fo...

Страница 144: ...attery volts then the F R switch has failed Stop trouble shooting here and repair the problem When the repair is completed completely retest the vehicle before lowering the drive wheels to the ground Connect a voltmeter across the reverse terminal of the forward and reverse side of the F R switch and battery negative Close all interlock switches turn the Key Switch ON and place the F R Switch in r...

Страница 145: ... may vary Battery Negative FWD REV Connect a voltmeter across the ISO solenoid COLD terminal and battery negative Close all interlock switches and turn the Key Switch ON Depress the accelerator pedal fully If the voltage is at battery volts then the wire from the ISO solenoid to the PMC is bad Stop trouble shooting here and repair the problem When the repair is completed completely retest the vehi...

Страница 146: ...y volts then go to the F R Switch sequence Set the test light voltage to the same voltage as the battery volts Connect the test light across the normally open contacts of the reverse solenoid Refer to your vehicles wiring diagram to identify the position of the reverse solenoid Close all interlock switches turn the Key Switch ON and place the F R Switch in reverse Depress the accelerator pedal ful...

Страница 147: ... When the repair is completed completely retest the vehicle before lowering the drive wheels to the ground Reverse does not run in forward Connect a voltmeter across the PMC KSI terminal and battery negative Close all interlock switches turn the Key Switch ON and place the F R Switch in forward If the voltage is not at battery volts then go to the Key Switch sequence Connect a voltmeter across the...

Страница 148: ...he position of the forward solenoid Close all interlock switches turn the Key Switch ON and place the F R Switch in forward Depress the accelerator pedal fully If the light comes on then the Forward solenoid has failed Stop trouble shooting here and repair the problem When the repair is completed completely retest the vehicle before lowering the drive wheels to the ground Set the test light voltag...

Страница 149: ...ceeds normal speed in both directions plus high armature current NOTE Field current will be very low SOLENOIDS Ø Full speed only PMC CONTROL Ø Does not run in either direction plus there is noise from motor hum or whine with high field current and low armature current PLUGGING DIODE Ø Excessive spark when connecting battery ISO Ø Does not run or runs very slow with low motor current and high batte...

Страница 150: ... in the OFF position then remove the key 2 Place the forward reverse switch in the center OFF position 3 Set the park brake 4 Place blocks under the front wheels to prevent vehicle movement 5 Disconnect the main positive and negative cables at the batteries The rear drive wheels may rotate during some of the following tests Block the front wheels raise the rear drive wheels off the ground and supp...

Страница 151: ...e drive wheels to the ground otherwise continue with the next test If the voltage at pin 2 is correct and the voltage at M is correct then there is a short in the harness between the wire connected to the PMC M and main battery negative Stop trouble shooting here and repair the problem When the repair is completed completely retest the vehicle before lowering the drive wheels to the ground B M A2 ...

Страница 152: ...olution then you may have an unanticipated problem or have made an error during testing It is important to review the trouble shooting steps that have led to this point The tests may need to be repeated 1 Make sure the key switch is in the OFF position then remove the key 2 Place the forward reverse switch in the center OFF position 3 Set the park brake 4 Place blocks under the front wheels to pre...

Страница 153: ...tant to review the trouble shooting steps that have led to this point The tests may need to be repeated B M A2 B 2 KSI _ The reading shown is for illustration only The actual reading may vary 1 Make sure the key switch is in the OFF position then remove the key 2 Place the forward reverse switch in the center OFF position 3 Set the park brake 4 Place blocks under the front wheels to prevent vehicl...

Страница 154: ...ere bodily injury and or property damage Rotating rear drive wheels are a potential hazard Keep hands arms legs and loose clothing away from the rear drive wheels while conducting tests Failure to do so may cause serious bodily injury ISO FWD REV ISO Remove the wires and the resistor from the ISO solenoid and perform the following tests Test continuity across the ISO power contacts If you do not k...

Страница 155: ... repeated Reading is plus or minus 10 ISO solenoid is shown for reference only The type of solenoid in your truck may look different _ Connect the meter to each end of the resistor that was removed from the ISO solenoid and measure its resistance The meter reading should be 250 Ohms 10 If it is not 250 ohms 10 then replace the resistor Stop trouble shooting here and repair the problem When the rep...

Страница 156: ... is a very slight possibility that a failure in the motor could cause these symptoms Perform the tests covered in the MOTOR section first If the motor is OK continue with the following tests Remove the wires from the S1 and S2 terminals on the motor Remove the wire from the M terminal on the PMC control Make sure none of these wires can come into electrical contact with the frame or any other wire...

Страница 157: ...o the wire connected to the motor A2 terminal C The wire connected to the motor S2 terminal is shorted to the wire connected to the PMC A2 terminal Stop trouble shooting here and repair the problem When the repair is completed completely retest the vehicle before lowering the drive wheels to the ground otherwise continue with the next test With the key switch on and the F R switch in forward depre...

Страница 158: ...rse solenoid is shorted B The wire connected to the PMC M terminal is shorted to the wire connected to the motor S1 terminal Stop trouble shooting here and repair the problem When the repair is completed completely retest the vehicle before lowering the drive wheels to the ground STOP Stop do not continue If you reached this point without a solution then you may have an unanticipated problem or ha...

Страница 159: ...ting here and repair the problem When the repair is completed completely retest the vehicle before lowering the drive wheels to the ground otherwise continue with the next test 1 Make sure the key switch is in the OFF position then remove the key 2 Place the forward reverse switch in the center OFF position 3 Set the park brake 4 Place blocks under the front wheels to prevent vehicle movement 5 Di...

Страница 160: ...o black or the insulation is cracked and peeling then the armature has been overheated and burnt The motor must be replaced Stop here and repair the problem otherwise continue with the next test 4 Perform a continuity test around the armature commutator Place one of the test leads on a single commutator segment While holding the first test lead on the segment check the continuity to the other segm...

Страница 161: ...Wire Diagrams ...

Страница 162: ...nge Black Black Black White Red Brown Orange Main Battery Positive Main Battery Negative 12v negative tap Green Black Red White CB 10A R F I Reverse solenoid or contactor coil Forward solenoid or contactor coil BSI Battery Status Indicator Green Black Violet Black Violet Black Horn Switch Charger Interlock Relay Contacts Key Switch The charger interlock is optional and may not be installed on your...

Страница 163: ...g 4 Important Notes and Instructions 4 Troubleshooting for Built in Charger 5 Troubleshooting for Portable Charger 8 Testing The Timer Relay 9 Testing the Interlock Relay 10 Turn the Key switch OFF BEFORE disconnecting the batteries Disconnecting the batteries with the key switch ON may corrupt the controller programming resulting in a fault code 1 refer to fault table Rev E ...

Страница 164: ...current state of charge when it is plugged in it assumes that the batteries require charging when it is connected For this reason it is recommended to discharge the batteries approximately 50 1175 1200 as indicated on a hydrometer before connecting the charger If the charger is connected before the batteries are discharged 50 the batteries may enter an overcharge state before the charger can sense...

Страница 165: ...before connecting the charger The electrolyte in the batteries is too high boil over The electrolyte in the batteries is too low excessive gassing or sulfur smell To test the charger to see if it is turning off correctly monitor the battery voltage and the electrolyte specific gravity during the charging cycle as indicated below Specific Gravity Using a hydrometer take the specific gravity reading...

Страница 166: ... than 80 discharged as per hydrometer reading The battery voltage must be above approximately 65 of the chargers rated DC voltage If the batteries are below approximately 65 of the chargers rated DC voltage the charger will not turn on If the charger exhibits intermittent problems it must be in the failed mode for troubleshooting Battery volts Full voltage available at the batteries at the time of...

Страница 167: ...or has a bad connection Stop here and repair the problem Slide the insulators back onto the connectors on the two 10 gauge wires Slide the insulators off the connectors on the two 14 gauge wires Re Connect the charger to the AC source 8 Test the voltage across the two 14 gauge wires This voltage should be the same as the voltage at the AC receptacle rated voltage of the charger If the voltage is l...

Страница 168: ...ore continuing Connect a 2k ohm resistor across the capacitor terminals for 10 seconds Do not touch the capacitor terminals with your hands The resistor should be held with a pair of insulated pliers Failure to do so may cause serious bodily injury HighVoltageinsidethecharger Donottouchanyinternalcomponents while the charger is plugged in Failure to do so may result in serious bodilyinjury Fuse Li...

Страница 169: ...imer Relay Test Stop here and repair the problem Test the AC voltage across the transformer primary circuit The transformer primary consists of the two solid wires with the brown fiber insulator that are connected to the timer board This voltage should be the same as the rated AC voltage of the charger If the voltage is less than the rated AC voltage of the charger then the timer relay is bad Stop...

Страница 170: ...oblem Remove the charger cover and perform the following tests 1 Inspect the internal wiring of the charger and repair as required 2 Check the continuity of both fuse links and replace if bad 3 Disconnect one lead from the capacitor Test the capacitor using the capacitor test function on the meter If the capacitor is bad it must be replaced Stop here and repair the problem 4 Reconnect the lead to ...

Страница 171: ...of the charger If it is less than the rated AC voltage of the charger then the timer relay is bad Stop here and repair the problem Test the AC voltage across the transformer secondary circuit The voltage here will vary depending on the state of charge in the batteries The voltage should be between 208 and 250 of the rated DC voltage of the charger If the voltage is not between 208 and 250 of the c...

Страница 172: ...p here and repair the problem 9 Connect the charger to a working AC power source The charger should turn on If the charger does not turn on then their may be a problem with the AC power source or the AC wiring to the charger Refer to the beginning of this section for charger troubleshooting DO NOT continue until you have confirmed that the AC power source is working The DMM should indicate an open...

Страница 173: ...est Equipment Required for Troubleshooting 4 Important Notes and Instructions 4 Status LED Error Code Table 5 Troubleshooting 6 Turn the Key switch OFF BEFORE disconnecting the batteries Disconnecting the batteries with the key switch ON may corrupt the controller programming resulting in a fault code 1 refer to fault table Rev H ...

Страница 174: ...ases the charger current while holding the batteries at the terminal voltage until the charging cycle is complete The charger faceplate has three status LED s that monitor the charging status Refer to the chart and illustration below for the function of these LED s If an error occurs during charging the charger will beep and display an error code by flashing the status LED s Refer to the Status LE...

Страница 175: ...meter and clamp on DC ammeter monitor the battery voltage and current during the charging cycle The charging current should remain within 10 of the DC output current see previous page until the battery voltage reaches 2 55 volts per cell When the voltage reaches 2 55 volts per cell the charging current will drop significantly and slowly taper off voltage will remain constant The charger should tur...

Страница 176: ...ood working condition Make sure that the AC voltage at the electrical socket is the same as the AC voltage on the charger nameplate Make sure the batteries are in good condition If the charger exhibits intermittent problems it must be in the failed mode for troubleshooting Battery volts Full voltage available at the batteries at the time of the test being performed There are no internally servicea...

Страница 177: ...harger cooling fins and clean as required 4 Input or Output over current Charger will automaticaly correct for this condition and restart Note If only the 100 LED is flashing and all others are OFF then the charger has exceeded its maximum charging time and shut off before the batteries were fully charged This could be a result of Defective battery or batteries Excessively discharged batteries Ove...

Страница 178: ...ng current will be reduced and will taper off until the batteries are fully charged Perform the following if the charger does not turn on 5 Disconnect the charger from the AC source 6 Remove the charger end cap where the DC wires enter 7 Test the voltage across the Battery Positive red and Battery Negative black wires at the lower left of the charger circuit board This voltage should be equal to t...

Страница 179: ...ging Cycle 4 Status Light Error Code Table 5 Troubleshooting 6 Rev C Turn the Key switch OFF BEFORE disconnecting the batteries Disconnecting the batteries with the key switch ON may corrupt the controller programming resulting in a fault code 1 refer to fault table GEL batteries must be charged with a charger configured for GEL batteries Use of any other charger will result in damage to the batte...

Страница 180: ...There are no internally serviceable components in the charger If the charger has failed then it must be replaced DEFINITIONS Volts Per Cell Voltage for each cell in a battery pack for example one 6 volt battery has 3 cells This charger is rated for 115 VAC or 230 VAC operation nominal When switching from one input voltage to the other wait until all LED s are off Switching voltage when any of the ...

Страница 181: ...age the charger decreases the charger current while holding the batteries at the terminal voltage until the charging cycle is complete The charging cycle is complete when the current is down to A1 On the charger face plate there is a status light panel that displays the current status of the charger The first light POWER should be ON when the AC cord is connected to a proper AC power source The th...

Страница 182: ...ing off due to that the charger has restarted Fully test the battery pack before assuming that the charger is not turning off or running too long A charger could turn off in less than 12 hours but still show symptoms of overcharging if The electrolyte in the batteries is too high boil over The electrolyte in the batteries is too low excessive gassing or sulfur smell To test the charger to see if i...

Страница 183: ... charger Battery voltage must be less than 33 7v 36v charger Battery voltage must be less than 43 2v 48v charger Battery voltage must be less than 57 6v 4 Overheated Inspect for dirt or debris on the charger cooling fins and clean as required 5 AC line voltate too high or too low Check the input voltage It must be within 85 137VAC or 170 264VAC 6 Low battery voltage Extremely discharged battery de...

Страница 184: ...be reduced and will taper off until the batteries are fully charged The batteries are fully charged when the charging current is down to A1 If the charger does not turn on there are no faults and the POWER light is ON then the charger has failed and must be replaced If the POWER light is OFF then check the AC power source AC power cable and connections If the source cable and connections are good ...

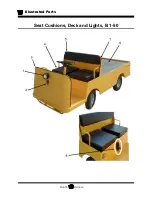
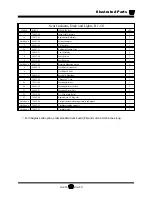
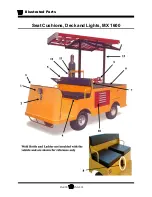
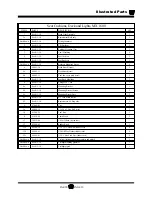
Страница 185: ...ls and Tires 22 Instrument Panel dash 24 Speed Control Panel 26 Miscellaneous Electrical 28 Charger Lestronic 30 Charger Signet 32 Batteries 34 Seat Cushions Deck and Lights B 1 50 36 Seat Cushions Deck and Lights MX 1600 38 Decals B 1 50 40 Fiberglass Cab Doors Mirrors 42 Strobe Light 44 Stake Sides B 1 50 46 Hydraulic Brake Lines and Fittings optional 48 NOTE Parts lists are for both the MX 1600...

Страница 186: ...Illustrated Parts PARTS PAGE 2 Front Axle Steering Knuckle 19 1 18 14 13 16 15 11 10 12 10 17 9 12 Small Cup Large Cup Bronze washer Steel Washer Steel Washer 8 20 2 4 3 7 ...

Страница 187: ... Beam Includes 19 and 20 disc brakes 1 4 14 240 05 Right Steer Knuckle no brake 1 14 240 03 Right Steer Knuckle disc brake 1 5 6 7 87 074 00 Grease Fitting 2 8 80 309 10 Thrust Bearing 2 9 45 338 00 Grease seal 2 10 80 103 00 Race 4 11 12 124 00 Hub includes 9 10 and 1 of 12 2 12 158 10 Hubwith disc rotor includes 9 10 and 1 of 12 2 12 80 017 00 Bearing 4 13 88 239 85 3 4 NF Castle Nut 2 14 92 104...

Страница 188: ...Illustrated Parts PARTS PAGE 4 Steering Linkage 10 3 9 3 8 Ref Arm on Right Steering knuckle Ref Arm on Left Steering knuckle 6 15 7 Ref Stering Gear 7 15 11 17 5 16 12 14 6 13 1 ...

Страница 189: ...5 1 2 NF Hex Castle Nut 2 8 86 501 98 Ball Joint left thread 1 9 18 041 05 Tie Rod Sleeve 18 057 20 assembled with ball jointsand clamps 1 10 86 501 99 Ball Joint right thread 1 11 86 518 00 Rod End RH 1 12 88 279 82 7 8 NF Hex Jam Nut 1 13 18 640 00 Pitman Arm 1 14 88 268 62 7 8 Split Lock Washer 1 15 88 527 11 1 8 x 1 Cotter Pin 2 16 97 202 50 3 8 NF Left Thread Nut 1 17 88 119 80 3 8 NF Hex Nut...

Страница 190: ...ated Parts PARTS PAGE 6 Steering Column 1 2 5 6 3 4 7 The steering column is an integral part of the frame and is not shown Part ID 5 is located in the top of the steering column tube 9 8 Ref Steering Gear 10 ...

Страница 191: ...Wheel 1 3 88 081 14 Bolt Plated grade 8 1 4 88 089 84 Nut Plated grade 8 1 5 80 400 10 Bushing 1 6 20 031 64 Steering shaft includes 3 4 1 7 19 011 25 Steering Wheel Cover 1 8 88 128 62 7 16 Split Lock Washer 3 9 88 120 15 7 16 NC x 1 1 2 Hex Bolt Grade 5 3 10 97 200 00 Dust Wasjer 1 Not Shown 01 200 84 Steering Column Cover 1 ...

Страница 192: ...Illustrated Parts PARTS PAGE 8 Steering Gear 5 4 2 1 6 See steering linkage 7 10 15 17 3 11 12 13 14 16 ...

Страница 193: ...aft Ball Nut Assembly 1 4 18 308 23 Upper Worm Shaft Bearing 1 5 18 308 22 Upper Worm Shaft Cup 1 6 18 308 77 Housing 1 7 18 308 78 Pinion Shaft Seal 1 8 9 10 18 308 79 Worm Shaft Seal 1 11 18 308 82 Gasket 1 12 18 308 76 Pinion Shaft 1 13 18 308 75 Gear Lash Adjuster 1 14 18 308 84 Side Cover 1 15 18 308 86 Lock Nut 1 16 18 308 83 Side Cover Screws 3 17 18 308 85 Shim Kit 1 ...

Страница 194: ...Illustrated Parts PARTS PAGE 10 Front Suspension 4 3 2 1 5 10 6 8 9 7 11 12 ...

Страница 195: ... 1 2 3 32 213 00 Spring Eye Bushing 2 4 88 169 82 9 16 NF Lock nut Grade C 2 5 85 506 05 Leaf Spring includes 3 2 6 96 118 00 1 2 NC x 1 87 x 6 5L U bolt 2 7 96 123 00 3 8 NC x 2 06 x 4L U bolt 4 8 88 149 81 1 2 NC Lock nut 4 9 16 872 03 Shackle Strap 2 10 01 200 63 Spring Support 2 11 88 109 81 3 8 NC Locknut 8 12 16 865 06 Spring Plate 2 ...

Страница 196: ...Illustrated Parts PARTS PAGE 12 Transmission Differential Case 1 2 3 4 5 6 7 6 5 8 3 9 3 9 8 5 6 7 15 10 16 10 3 14 11 11 17 12 13 ...

Страница 197: ...haft Bearing 1 3 31 265 00 Gear set 1 4 80 480 15 Outer Input Shaft Bearing 1 5 88 840 12 Snap Ring 3 6 Special order O ring 3 7 Special order Bore Plug 2 8 66 610 35 Intermeadiate Shaft Bearing 2 9 80 715 00 O ring 2 10 80 480 00 Differential Bearing 2 11 96 330 10 Bearing Cap Screw 2 12 41 127 94 Fill Drain Plug 1 13 Special order Gear Case Cover 1 14 66 610 04 Differential 1 15 Special order Bo...

Страница 198: ...Illustrated Parts PARTS PAGE 14 Rear Axle and Brakes Ref Transmission housing 2 3 4 1 5 7 10 6 11 15 9 12 8 13 14 16 18 19 17 ...

Страница 199: ... 6 45 303 10 Dust seal 2 7 41 347 25 Spider Mechanical Brake 2 41 347 27 Spider Hydraulic Brake 2 8a 41 171 10 Axle shaft right does not include 17 wheel stud 1 8b 41 170 10 Axle Shaft Left does not include 17 wheel stud 1 9 85 215 00 Spring 2 10a 85 411 10 Spring green 2 10b 85 411 15 Spring red 2 11 41 635 00 Brake Shoe Set 1 wheel 2 12 41 347 31 Adjusting Screw 2 13 41 516 00 Brake Drum 2 14 66...

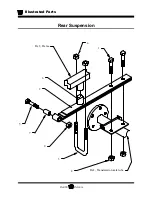
Страница 200: ...Illustrated Parts PARTS PAGE 16 Rear Suspension 5 7 8 3 4 Ref Frame 2 6 4 1 Ref Transmission axle tube ...

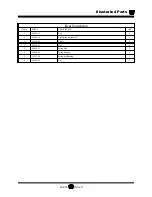
Страница 201: ... Suspension ITEM PART DESCRIPTION QTY 1 88 140 17 Bolt 4 2 85 506 10 Leaf Spring includes 7 2 3 96 118 00 U bolt 2 4 88 149 81 Nut 8 5 96 248 01 Spring Bolt 2 6 01 200 62 Spring Support 2 7 32 213 00 Spring Eye Bushing 2 8 88 169 82 Nut 2 ...

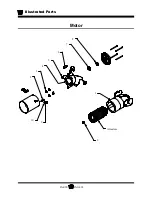
Страница 202: ...Illustrated Parts PARTS PAGE 18 Motor 2 3 5 6 4 7 8 1 9 10 Armature 9 ...

Страница 203: ...il Stator Assembly 1 2 70 210 51 Insulator 2 3 85 412 00 Brush Spring 4 4 70 172 15 Brush Holder includes 3 1 5 70 104 15 Brush Pair 2 6 70 210 51 Insulator 2 7 32 508 15 Bearing Retainer 1 8 80 209 00 Bearing 1 9 70 049 06 Rubber Bushing 1 Not Shown 88 060 12 1 4 NC x 1 1 8 Motor Mounting Bolt 3 Not Shown 88 068 62 1 4 Split Lock Washer 3 ...

Страница 204: ...nkage 1 2 3 4 5 6 7 8 7 19 10 11 12 10 19 7 8 19 10 13 8 6 6 6 7 14 22 Transmission Ref frame 29 18 17 18 19 29 19 20 19 10 10 19 Ref frame 21 22 23 24 10 Crosshaft Arm A To Crosshaft arm A 14 18 29 19 10 25 26 27 28 24 19 10 21 9 Accelerator Module Arm 15 30 31 32 33 ...

Страница 205: ...Spring 1 13 00 200 49 Brake Cross Shaft 1 14 00 200 48 Park Brake Linkage 1 15 88 065 09 1 4 NC x 3 4 Truss Head Machine Screw 3 16 17 50 002 01 Brake Rod 1 18 88 099 80 Nut 2 19 96 773 00 5 16 x 1 Clevis Pin 7 20 01 200 47 Brake Equalizer 1 21 96 826 09 Cable Lock 4 22 96 826 12 Brake Cable 2 23 88 847 06 E clip 2 24 96 754 00 Brake Cable Clevis 4 25 51 344 80 Park Brake Handle 1 26 88 080 11 Bol...

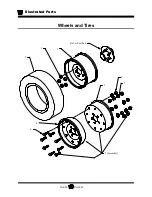
Страница 206: ...Illustrated Parts PARTS PAGE 22 Wheels and Tires Ref wheel hub 1 2 5 assembly 4 3 6 7 8 9 ...

Страница 207: ...2 5 bead 4 4 12 041 13 Outer Wheel 2 5 bead 4 5 12 041 00 Wheel Assembly 2 5 bead width includes 3 4 6 7 8 4 3a 12 042 12 Inner Wheel 12 bolt 4 4a 12 042 13 Outer Wheel 12 bolt 4 5a 12 042 00 Wheel Assembly 3 75 bead width includes 3a 4a 6 7 8 4 6 88 110 09 3 8 x 3 4 NF Hex Bolt grade 5 4 7 88 109 62 3 8 Split Lock Washer 4 8 88 119 80 3 8 NF Hex Nut 4 9 97 236 00 Wheel Nut 20 Not Shown 13 989 00 ...

Страница 208: ...Illustrated Parts PARTS PAGE 24 Instrument Panel dash ...

Страница 209: ...ur Meter 1 5 01 200 75 Dash Housing 1 6 74 009 00 Battery Status Meter 1 7 94 304 10 Dash Plate 1 8 71 039 02 F R Switch 1 9 71 120 00 Key Switch keyed alike standard 1 9a 71 121 00 Key Switch keyed unalike Option 10 71 120 80 Extra Keys for 9 71 120 00 11 71 039 20 Hole Plug 2 Not Shown 71 501 00 Horn Switch Option Not Shown 88 060 09 Dash mounting bold 2 Not Shown 97 211 20 U nut for Dash Mounti...

Страница 210: ...Illustrated Parts PARTS PAGE 26 Speed Control Panel 3 4 5 6 2 7 8 9 10 1 1 11 12 14 18 17 16 1 13 15 Typical Control Panel The control panel in your vehicle may be layed out differently 20 ...

Страница 211: ...0 10 32 Hex Nut 3 9 61 838 42 Bus Bar 2 10 72 501 38 ISO Solenoid 1 11 79 840 00 Small Circuit Breaker 2 12 79 844 00 Large Circuit Breaker 1 13 88 080 11 5 16 NC x 1 Hex Bolt 4 14 01 534 80 Mounting Panel 1 15 73 004 20 Horn 1 16 88 088 62 5 16 Split Lock Washer 4 17 88 089 80 5 16 NC Hex Nut 4 18 88 818 06 8 x 1 2 Pan Head Screw Type B Thread 4 19 88 817 09 8 x 3 4 Phillips Head Sheet Metal Scre...

Страница 212: ...s Electrical Horn Switch Mounted 5 7 6 Floorboard Mechanical Brake Light Switch Mounted Under Floorboard 8 9 Seat Interlock Switch Accelerator Module 10 14 13 11 12 Seat Frame 1 2 Motion Alarms Miscellaneous Wire Harness Clamps 2 3 17 16 15 18 4 ...

Страница 213: ...ip push mount 4 62 033 00 Accelerator Module 1 5 71 122 20 Horn Switch 1 6 88 065 06 1 4 NC x 21 2 Phillips Truss Head Screw Horn Switch 2 7 88 069 81 1 4 NC Hex Nylon Locknut Horn Switch 2 8 71 111 00 Brake Light Switch 1 9 88 045 06 10 32 x 1 2 Machine Screw brake light switch 2 10 71 102 10 Seat interlock Switch 1 11 85 030 00 Spring 2 12 96 773 00 Clevis Pin 2 13 02 610 18 Mounting Plate 1 14 ...

Страница 214: ...Illustrated Parts PARTS PAGE 30 Charger Lestronic 1 2 3 4 8 7 5 6 11 BI_CHARGER W INTERLOCK DWG Charger Identification ...

Страница 215: ...Releif 7 79 831 00 Fuse 1 8 79 530 00 Strain Releif 1 9 10 11 79 809 60 Interlock Relay 1 See Seat Cushions Deck and Lights Charger Lester Model 11860 225 export ITEM PART DESCRIPTION QTY 79 304 65 Complete Charger Assembly 1 79 805 82 Timer Assembly 1 1a Special Order Timer Relay not shown 1 2 79 902 00 Capacitor 1 3 79 745 10 Diode Assembly 1 4 Special order Transformer 1 5 AC cord 6 Strain Rele...

Страница 216: ... intergral part of the charger When replacing the charger do not cut and splice the AC cord Cutting the AC cord will void the charger warranty NOTE The Signet model HBS series charger replaces all previous Signet models Model HBS series charger shown Model HBS for GEL Batteries PART DESCRIPTION 24 volt Charger Assembly see note 36 volt Charger assembly see note 48 volt charger assembly see note Mo...

Страница 217: ...Illustrated Parts PARTS PAGE 33 This page intentionaly left blank ...

Страница 218: ...Illustrated Parts PARTS PAGE 34 Batteries 9 6 and 7 hardware 5 4 3 2 1 Main battery negative NEG POS NEG NEG POS POS 12v tap Main battery positive NEG NEG POS POS NEG POS ...

Страница 219: ...ut 12 8 9 77 042 00 T 105 217AH Battery standard 6 77 042 50 TD217 217AH Battery 77 042 80 217AH Moist Charge 77 044 00 T 125 230AH Battery 77 047 00 T 145 244AH Battery 77 047 50 TD 250 250AH Battery 77 047 80 244AH Moist Charge 77 048 00 J250 250AH Battery 77 048 80 J250 250AH Moist Charge Not Shown 77 055 01 Low Level Electrolyte Alarm Moist charge batteries must be filled with battery electrol...

Страница 220: ...Illustrated Parts PARTS PAGE 36 Seat Cushions Deck and Lights B 1 50 ...

Страница 221: ...ackrest Mounting Screws 6 6 90 444 50 Deck Board standard 1 6 Deck Board Cab 1 7 94 035 01 Seat Back Moulding 7 8 79 575 30 Charger AC Cord 1 8a 79 511 00 Mounting Bracket 1 8b 88 065 06 Mounting Bracket Screws 2 8c 88 069 81 Mounting Brackt Nuts 2 8e 79 530 00 AC Cord Strain Releif 1 8f 76 200 00 Replacement AC Plug only 1 Not Shown 72 022 00 Tai light includes mounting grommet and pigtail 1 Not ...

Страница 222: ...Illustrated Parts PARTS PAGE 38 Seat Cushions Deck and Lights MX 1600 ...

Страница 223: ...Seat Back Moulding 7 8 See B 1 50 Charger AC Cord 1 8a See B 1 50 Mounting Bracket 1 8b See B 1 50 Mounting Bracket Screws 2 8c See B 1 50 Mounting Brackt Nuts 2 8e See B 1 50 AC Cord Strain Releif 1 8f See B 1 50 Replacement AC Plug only 1 9 97 840 01 Vise 1 9a 88 080 16 5 16NC x 2 Hex Bolt vise 3 10 91 340 25 Tool Box 1 11 91 530 00 Chain Hook 2 12 30 552 00 1 4 Coil Chain by the foot 13 02 200 ...

Страница 224: ...Illustrated Parts PARTS PAGE 40 Decals B 1 50 VIEW FROM INSIDE OF COWL 1 2 3 4 5 6 7 8 9 ...

Страница 225: ...33 00 FM 1 2 94 313 20 Safety Warning 1 3 94 384 01 Not a Motor Vehicle 1 4 94 309 00 Park Brake 1 5 94 384 14 Leaving Vehicle 1 6 94 373 10 Vinyl Data Plate 1 94 373 70 Metal Data Plate 1 7 94 301 42 Arms and Legs 1 8 94 319 00 Battery Disconnect 1 9 94 313 00 Battery Warning 1 ...

Страница 226: ...Illustrated Parts PARTS PAGE 42 Fiberglass Cab Doors Mirrors 1 2 4 3 5 6 7 8 9 10 11 12 13 17 18 19 20 21 23a 24 25 23b 16 15 14 26 ...

Страница 227: ...Cover left 1 11b 90 923 10 Door Frame left 1 11c 90 924 97 Door Cover right 1 11d 90 923 20 Door Frame right 1 12 01 200 73 Front Bumper 1 13 88 102 17 Bolt 1 14 16 206 00 Spacer 1 15 88 108 62 Split Lock Washer 3 16 88 109 80 Nut 3 17 97 315 53 Outer Door Handle 2 18 97 315 51 Door Latch 2 19 97 315 54 Inner Door Handle 2 20 92 202 00 Mirror 2 21 92 201 00 Mirror Mounting Bracket 2 22 23a 88 025 ...

Страница 228: ...rated Parts PARTS PAGE 44 Strobe Light Strobe mounted on fiberglass cab Strobe mounted on pole Apply silicon sealer around each mounting screw to prevent leakage 2 3 4 4 2 1 3 5 6 7 7 8 9 10 11 12 1 Seat Back ...

Страница 229: ...1 1c 72 023 22 Replacement lens amber 1 1d 72 023 24 Replacement Lens red 1 2 88 029 80 Nut 3 3 88 028 62 Flat Washer 3 4 88 025 08 Screw 4 5 88 048 61 Washer 3 6 72 023 41 Mounting Pole 1 7 98 603 00 Rubber Grommet 2 8 88 108 60 Flat Washer 2 9 88 101 16 Bolt 2 10 17 104 00 Spacer 2 11 88 109 81 Nut 2 12 88 108 60 Flat Washer 2 ...

Страница 230: ...Illustrated Parts PARTS PAGE 46 Stake Sides B 1 50 1 2 3 4 5 6 7 8 ...

Страница 231: ...Stake Sides B 1 50 ITEM PART DESCRIPTION QTY 1 90 542 20 Side Gate 1 2 90 542 22 End Gate 1 3 90 542 20 Side Gate 1 4 90 540 00 Gate Hook 6 5 90 540 00 Gate Hook 6 6 88 065 13 Bolt 44 7 88 069 81 Nut 44 8 90 543 00 Mounting Channel 8 ...

Страница 232: ... 00 COPPER GASKET 0 813OD 0 500ID 99 572 00 COPPER GASKET 0 813OD 0 594ID 99 575 00 BRAKE LINE COUPLER 99 576 00 BRAKE LINE CLIP 99 579 00 BOLT MASTER CYLINDER 99 603 50 BRAKE LINE LEFT AND RIGHT REAR 99 605 80 BRAKE LINE REAR BRAKES FRONT 99 608 57 BRAKE LINE REAR BRAKES REAR FRONT BRAKES 99 559 00 FITTING MASTER CYLINDER 99 564 00 UNION T 3 16 INV FLARE 99 580 20 HOSE BRAKE W 1 8PM 3 16TF 99 603...

Страница 233: ...ted Torque Limits for Standard Hardware 3 Hardware Identification 3 Standard Head Markings 3 Hex Bolts 3 Other Bolts 3 Hex Nuts 4 Hex Lock Nuts stover 4 Other Nuts 4 Suggested Torque Values non critical hardware 5 Appendix C Brake Lining Handling Precautions 7 REV B ...

Страница 234: ...and program the 62 215 00 PMC speed control used on early model C4 25 Huskey 62 027 10 PMT C Meter Reset Module Used to reset the PMT C maintenance meter after a maintenance is completed 96 500 43 Disc Brake Boot Installation Tool Used to install the rubber boot on all disc brake bodies 41 350 13 Pin Removing Tool Used to remove pins and sockets from AMP connectors 75 440 55 Pin Removing Tool Used...

Страница 235: ... Carriage Bolt grade 2 unless marked as above Other Bolts NOTE Torque value used should be for lowest grade of hardware used If a grade 2 nut is used on a grade 8 bolt use grade 2 torque value NOTE Toque values specified are for clean dry threads Hex Bolts S A E Grade 8 L 9 L 9 APPENDIX B SUGGESTED TORQUE LIMITS FOR STANDARD HARDWARE ...

Страница 236: ...d as S A E Grade 2 Lock nuts use a letter to indicate the grade of the nut Grade A locknuts would be the equivelent of Grade 2 hex nuts Grade B as Grade 5 and Grade C as Grade 8 NOTE Nuts with no markings are to be treated as S A E Grade A S A E Grade B S A E Grade C Other Nuts Other nuts used by Taylor Dunn should be treated as S A E grade A Grade L 9 ...

Страница 237: ... 2 13 39 59 60 90 85 128 95 1 2 20 44 66 68 102 96 144 110 9 16 12 56 84 87 131 123 184 140 9 16 18 63 94 97 146 137 206 160 5 8 11 78 117 120 180 170 254 195 5 8 18 88 132 136 204 192 288 225 3 4 10 138 207 213 319 301 451 350 3 4 16 154 231 238 357 336 504 390 7 8 9 222 334 344 515 485 728 565 7 8 14 245 367 379 568 534 802 625 1 8 333 500 515 773 727 1091 850 1 14 373 560 577 866 815 1222 930 1...

Страница 238: ... center section Dana F N R 25 35 300 420 34 47 6 Carrier cap bolts Dana 100 120 1200 1440 136 163 2 Differential Cover plate Dana H12 18 25 216 300 24 5 34 Drain plug Dana H12 25 40 300 480 34 54 4 Drain plug GT drive 21 25 252 300 28 6 34 Gear case to 3rd member GT drive 18 20 216 240 24 5 27 2 Motor mounting GT Dana 6 5 7 78 84 8 8 9 5 Pinion nut F2 F3 175 175 2100 2100 238 238 Pinion nut GT dri...

Страница 239: ...uum cleaner or any alternate method approved by OSHA to minimize the hazard caused by airborne asbestos fibers and brake dust Do not grind sand break or chisel the brake pads shoes as this will cause unnecessary dust possibly releasing asbestos fibers in the air Always wear protective clothing and a respirator when working on the brake pads shoes or their associated components Inhaled asbestos fib...

Страница 240: ...Taylor Dunn Mfg 2114 W Ball Rd Anaheim CA 92804 800 688 8680 714 956 4040 FAX 714 956 0504 Mailing Address P O Box 4240 Anaheim California 92803 Visit our Website www taylor dunn com ...

Отзывы: