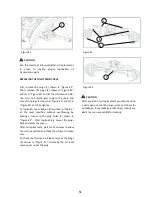


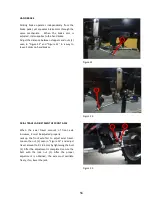


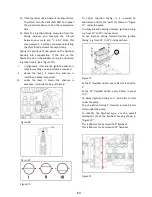


BOOSTER CONNECTION
In case the battery has run down making it
impossible to start the engine, the booster is used
for starting the engine using good battery of the
other vehicle (12V vehicle) as power source.
1. Select a booster cable with as large a capacity as
possible. It must resist a 200A current.
2. Stop the engine of the vehicle (source side)
which is in normal operation.
Connect a clip of the booster cable (in red) to (+)
terminal of the battery on the troubled vehicle and
firmly connect another clip to (+) terminal of the
normal vehicle.
4.
Then connect a clip of another booster cable
(in black) to (-) terminal of the normal vehicle
and finally connect another clip firmly to the
engine block.
5.
Start the engine on the troubled vehicle. If the
engine is difficult to start, try to start it after
starting the engine of the normal vehicle.
Do not fail to perform in above order.
During the final connection, spark will be
generated. Therefore, connect the (-) clip to the
engine block at as far away point from the battery
that is generating gas as possible.
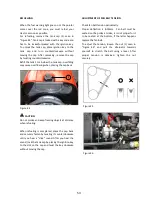
Before connecting the cables, remove the
electrolyte port plugs where possible, because as
long as such plugs have been removed, the
explosion will be smaller even if it may catch fire
resulting in smaller damage.
During charging, hydrogen gas is generated on
terminals. Since this is a flammable gas, it is very
important that the environment is properly
ventilated during charging. Do not smoke and
keep flaming objects at distance during charging.
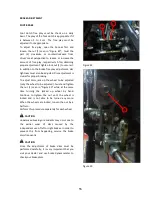
After the engine is started, remove the booster
cables in the reversed procedure of above.
1. First remove the (-) end clip from the engine
block of the troubled vehicle, then remove another
clip from the (-) terminal of the normal vehicle.
2. Then remove a clip from (-) terminal of the
normal vehicle, followed by removal of another
clip from the (-) terminal of the troubled vehicle.
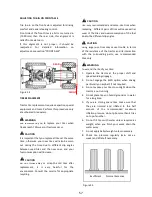
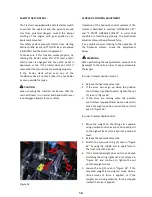
BATTERY RECHARGING
1.
Remove battery terminal cables. You must
remove first the chassis cable and then the (+)
cable.
2.
Remove the bracket securing the battery to the
tractor and remove the battery.
3.
Connect the terminals to the charger properly.
See charger manual for correct connection and
usage.
4.
For charging the battery on this tractor, a slow
charging operation should be carried out at 4.5
amp.
5.
In case the specific gravity is below
1.200kg/m3, make lower rate charging at 3
amp. For more information, consult local
dealer.
Do not forget to turn off illumination elements
such as head lamps, hazard warning light and
rotating beacon lamp when the tractor is not
operated; do not turn on/off the ignition
consecutively and do not use the battery in a way
making it discharged quickly.
For charging the battery on this tractor, a slow
charging operation should be carried out at 4.5
amp. See section “SAFETY PRECAUTIONS”.
Figure 75
WARNING
CAUTION
WARNING
CAUTION
WARNING
CAUTION
CAUTION
65
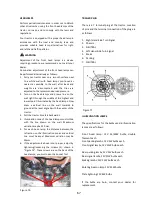
Damaged Tractor
Engine
Содержание 850
Страница 1: ......
Страница 2: ......
Страница 7: ......
Страница 12: ......
Страница 24: ...12 ...
Страница 28: ...16 ...
Страница 50: ...38 ...
Страница 54: ...42 ...
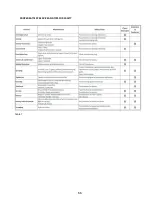
Страница 78: ...PROPER BATTERY SERVICE AND TIPS FOR SAFETY Table 7 66 ...
Страница 86: ...74 ...
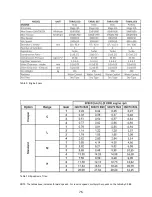
Страница 87: ...SECTION 7 TECHNICAL SPECIFICATIONS Figure 83 Table 8 Technical Specs 75 ...
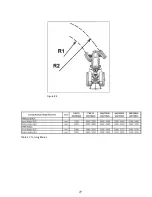
Страница 89: ...Figure 84 Table 11 Turning Radius 77 ...
Страница 94: ...82 ...
Страница 100: ...88 ...
Страница 101: ......