T&D RTR-5 US Скачать руководство пользователя страница 104

99

Editing the Graph

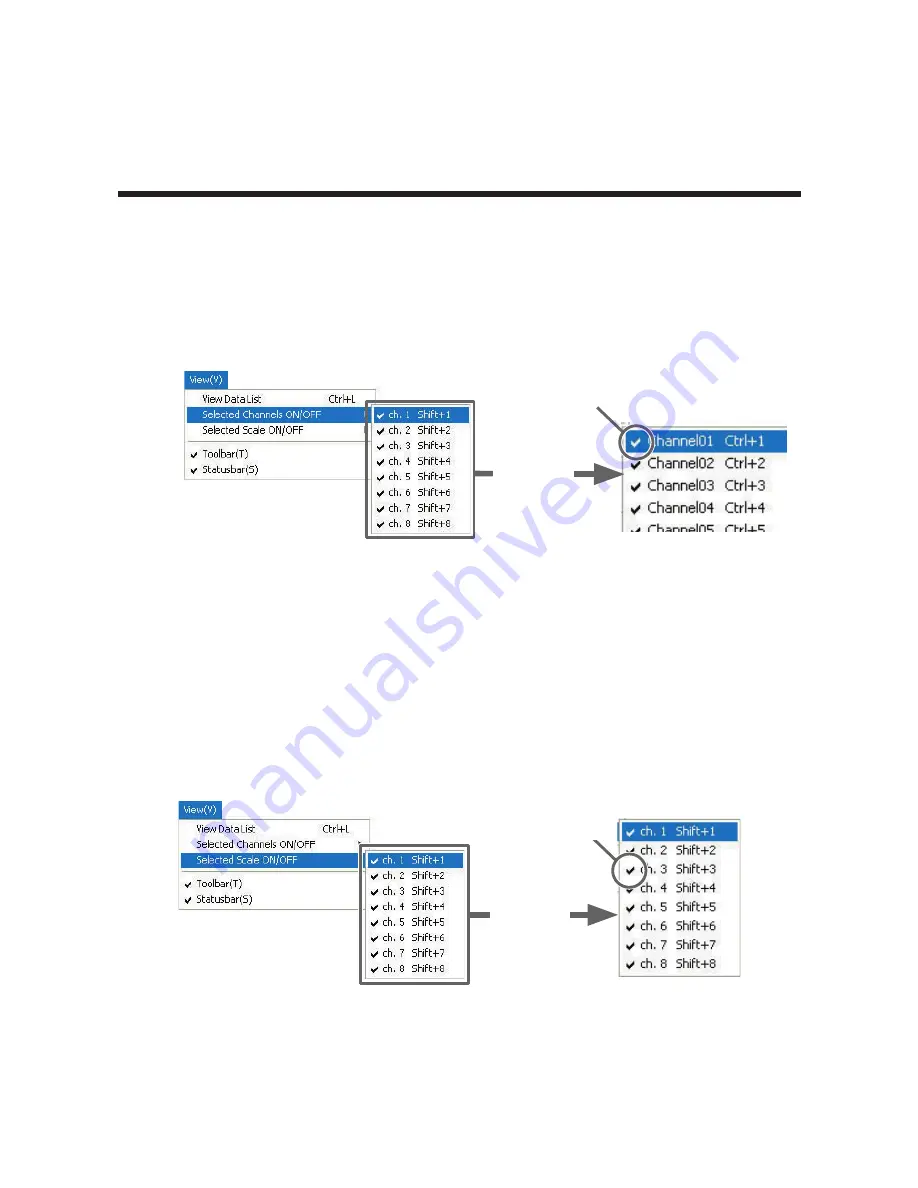
Selected Channels ON/OFF:From the [View] Menu

1

The channel numbers are displayed in the pull down menu of [Selected 

Channels ON/OFF].

2

Check the channel numbers you wish to display.

Check

Enlarged

Note

- By clicking a Channel Number in the Toolbar, you can carry out the same operation.

Scale Display ON/OFF: From the [View] Menu

1

The channel numbers are displayed in the pull down menu of [Selected 

Scale ON/OFF].

2

Put a check next to the channel number(s) you wish to be displayed.

Check

Enlarged

Note

- You can also hide or view channel scales by checking the channel number of the left 

of the graph.

Содержание RTR-5 US

Страница 1: ...User s Manual Thank you for purchasing our product Carefully read this instruction manual before using this unit Copyright T D Corporation All rights reserved 2010 08 16504450006 6th Edition...

Страница 2: ...tered trademarks company names product names and logos mentioned herein are the property of T D Corporation or of their respective owners Speci cations design and other contents outlined in this manua...

Страница 3: ...t or indirect from the inability to use T D Recorder for Windows T D Corporation has no obligation to correct any defects found in T D Recorder for Windows Copyright The Copyright for T D Recorder for...

Страница 4: ...Unit Registration 33 Registering a Remote Unit 33 Collect Registration Info Button 35 New Registration Button 36 Con rming after Registration 38 Other Remote Unit Registration Functions 39 Saving Reg...

Страница 5: ...ing High Low Average Calculation Range From the Tools Menu 100 Editing Recording Conditions From the Tools Menu 101 Re ordering Channel Data From the Tools Menu102 Merging Channel Data From the Tools...

Страница 6: ...automatically creates a new data le each time an Auto Download session occurs Note that when using the Vista OS the Virtual Store function will redirect les from the default folder into which the pro...

Страница 7: ...this product to a PC with a USB cable it is necessary to rst install the application and the USB driver If you use the USB cable to connect the product to a PC before installation the USB driver may...

Страница 8: ...all T D Recorder for Windows it is necessary to have Administrator rights Computer Administrator for the computer in which you wish to install it PC CPU IBM compatible equipped with more than Pentium...

Страница 9: ...ou can simultaneously display up to 8 channels of recorded data downloaded from a main unit in one graph Printing Graphs and Data Lists You can print graphs displayed on screen in full color When prin...

Страница 10: ...ation it is rst necessary to register the data logger as a Remote Unit to an RTR 57U Making Recording Start Settings see Basic Functions for each type of device NOTE Before making Record Start Setting...

Страница 11: ...eless Communication it is rst necessary to register the data logger as a Remote Unit to an RTR 57U Making Recording Start Settings see Basic Functions for each type of device NOTE Before making Record...

Страница 12: ...a Remote Unit to an RTR 57U Making Recording Start Settings see Basic Functions for each type of device NOTE Before making Record Start Settings make sure that your computer clock settings are correct...

Страница 13: ...er to install T D Recorder for Windows it is necessary to have Administrator rights Computer Administrator for the computer in which you wish to install it The layout of the installation window for Wi...

Страница 14: ...e open it by double clicking on the CD ROM icon in My Computer Execute Button Install T D Recorder for Windows 3 Select Install T D Recorder for Windows and by clicking on the Execute Button the insta...

Страница 15: ...stall Program window will appear If the Install Program Window does not automatically open please open it by double clicking on the CD ROM icon in Computer Execute Button Install T D Recorder for Wind...

Страница 16: ...r the application has been installed the following message will appear Click the Install Button Install Button After installation is completed an icon for T D Recorder for Windows will appear in the S...

Страница 17: ...12...

Страница 18: ...n the Menu Bar are Menus containing an array of commands Click on the desired menu in the menu bar to set or display functions for each type of device By clicking Display Change Icon Size you can sele...

Страница 19: ...from the key word list and by clicking the Display Button the explanation will be displayed Search Tab Enter the key word you wish to search for and click the Start Search Button and the topic in whi...

Страница 20: ...rt below and see the pages noted under each type of communication for more details Communication between RTR 5 Series Loggers and Data Collectors 1 There are two ways to carry out communication betwee...

Страница 21: ...ly Collector RTR 57U Computer Serial Cable RS 232C Collector RTR 57U Optional Cable RTR 57C Computer See p 20 Communication between Logger s and your Computer 3 By using a Data Collector as a communic...

Страница 22: ...R 57C 57U connect a Data Logger to your computer and using the T D Recorder for Windows software register that Data Logger as a Remote Unit 2 Place the Remote Unit in the actual place where you wish t...

Страница 23: ...U Connect to Computer Place the Data Logger face down It is possible to carry out some operations such as recording start settings or changes and downloading recorded data via communication with an RT...

Страница 24: ...puter The USB cable is a USB A plug USB mini B plug type Please connect to a place with this kind of mark USB Port Mark USB mini B To the RTR 57U USB mini A To the Computer USB Cable US 15C If the cab...

Страница 25: ...ptional RS 232C communication cable TR 07C is required Serial Port Mark The communication cable connection is a D Sub 9 pin female Please connect it to a port that has markings such as these If the ca...

Страница 26: ...7C 2 Place the Data Logger on the RTR 57C 57U Place the unit face down on the RTR 57C 57U Communication Cable to computer Note If light enters during communication an error will occur Please make sure...

Страница 27: ...22...

Страница 28: ...ages as they appear For Windows 7 Vista 2000 For Windows 7 Vista 2000 by installing T D Recorder for Windows the USB device driver will also be automatically installed Con rming after Installation for...

Страница 29: ...n the Control Panel and double click on System the System Properties will be displayed Device Manager Button Hardware Tab 3 Click the Hardware Tab and click the Device Manager Button in the Device Man...

Страница 30: ...the Found New Hardware Wizard will automatically open If it does not automatically open please see the next page If a window appears such as the one below check No not this time and then click the Nex...

Страница 31: ...Hardware Wizard will automatically open If a window appears such as the one below check No not this time and then click the Next Button Windows such as this will not appear for No Service Pack and Ser...

Страница 32: ...ing used from the folder where T D Recorder for Windows was installed For TR RTR 57U Driver RTR 57U Insert the CD ROM into the proper drive and from the CD ROM select the driver for the device being u...

Страница 33: ...tton in the Device Manager Area Device Manager Button Hardware Tab 4 In the Device Manager Window check to see if USB Recorder is listed under USB Recorder Com 1 1 For RTR TR 57U USB Recorder2 Com USB...

Страница 34: ...XP If this occurs the USB device driver must be re installed How to Re install The images in the following explanation are taken from Windows XP They may differ from the windows that appear when using...

Страница 35: ...r Other Devices and then click on Properties to display the USB Device Properties Window 4 In the USB Device Properties Window click on the Re install Driver Button to display the Hardware Detection W...

Страница 36: ...ommunication via USB 1 In the Toolbar of the Data Logger you are using under Communication select Communication Port Settings Open the Settings Window by clicking the Communication Port Settings Tab 2...

Страница 37: ...Types and click Set Button and port settings can be done for all devices in one step Auto Detect Button 1 In the main window open the Setting Communication Display of the type of Data Logger connected...

Страница 38: ...er Registering a Remote Unit By selecting the icon Remote Unit Registration a message will be displayed Remote Unit Registration can be carried out for each type of unit from the Setting Communication...

Страница 39: ...Button Transfer the contents of Remote Unit Registration File to a Data Collector This is especially useful when setting up a number of Data Collectors with the same registration contents See P 42 Ret...

Страница 40: ...Groups Com Freq Ch View the Communication Frequency Channel for the Groups being displayed 2nd Column light blue background Number View the Remote Unit Numbers The Remote unit info will appear under...

Страница 41: ...ul when registering units If you wish to register a multiple number of Remote Units to the same Group proceed by placing and replacing the Remote Units you wish to register on the Data Collector and c...

Страница 42: ...o select an already registered remote name and make slight changes to create a new name Communication Frequency Channel By clicking the Set check box you can select a channel number One Frequency Chan...

Страница 43: ...motes 2 Choose the range in which to search and activate If you choose All Groups the search for remotes in all registered groups will begin immediately If you choose Specify Group select the desired...

Страница 44: ...a file 1 From the File Menu choose Save Registration Contents to File 2 Designate the saving location and enter a le name 3 Click the Save Button to save the le Note You cannot edit the contents of r...

Страница 45: ...attern 2 Number of Groups 15 Number of Remotes in 1 Group 250 OK Button Note The Default Setting is Pattern 1 If you wish to monitor using the All Groups range it is possible to monitor only 120 Remot...

Страница 46: ...tton Group Name Remote Unit Number Remote Unit Name Change Button If a Remote Unit is placed on top of the Data Collector the changes for the selected info will be performed in both the Data Collector...

Страница 47: ...stration info will be deleted from only the Data Collector After deletion of info from a Remote Unit the unit will be returned to its original default settings Transfer List Info Button If the registr...

Страница 48: ...annel The Communication Frequency Number for the Group to which Remote Unit belongs Channel Number Remote Number The Number of the Remote unit Remote Name Data Logger Registration Status Data Collecto...

Страница 49: ...n Stop Recording Button Close Button Detailed Settings Button Get Settings Button Start Recording Tab Recording Start Date and Time Select the Recording Start Method Programmed Start Recording will be...

Страница 50: ...mote Unit recording settings registration contents and remaining battery life are displayed Registration contents If a settings transmission was received it displays the Group and Remote Name s Remain...

Страница 51: ...n the set upper and lower limits By checking the Set Limits box Make sure to make entries in the following ranges depending upon the device for RTR 51 between 40 and 80 40 and 176 F for RTR 52 between...

Страница 52: ...elect RTR 52Pt Sensor Setting to open the setting window Note By changing the sensor the current recording session will be automatically stopped Sensor Setting window Send Button Check either Pt100 or...

Страница 53: ...he Download Recorded Data Tab Download Button Detailed Settings Button Download Recorded Data Tab 3 After selecting the downloading range click the Download Button to start downloading 4 When download...

Страница 54: ...Humidity graph Window The File is not saved and if necessary should be done separately After downloading specify le in which to save data After data has been downloaded the Save File dialog box will a...

Страница 55: ...culate to record and display the post adjusted measurement It is possible to select from two methods of adjustment 1 point adjustment and 2 point adjustment Note By changing the sensor the current rec...

Страница 56: ...ation between Data Loggers and Computers by connecting the RTR 57U unit to your computer and place the Data Logger unit face down on top of it see p 21 for details 2 In the Main Window click on the Da...

Страница 57: ...djustment the measuring accuracy will improve for all measuring ranges By carrying out adjustment on an already adjusted device without rst clicking the Initialize Button the new adjustment equation w...

Страница 58: ...icon RTR 53 2 Click the Start Recording Tab and set the recording conditions Close Button Start Recording Button Get Settings Button Stop Recording Button Detailed Settings Button Main Unit Display S...

Страница 59: ...s been completed the communication result will appear By clicking OK the set up process will be nished By clicking Close you can close the window Main Unit Display Settings Button Set the desired unit...

Страница 60: ...ording from occurring If you wish to forbid the starting of recording by wireless communication check FORBID to allow check PERMIT Note The Default Setting is PERMIT Upper and Lower Limits The Data Co...

Страница 61: ...gs Button Download Button Close Button Main Unit display Settings Button Download Recorded Data Tab Select the downloading range 3 After selecting the downloading range click the Download Button to st...

Страница 62: ...d be done separately After downloading specify le in which to save data After data has been downloaded the Save File dialog box will appear wherein you can save the data to a speci ed le After downloa...

Страница 63: ...nd take personal responsibility for the process Temperature Humidity 1 point 2 point Adjustment Before Enter the actual measurement before adjustment After Enter the desired measurement after adjustme...

Страница 64: ...post adjusted reading s 4 Please enter the actual pre adjusted value s in the Current Reading column and the post adjusted reference value s in the Post adjusted Reading column 5 Click on the Send Se...

Страница 65: ...r that if adjustment takes place without initializing the device the adjustment will include the rst equation as well as the second and an over adjustment will occur This over adjustment will be espec...

Страница 66: ...ton Get Settings Button Stop Recording Button Start Recording Tab Detailed Settings Button Recording Start Date and Time Select the Recording Start Method Programmed Start Recording will begin on the...

Страница 67: ...ents from every 2 seconds Moisture Record Moisture by Percentage The unit of measurement on the display will show for Percent Pulse Lo Hi Record the number of signals rising within the recording inter...

Страница 68: ...smission was received it displays the remaining battery life Stop Recordings Button Stop current recording of Data Logger Detailed Settings Button Check one OK Button By checking you can make entries...

Страница 69: ...d lower limits By checking the Set Limits box you will be able to enter an upper and lower limit within the following conditions Upper and Lower Voltage Limits 0 0 to 7 0 V decimals are valid to the t...

Страница 70: ...ings Button Download Button Close Button Download Recorded Data Tab Select the downloading range 3 After selecting the downloading range click the Download Button to start downloading 4 When downloadi...

Страница 71: ...mp Humidity graph Window The File is not saved and if necessary should be done separately After downloading specify le in which to save data After data has been downloaded the Save File dialog box wil...

Страница 72: ...o the input value for Current Reading Adjustment Settings 1 Please follow directions as found Communication between Data Loggers and Computers by connecting the RTR 57U unit to your computer and place...

Страница 73: ...already adjusted device without rst clicking the Initialize Button the new adjustment equation will be be used to further adjust the previously adjusted result It is important to remember that if adj...

Страница 74: ...er and place the RVR 52A unit face down on top of it see P 21 for details 2 In the Main Window click on the RVR 52A icon To open the Moisture Probe Settings Window click on Settings in the Menu Bar an...

Страница 75: ...errors in measurement values The Data Logger will record only the adjusted value Current Reading Enter the actual measurement before adjustment Post adjusted Reading Enter the desired measurement aft...

Страница 76: ...be used Moreover versions of RTR 57U prior to version 3 are not compatible If you are unsure of what version you have please check the version information in the Help menu under RTR 57C 57U Version In...

Страница 77: ...ame display will automatically indicate Group Name Remote Unit Name When using the event recorder function the recording start time will be displayed even if you have downloaded by specifying the down...

Страница 78: ...displayed To download several sets of data at one time please see P 75 for details Download Data Button Select data from Data Collector Contents By clicking the Cancel Downloading Button you can stop...

Страница 79: ...e settings for the processing of the downloaded recorded data Select the desired processing method and click OK Button to complete the setting OK Button Check one After downloading autmatically show g...

Страница 80: ...such as No 20 and No 22 hold down the Ctrl key and click on les for No 20 and No 22 If you wish to download les in a row such as No 15 No 16 and No 17 hold down the Shift key and click on the les for...

Страница 81: ...e saved it is possible to save several sets of data into one le Note Each kind of data is displayed in the following graphs Temperature Humidity data Temperature Humidity Graph Voltage Pulse data Mult...

Страница 82: ...the list However info cannot be shown for event recording data Data Info Display Sample Delete Data Button Deletes selected data saved in the RTR 57C 57U from the software Delete All Data Button Dele...

Страница 83: ...t Clock Button the setting will be transmitted 4 Click Close Button to complete the setting Set Clock Button Close Button Set the speci ed clock settings If checked The date time you enter will be set...

Страница 84: ...mit Settings Tab and check the Change box Upper and Lower Limit Settings Tab Check Change Close Button Write Button Enter values Check Read Button 3 After entering the upper and lower limit values che...

Страница 85: ...ce These settings can be made for RTR 57 Series Version 2 and above If you are unsure of what version you have please check the version information in the RTR 57 Series Help menu For more details see...

Страница 86: ...Display Format Settings 2 Check either Month Day Year or Day Month Year Check one OK Button 3 By clicking the OK Button the setting will be completed Note The date format chosen will be applicable fo...

Страница 87: ...82...

Страница 88: ...ph display by clicking the icon Temp Humid Graph in the Main Window Click Note In the Main Window or in the Settings Communication Display of RTR 57C 57U RTR 51 52 or RTR 53 select the Temp Humid Grap...

Страница 89: ...igh Low and Average values for the set calculation range Menu Bar Click on the desired menu in the Menu Bar to set or display each function from which you can choose from an array of commands Toolbar...

Страница 90: ...These operations can be carried out via commands in the Graph Menu or by clicking icons in the Toolbar About the Horizontal Axis The entire graph shows in the horizontal axis the nearest data to the...

Страница 91: ...tarted Date Time Button Recorded Date Display Elapsed Time Display This is a list of the data that was displayed in graph form The highest value is in RED lowest is in BLUE and the average is in PINK...

Страница 92: ...t display for each channel between monochrome and channel color Selected Channels ON OFF From the View Menu 1 The channel numbers are displayed in the pull down menu of Selected Channels ON OFF 2 Chec...

Страница 93: ...have set will be displayed Entire Graph Button OK Button Enter the numerical value Entire Graph Button To make the Calculation Range that of the Entire Graph click the Entire Graph Button The dates a...

Страница 94: ...ted OK Button Restore Button Enter letters and numerical values Channel Number The selected channel number Name Up to 32 letters can be entered Starting Date Time The month day year hour minute and se...

Страница 95: ...ove by selecting the channel number 1 Enter in From _ the Channel number you wish to move from and enter the Channel number to which you want to move in To _ 2 By clicking the Re order Button the move...

Страница 96: ...s Menu By clicking on Shift Unit you can automatically change the temperature unit scale in the graph display and in the channel info list Changing Graph Colors From the Tools Menu 1 Click the channel...

Страница 97: ...opened Graph Line Width Settings Button Change the width of the data lines and the scale lines Every time you click on the numerical value gets larger the numerical value gets smaller Copying Display...

Страница 98: ...or left Move Graph Right Left Move the Graph Display to the right or left Move Graph Up Down Move the Graph Display up or down Vertical Axis Settings AUTO in Default Settings Set the vertical axis sca...

Страница 99: ...aphs data lists text les and print data It is also possible to scroll across the graph and make scale settings for each channel Note For detailed information about the compatible data le types for the...

Страница 100: ...B cursors Click and drag the A or B Button to move the cursor to the left or right A and B Cursor Position Information The approximate date and time for the A and B cursor positions and the time diff...

Страница 101: ...int Preview Help Hide View Channels Horizontal Gauge Bar and Button for Moving Horizontal Axis By dragging the gauge you can move left and right to the data you want to be displayed The time axis move...

Страница 102: ...he mouse to outline the area you want to zoom in on Menu Display Using the Mouse By right clicking on the graph the Menu will be displayed With Return to Original Size or Step by Step Return to Origin...

Страница 103: ...tarted Elapsed Time Display Recorded Date Display Date Time Button This is a list of the data that was displayed in graph form The highest value is in RED lowest is in BLUE and the average is in PINK...

Страница 104: ...Enlarged Note By clicking a Channel Number in the Toolbar you can carry out the same operation Scale Display ON OFF From the View Menu 1 The channel numbers are displayed in the pull down menu of Sel...

Страница 105: ...splayed Entire Graph Button OK Button Enter the numerical value Entire Graph Button To make the Calculation Range that of the Entire Graph click the Entire Graph Button The dates and times in the Set...

Страница 106: ...eted Channel Number Restore Button OK Button Enter letters and numerical values The selected channel number Name Up to 32 letters can be entered Starting Date Time The month day year hour minute and s...

Страница 107: ...ove and drag and drop it to the desired new channel position Move by selecting the channel number 1 Enter in From _ the Channel number you wish to move from and enter the Channel number to which you w...

Страница 108: ...ossible after adjusting the times in Editing Recording Conditions Data types are different Merging is possible between same types of data like temperature humidity Example If you wish to merge Ch 3 wi...

Страница 109: ...104 Erasing Selected Channel Data From the Tools Menu 1 Put a check on the channel number you wish to erase 2 By clicking on the OK Button the deletion will be completed OK Button Check...

Страница 110: ...pper limit at less than 40 000 Select Fixed and enter numerical values If you wish to make all of the settings the same OK Button 3 By clicking the OK Button the setting will be completed Note If you...

Страница 111: ...b or Designate by y ax b Tab Designate by 2 points Tab Designate by y ax b Tab Conversion Info OK Button 2 Set conversion formulas and units 3 By clicking the OK Button the setting will be completed C...

Страница 112: ...ge line width every time you click the Button the width gets wider and every time you click the Button the width becomes more narrow 2 Con rm the width in the image preview and click the Close Button...

Страница 113: ...Event Viewer icon in the Main Window Click Note By selecting Event Viewer from the Start Menu in the Settings Communication Display of the Main Window or RTR 57C 57U or RVR 52V the Event Viewer will...

Страница 114: ...you can choose from an array of commands Toolbar Buttons appear for frequently used commands Open File Save Data as Save as Text File Shift Display Display in ascending order Display in descending or...

Страница 115: ...date and the amount of elapsed time from the last recorded data View menu Recorded Date Display Elapsed Time Display Shifting Ascending Descending From the View Menu or Toolbar You can shift the displ...

Страница 116: ...le Info from the View Menu 2 Click the OK Button to return to the previous window File Name File name of data currently in display Path Location where le is saved Date Created The date and time when t...

Страница 117: ...ew will appear After con rming it is what you wish to print click Print to start printing Button Functions Print Print box will appear and printing will begin Previous Preview the previous page Specif...

Страница 118: ...ging File Name and Saving Location The same operation can be carried out from Save in the Toolbar In the File Menu select Save All Data as Save with a new File Name In the File Menu select Save Displa...

Страница 119: ...Menu select Save All Data as Save with a new File Name 1 Select Save Data as in the File Menu 2 Specify the Location and enter a File Name 3 Click Save to complete the saving process Specify Location...

Страница 120: ...ge to be Saved and click OK Comma Tab Space and Semi colon are codes used by common spreadsheet software such as Excel and Lotus when reading Text File to divide cells 3 Designate the location to whic...

Страница 121: ...eadsheet software such as Excel and Lotus when reading Text File to divide cells OK Button Select the Text File Type Designate File Button 3 Designate the location to which the le should be saved by c...

Страница 122: ...and select the les you with to open Opening a File with the Temp Humid Graph and Multi scale Graph 1 Select Open in the File Menu 2 Select the name of the data you wish to open and click Open to view...

Страница 123: ...with the Event Viewer 1 Open the Event Viewer from the RTR 57C 57U or RVR 52A Graph Menu 2 In the Event Viewer Window under the File Menu click Open and a list will appear Select a File Open Button S...

Страница 124: ...ecorder for Windows and click the Add Remove Button 3 The Install Shield Wizard will appear Check Remove and click Next Check Next Button 4 Follow the directions to Uninstall 5 To re install follow th...

Страница 125: ...ram Program Uninstall 2 From the list of currently installed programs select T D Recorder for Windows and click the Uninstall Button 3 The Install Shield Wizard will appear Check Remove and click Next...

Страница 126: ...adaptor Half pitch 14 pin male to a D SUB 9 pin male or a combination Half pitch 14 pin male to D SUB 25 pin male and D SUB 25 pin female to a D SUB 9 pin male Q I can t download settings and or data...

Страница 127: ...unusable With many all in one computers it serves as the modem jack How to check 1 Checking with the Device Manager For Windows Vista 1 In the Control Panel click on System and Maintenance Device Man...

Страница 128: ...port this communication port is unusable If you cannot use a communication port please contact your computer company Communication Port Icon with an x mark Device Manager Window To find out more deta...

Страница 129: ...teps outlined on P 122 2 Under Modems right click on Communications cable between two computers then in the pop up menu click on Properties in a short time a new window will appear Device Manager Wind...

Страница 130: ...corded data are different from the actual date and time of recording Why A When recording mode has been set to Endless and Recording Start was carried out via PC the time for recorded data is calculat...

Страница 131: ...126...

Страница 132: ...ent Method Instantaneous Value Average Value Pulse Measurement Method Rising Lo Hi Falling Hi Lo Event time Permission to Start Recording by Wireless Communication Downloading of Recorded Data Adjustm...

Страница 133: ...play Range for Vertical Axis Event Viewer Event List Event List Display showing Time of Event for Each Channel possible to scroll with mouse or keyboard Rising Signal Lo Hi Falling Signal Hi Lo Fallin...

Страница 134: ...129...

Страница 135: ...7 00 GMT 9 00 Tokyo Time Web Site We have opened an English Web Site for your convenience Here you can nd information about our company news products upcoming events software and User s Manual downloa...

Отзывы: