


21
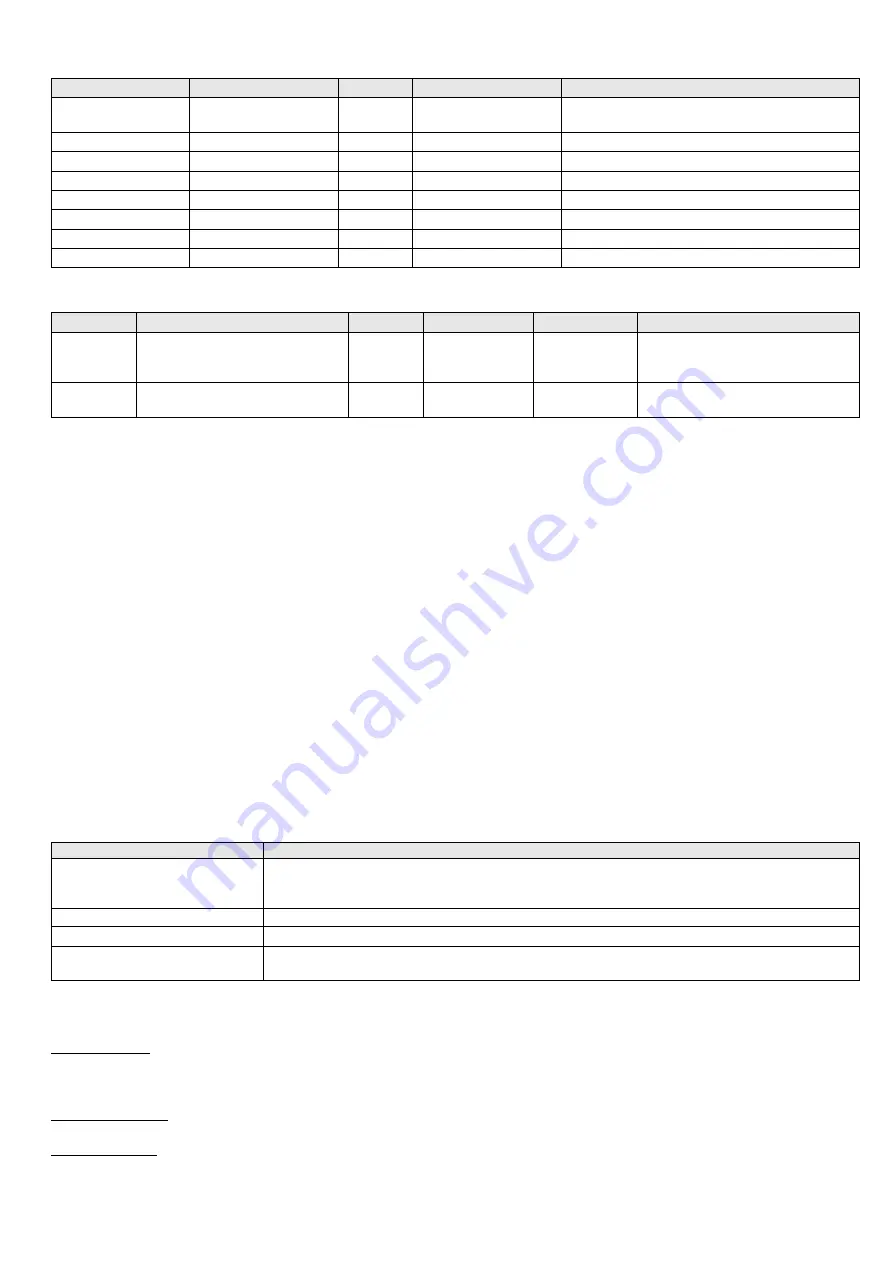
GENERAL CLEANING ADVICE:
Cleaning steps
Products
Method
Tools
Notes
Superficial cleaning
Manual
Spatula
Remove all residue directly after use, removing
smaller machine parts if necessary.
Extensive cleaning
Mild detergent
Manual
Brush, bucket
Leave product to work ± 15 minutes.
Rinsing
Warm water
Manual
Sponge, bucket
Warm water 40/50 º C - 100/120 º F.
Inspection
Check critical points and problematic parts.
Disinfecting
Disinfectant products
Manual
Sponge, cleaning cloth After completing all other cleaning operations.
Rinsing
Drinking water
Manual
Sponge, bucket
Drying
Cleaning cloth
Maintenance
Lubricating oil
Manual
Cleaning cloth
External machine parts.
SPECIFIC CLEANING ADVICE:
Interval
Cleaning area
Method
Products
Tools
Notes
Daily
Underside of the lid, lid gasket,
inside of the barrel and piston
bolt retaining screw
Manual
Mild detergent,
warm water
Sponge,
cleaning cloth
Eliminate dirt from retaining screw
using a brush if necessary. Avoid
build up of residues.
Fortnightly
Piston, piston gaskets and gasket
of piston bolt retaining screw
Manual
Mild detergent,
warm water
Sponge,
cleaning cloth
To remove the piston, follow the
instructions above.
These cleaning instructions have been elaborated for companies with just one shift; shorter intervals should be observed in companies
with many work groups.
IMPORTANT:
Among the parts which should be cleaned daily (see “SPECIFIC CLEAN ADVICE” above), the piston bolt retaining
screw must be cleaned thoroughly by dismantling it. In E models, the following parts should also be dismantled for better cleaning: lid
closing nuts, lid, barrel.
Piston removal: See section 7.1 above.
8. MAINTENANCE
IMPORTANT:
Unplug the machine before proceeding with maintenance and inspection.
During maintenance and inspection operations always follow the safety instructions in this manual.
Mechanical breakdowns caused by inadequate or improper maintenance can lead to high repair costs as well as work stoppages;
therefore, regular and adequate maintenance is indispensable.
The safety and life of the machine depend on many factors, including proper maintenance.
Because different companies have different shift schedules, it is impossible to prescribe in advance how often you should pro ceed with
inspections, maintenance or replacement. Adjust your inspection routine to the number of work groups you have in your company.
Our local dealer will be delighted to give you further information.
The table below contains information about maintenance and inspection (control intervals, critical points, etc.) for a machine under
normal use.
8.1 MAINTENANCE AND INSPECTION SCHEDULES
After reading the following, consult the MAINTENANCE AND INSPECTION TIPS section for more details.
Control interval
Critical points / Maintenance information
Daily
• Check green lid gasket and replace it if necessary.
• Check the two black piston gaskets and replace them if necessary.
• Check the air holes located at the base of the barrel and clear them of any obstruction.
Monthly
• Check the lid closure and tighten if necessary by regulating the lid fixing bolts (P models only).
Yearly
• Check hydraulic oil level and refill the reservoir if necessary.
Every 2500-5000 service hours
• Change hydraulic oil.
• Check oil filter and replace it if necessary.
8.2 MAINTENANCE AND INSPECTION TIPS
Green lid gasket: Replace if damaged or if leaks are observed. This gasket is reversible, i.e. it can be used with either side facing up. A
spare gasket comes with the machine. The gasket is made from a non-toxic material that is safe for alimentary use. Place the glued
joint of the gasket under the lid bolt. To reduce lid friction and extend lid gasket life, before closing always grease the green gasket and
the lower part of the lid with animal fat or another USDA approved.
Black piston gasket: Replace if damaged or if leaks are observed. To reduce noise caused by the movement of the piston, grease this
gasket with animal fat or another USDA approved shortening before placing it in the barrel.
Hydraulic oil level: The oil level can be tested with the dipstick provided on the oil inlet screw. Always fill the reservoir to the maximum
level marked without exceeding it since the more oil there is in the reservoir, the more effectively the heat given off by the hydraulic
assemblage will be cooled. This helps lengthen the life of the oil.