101
Chapter 6. Live View
Live viewing is a crucial part of any surveillance system. Having the right view can be
the crucial difference between catching an event as it happens and missing it
altogether. VMS provides powerful tools to manage the viewing experience to help
ensure that monitoring personnel are always on top of any event.
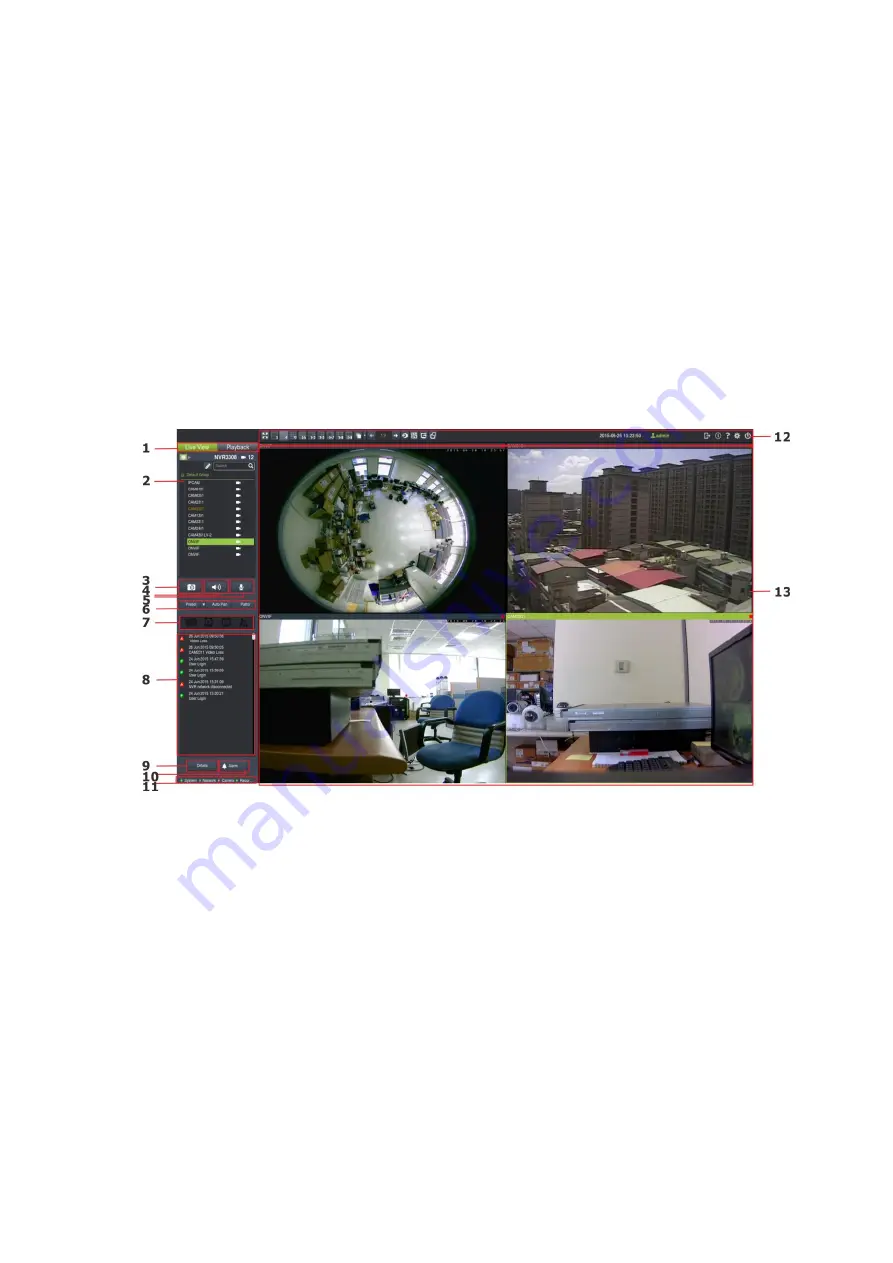
6.1. Live View Window Overview
The live view window is split into 10 distinct parts:
1.
Live View / Playback Selection Tabs
– Allows users to choose live view and
playback mode.
2.
Camera List
– Lists all the connected cameras.
3.
Snapshot
– Take a snapshot of the current camera image.
4.
Volume Control
– Control the volume.
5.
Microphone
– Enable/Disable the microphone functionality.
6.
Live View Control
– PTZ functions, including Preset, Auto Pan, and Patrol for
PTZ-enabled cameras.
7.
System Health Diagnosis
– Displays RAID problems, disk failure, service
problems, fan/power failures.
Содержание NVR7312(2U)
Страница 1: ...NVR7300 Series User Manual Release 1 2...
Страница 72: ...72 1st JBOD 2nd JBOD Last JBOD...
Страница 92: ...92...
Страница 98: ...98 2 Click the Apply button to apply the schedule and OK to exit the dialog...
Страница 100: ...100...
Страница 127: ...127...
Страница 141: ...141 8 1 4 Search Camera Input the query in the search box and press Enter to search from the added cameras...
Страница 249: ...249 Jumps to the next segment The play speed can be adjusted from 1x to 8x...
Страница 283: ...283 12 4 5 EonOneLite Enter EonOneLite platform to operate the system See Chapter 4 8 7 1 8 EonOneLite...
Страница 286: ...286 12 5 5 FTP Setting It allows you to configure FTP server settings...
Страница 293: ...293 12 7 Network Click to bring out VMS Setup window and select Network to set the network related settings...
Страница 324: ...324 You can click on any channel you d like to see or manage to have a single view on your device...
Страница 331: ...331 You can click on any channel you d like to see or manage to have a single view on your device...
Страница 336: ...336 2 Accept the terms in the license agreement and click Next...
Страница 337: ...337 3 Accept and click Next 4 See if there s any information you d like to change if not click Next...
Страница 339: ...339 7 Click Install to start the installation 8 When the installation wizard completed click Finish...
Страница 340: ...340 9 Then the SurveOne Installation Wizard will start Click Next 10 Input the port which is not occupied and click Next...
Страница 358: ...358 Click Run to execute the setups now...


