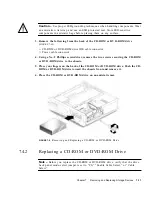
7-6
Sun Blade 100 Service Manual • October 2000
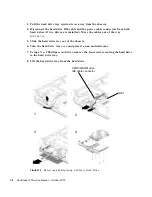
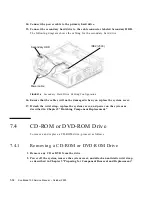
3. Pull the hard drive tray ejection lever away from the chassis.
4. Disconnect the hard drive IDE cable and the power cable connectors from both
hard drives (if two drives are installed). Move the cables out of the way
(
FIGURE 7-3
).
5. Slide the hard drive tray out of the chassis.
6. Turn the hard drive tray over and place it on an antistatic mat.
7. Using a No. 2 Phillips screwdriver, remove the four screws securing the hard drive
to the hard drive tray.
8. Lift the hard drive tray from the hard drive.
FIGURE 7-3
Removing and Replacing a Primary Hard Drive
1
2
3
4
CD/DVD-ROM drive
IDE 1
IDE cable connector
Содержание Sun Blade 100
Страница 6: ...vi Sun Blade 1000 Service Manual September 2000...
Страница 8: ...viii Sun Blade 100 Service Manual October 2000...
Страница 26: ...xxvi Sun Blade 100 Service Manual October 2000...
Страница 30: ...xxx Sun Blade 100 Service Manual October 2000...
Страница 38: ...xxxviii Sun Blade 100 Service Manual October 2000...
Страница 40: ...1 2 Sun Blade 100 Service Manual October 2000 FIGURE 1 1 Sun Blade 100 System...
Страница 48: ...1 10 Sun Blade 100 Service Manual October 2000...
Страница 52: ...2 4 Sun Blade 100 Service Manual October 2000...
Страница 94: ...4 26 Sun Blade 100 Service Manual October 2000...
Страница 102: ...5 8 Sun Blade 100 Service Manual October 2000...
Страница 120: ...6 18 Sun Blade 100 Service Manual October 2000...
Страница 154: ...8 22 Sun Blade 100 Service Manual October 2000...
Страница 158: ...9 4 Sun Blade 100 Service Manual October 2000...
Страница 162: ...10 8 Sun Blade 100 Service Manual October 2000...
Страница 170: ...A 8 Sun Grover Service Manual October 2000...
Страница 182: ...B 12 Sun Grover Service Manual October 2000...


