


Chapter 3
Power and Fan Module FRUs
3-3
3.1.2
Installing an AC Power Supply/Fan Module
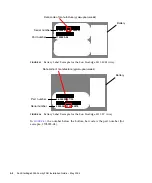
1. Slide the new module into the fan and power supply slot.
2. Push the latch back so that the power supply is fully inserted into the chassis.
3. Turn the thumbscrew at the top of the power supply latch clockwise until it is
finger-tight, to secure the module.
Note –
To ensure that a thumbscrew is finger-tight, tighten it with a screwdriver
and then loosen the thumbscrew counterclockwise a quarter-turn.
4. Attach the power cable and reinstall the AC cord locks if applicable.
5. Turn the power back on.
3.1.3
Replacing a DC Power Supply/Fan Module
Caution –
To avoid damage to equipment, do not remove a power supply/fan
module without a working replacement.
3.1.3.1
Removing a DC Power Supply/Fan Module
Be sure to follow
“Static Electricity Precautions” on page 1-5
.
1. Use a flatblade screwdriver to loosen the two screws that secure the power cable
to the power supply and then disconnect the cable from the supply.
2. Turn the thumbscrew at the top of the power supply latch counterclockwise until
the thumbscrew is disengaged from the power supply.
3. Pull the latch forward about 45 degrees to disconnect the power supply/fan
module from the midplane.
4. Use the power supply handle to pull the power supply/fan module out of the
chassis.
3.1.3.2
Installing a DC Power Supply/Fan Module
1. Slide the new module into the fan and power supply slot.
2. Push the latch back so that the power supply is fully inserted into the chassis.
Содержание StorEdge 3000 Series
Страница 12: ...1 6 Sun StorEdge 3000 Family FRU Installation Guide May 2004 3 Power off both power supply fan modules ...
Страница 34: ...3 8 Sun StorEdge 3000 Family FRU Installation Guide May 2004 ...
Страница 74: ...5 26 Sun StorEdge 3000 Family FRU Installation Guide May 2004 ...
Страница 94: ...6 20 Sun StorEdge 3000 Family FRU Installation Guide May 2004 ...


