


Chapter 2
Disk Drive, Air Management Sled, and Tabletop Cover FRUs
2-3
2.1.1
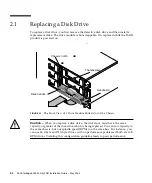
Identifying the Defective Disk Drive
Before replacing a disk drive, perform the following steps to ensure that you have
identified the correct defective disk for removal.
Caution –
To prevent any possibility of data loss, back up the data prior to
removing disk drives.
4. Examine the back of the RAID array and any attached expansion units, and record
the cable connections.
5. Prepare the RAID product for the disk replacement:
a. From the Main Menu, choose “view and edit Configuration parameters,” then
choose “Drive-side SCSI Parameters.”
b. Set the “Periodic Drive Check Time” option to 5 seconds, then confirm Yes
when prompted.
6. Find the Channel number and SCSI target ID combination (i.e. Chl 0 ID 4) of the
disk drive to be replaced:
a. From the Main Menu, choose “view and edit scsi Drives.”
b. Locate the disk drive that has a status of
BAD
or
FAILED
in the Status column:
Write down the Channel number and SCSI target ID of the defective disk drive
from the Chl and ID columns.
Write down the number of the associated logical drive, as shown in the LG_DRV
column, that the defective disk drive is a member of.
7. Physically locate the defective disk drive using the Chl and ID numbers obtained
in
.
Refer to your
Sun StorEdge Product Installation, Operation, and Service Manual
for
descriptions of ID locations.
Caution –
Failure to identify the correct disk drive may result in replacing the
wrong disk drive and could cause a loss of data. Be sure that you have identified the
correct disk drive. Back up the data prior to removing a disk drive.
8. If you are uncertain about the location of a drive, check your installation manual
for drive ID locations or perform the following steps.
Note –
The following steps only work if there is no I/O activity.
Содержание StorEdge 3000 Series
Страница 12: ...1 6 Sun StorEdge 3000 Family FRU Installation Guide May 2004 3 Power off both power supply fan modules ...
Страница 34: ...3 8 Sun StorEdge 3000 Family FRU Installation Guide May 2004 ...
Страница 74: ...5 26 Sun StorEdge 3000 Family FRU Installation Guide May 2004 ...
Страница 94: ...6 20 Sun StorEdge 3000 Family FRU Installation Guide May 2004 ...


