


Chapter 2
Disk Drive, Air Management Sled, and Tabletop Cover FRUs
2-5
Caution –
Do not remove a defective module unless you have a replacement FRU
module to immediately replace the defective module. If you remove a module and
do not replace it, you alter the air flow inside the chassis and could overheat the
chassis as a result.
Note –
When a failed drive is replaced, the system rebuilds the logical drive by
restoring data that was on the failed drive onto a new or spare drive. If you replace
more than one drive at a time, the logical drive cannot be rebuilt. If more than one
drive fails in a logical drive (except RAID 1+0), the logical drive fails and data from
the logical drive is lost.
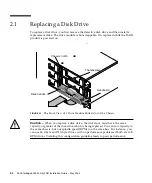
Remove the defective disk drive with the following steps.
1. Unlock the locks with the provided key, and gently pull the plastic front bezel
away from the front of the unit so that it drops down and is supported by the two
hinged brackets on the sides.
2. Turn the thumbscrew of the defective disk drive counterclockwise several full
turns until the thumbscrew and drive module are loosened.
3. Gently pull the release handle upward.
4. Pull the drive module out until the drive connector has fully disconnected from
the midplane.
5. Wait 20 seconds for the drive to stop spinning and then remove it from the chassis.
2.1.3
Installing a New Disk Drive
To install the replacement disk drive, perform the following steps.
Caution –
When you replace a disk drive, the replacement disk drive must have the
same capacity or more than the disk drive which is being replaced. You can mix
capacity in the same chassis, but not spindle speed (RPMs) on the same SCSI bus.
For instance, you can use 36 Gbyte and 73 Gbyte drives with no performance
problems if both are 10K RPM drives. Violating this configuration guideline leads to
poor performance.
Содержание StorEdge 3000 Series
Страница 12: ...1 6 Sun StorEdge 3000 Family FRU Installation Guide May 2004 3 Power off both power supply fan modules ...
Страница 34: ...3 8 Sun StorEdge 3000 Family FRU Installation Guide May 2004 ...
Страница 74: ...5 26 Sun StorEdge 3000 Family FRU Installation Guide May 2004 ...
Страница 94: ...6 20 Sun StorEdge 3000 Family FRU Installation Guide May 2004 ...


