


2-12
Sun StorEdge 3000 Family FRU Installation Guide • May 2004
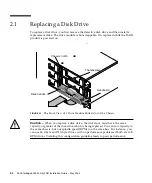
2.3.1
Converting a Rack-Ready Array to a Tabletop
Array
Perform the following steps to convert a rackmounted or rack-ready array to a
tabletop array.
1. If attached, unlock the front bezel cover with the provided key, and pull it
forward and downward. Then press the right bezel arm (hinge) towards the left
side to release it from the chassis hole. The left hinge will release also. Note the
location of the chassis bezel holes on each ear.
2. Remove the caps from the front left and right ears of the array by squeezing the
left and right sides of each cap, and pressing the cap so that you turn the cap
inward towards the center of the array until it is free.
3. Remove the array from the rack if it is rackmounted with the following steps. If it
is not rackmounted, proceed with step 4.
a. Remove the screws which attach the front ears to the rack and which attach the
array to the back brackets of the rack.
b. Slide the array out of the rack.
c. Remove the screws which attach the side rails to the array and store the rails
and related screws.
4. On the top of the array, remove the top two back center screws with a Phillips No.
1 screwdriver and discard these screws.
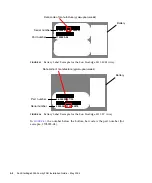
5. Slide the back of the array into the front of the tabletop cover until the front of the
array is flush with the front of the tabletop cover. See
Note –
As you slide the array into the cover, keep the back of the array tilted
slightly upward to avoid bumping the edge of the array on the metal feet of the
cover.
6. Loosely attach the front of the tabletop cover to the front ears of the array with
two 10-32 x 1/4-inch Phillips panhead screws on each side. See
.
7. Attach the top center back of the tabletop cover to the array with two new black
flathead 4-40 x 1/4-inch screws and a Phillips No. 1 screwdriver.
8. Tighten the front screws (in step 6) with a Phillips No. 2 screwdriver.
Содержание StorEdge 3000 Series
Страница 12: ...1 6 Sun StorEdge 3000 Family FRU Installation Guide May 2004 3 Power off both power supply fan modules ...
Страница 34: ...3 8 Sun StorEdge 3000 Family FRU Installation Guide May 2004 ...
Страница 74: ...5 26 Sun StorEdge 3000 Family FRU Installation Guide May 2004 ...
Страница 94: ...6 20 Sun StorEdge 3000 Family FRU Installation Guide May 2004 ...


